
Don’t Just Read About AI - 🤫Secretly Implement It.
The secret to doing 10 hours of business work in 10 mins? Master AI & automation basics in just 3 hours. Apply to ANY field! 🚀
Save My Spot 🙋♂️/🙋♀️Automating your email responses using n8n is one of the most effective ways to enhance communication efficiency, maintain professional consistency, and reduce repetitive manual work. With n8n, you can build a simple yet powerful automation that captures user contact details directly from a web form and instantly sends professional emails through Microsoft Outlook. This setup ensures that your responses are not only faster but also more personalised and structured. Whether it’s for event registrations, community signups, or customer inquiries, this guide teaches how to automate communication reliably and create a seamless no-code workflow.
Create a New Project in n8n
Every workflow in n8n begins within a project, which serves as your main workspace for building and managing automations. Creating a dedicated project helps you organize multiple workflows, maintain clarity, and easily locate related tasks later. It’s especially helpful when working with teams or managing several automation processes at once.
Log in to your n8n account.
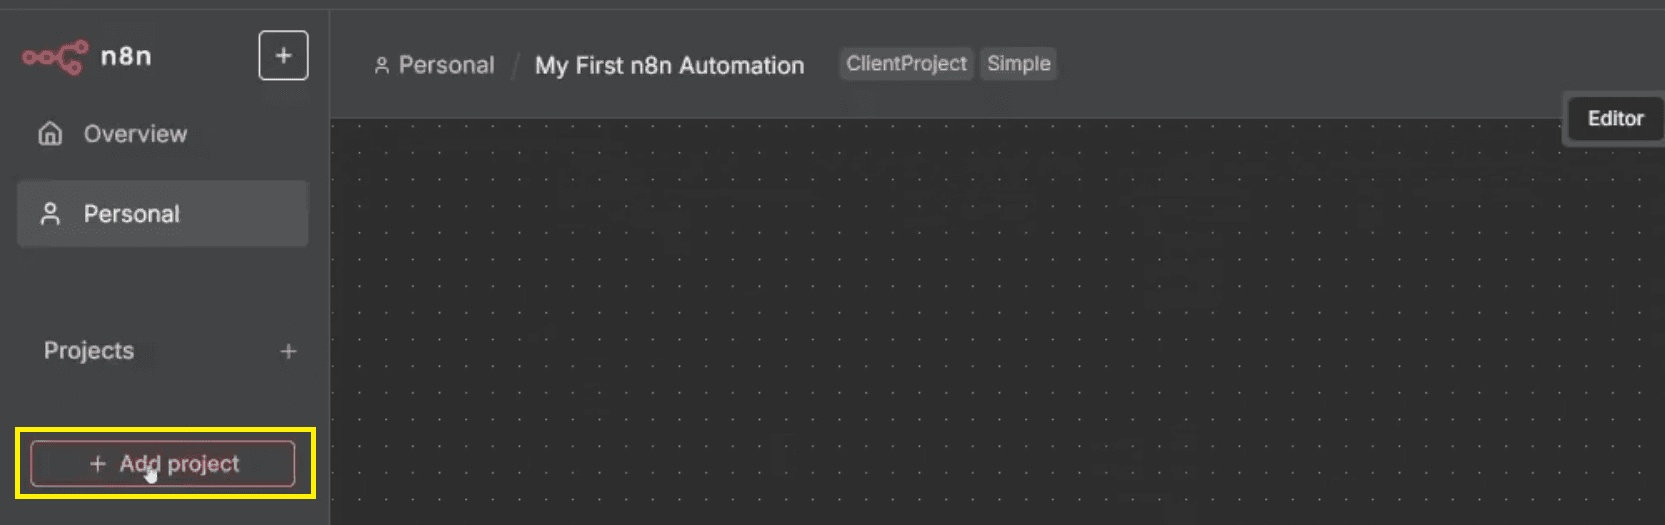
On the left sidebar, click Add Project.
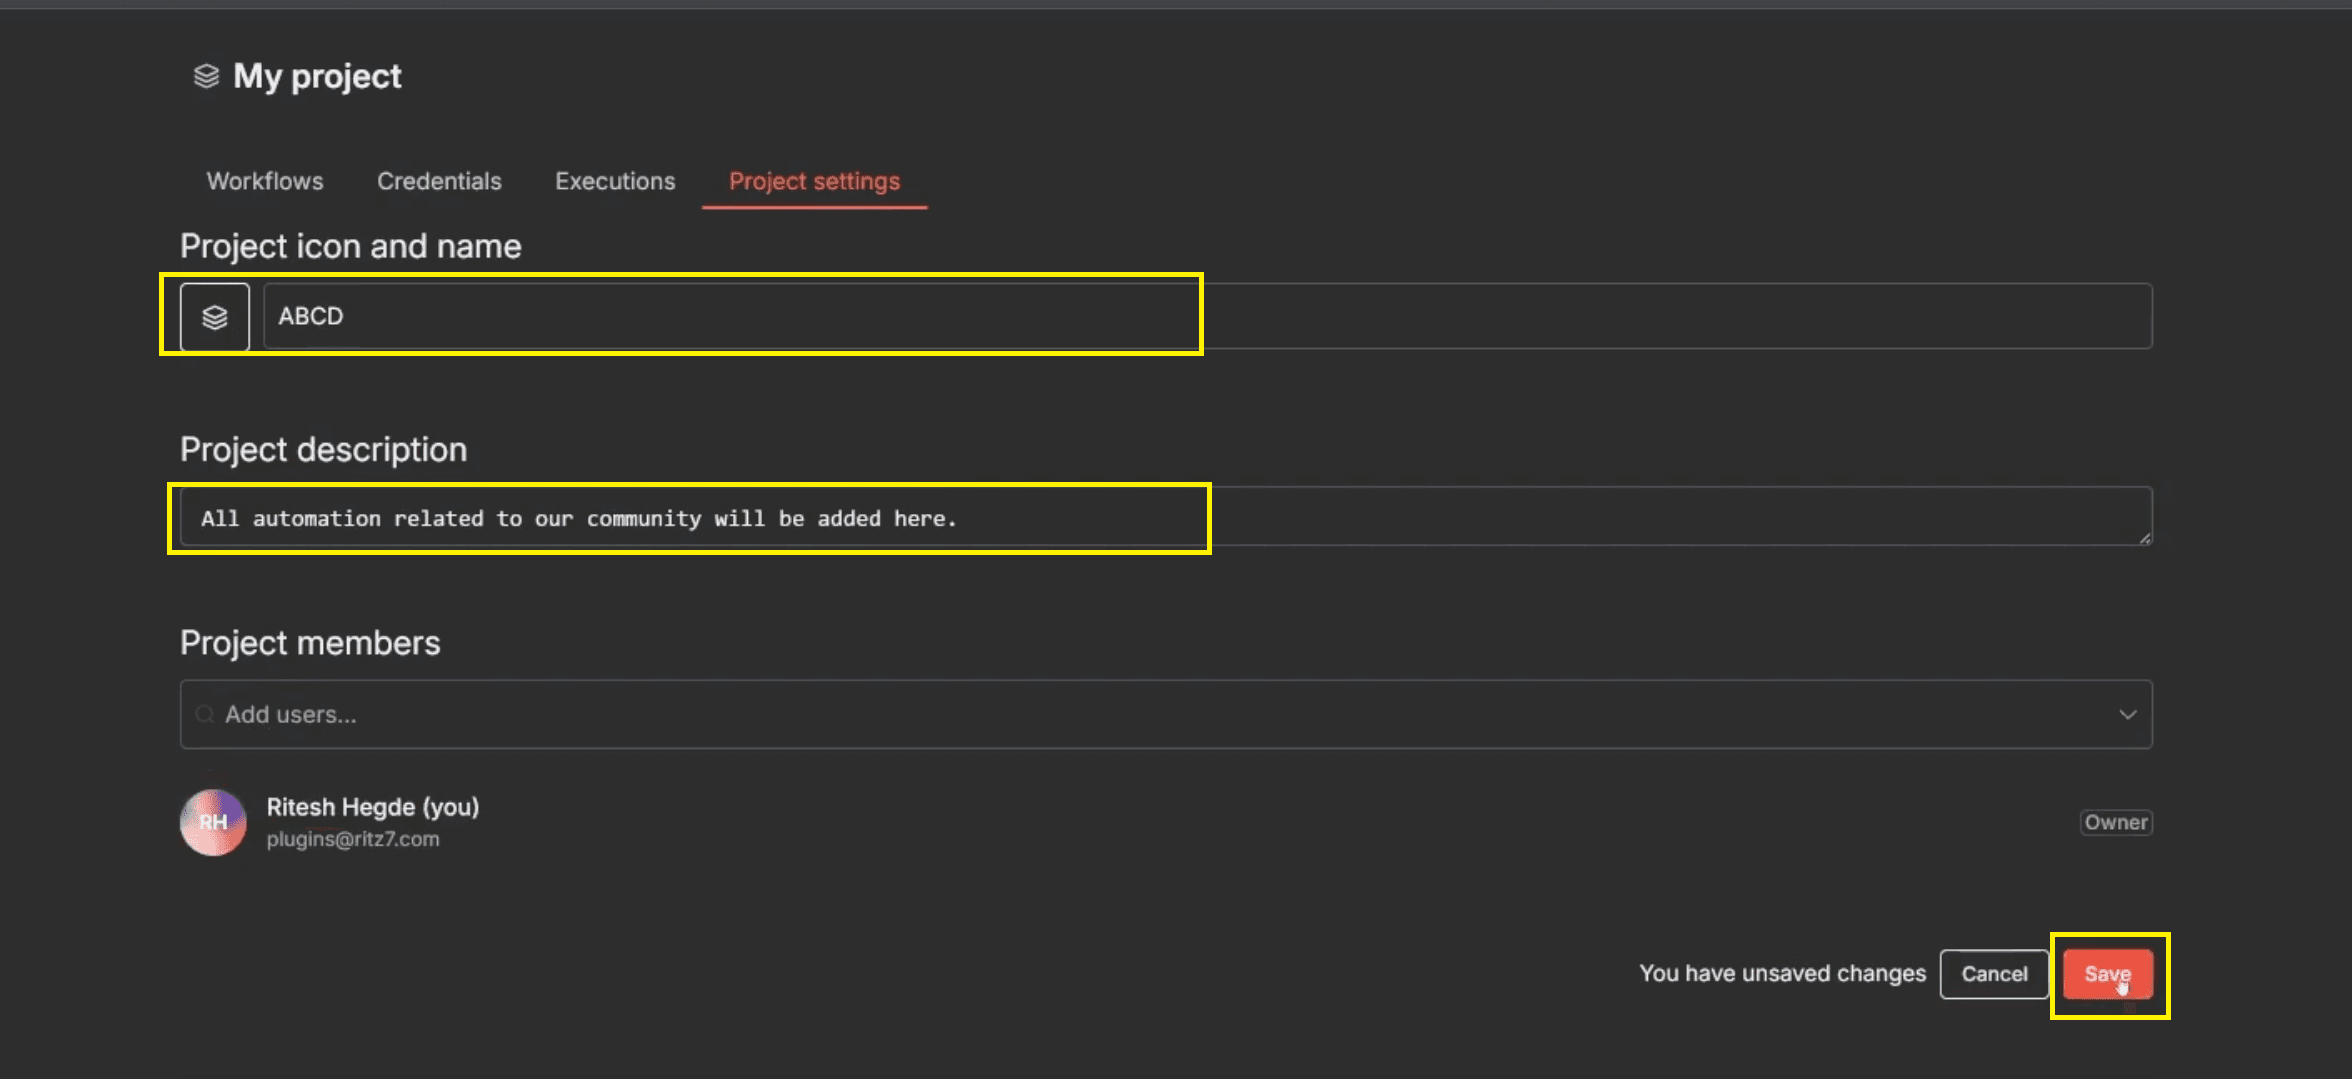
Enter your project details based on your specific requirements or automation goal. For instance, if you’re setting up a form or email automation, you can name it to reflect that. In this tutorial, we’ll use:
Name: ABCD
Description: All automation related to our community will be added here.
Click Save to confirm. Refer this image → 1.1 new project in n8n.png
This new project now acts as your central workspace where all workflows, triggers, and integrations will be stored and managed efficiently.
Start a Blank Workflow
A workflow in n8n is a complete sequence of connected steps that work together to automate a task from beginning to end. Each step, known as a node, performs a specific action such as collecting data, sending an email, or processing information. When you create a workflow from scratch, you gain full control over how each node interacts, allowing complete flexibility to design the process exactly as you need.
Inside your project, click Start from Scratch to open a new blank canvas where you’ll design your automation.
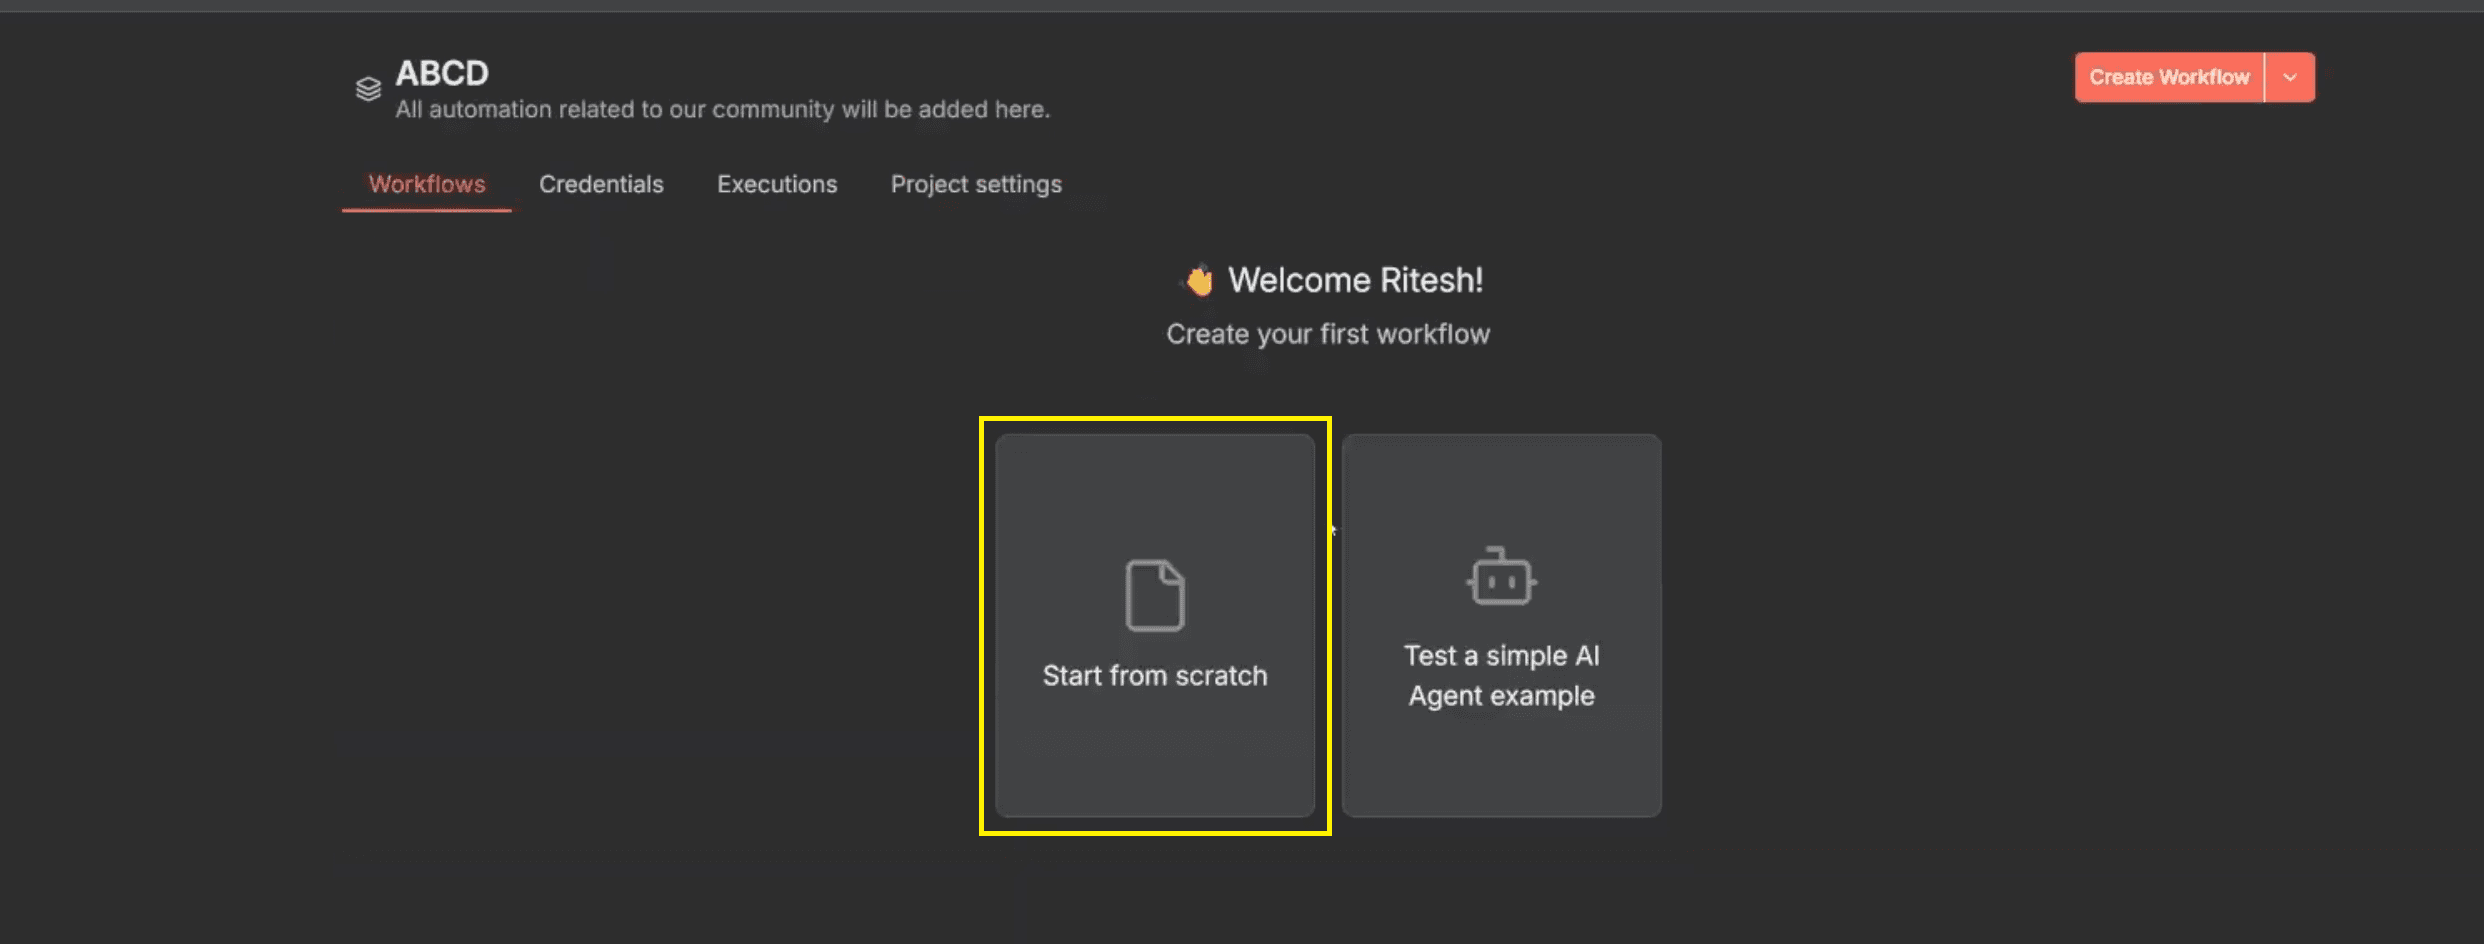
This clean starting point helps you visualize the flow of your automation clearly — from trigger to action — ensuring that every step aligns perfectly with your intended outcome.
Also Read: Build an AI Resume Analysis Bot in n8n
Step 1: Add "On Form Submission"
After opening the blank canvas, the first step in any workflow is to add a trigger — the event that starts the automation. In this case, your automation should begin when a user submits a form. The form that collects the required information from your users. This form acts as the starting point of your workflow.
In n8n, you’ll do this using the On Form Submission trigger. This trigger captures every submission and starts the automation instantly. By designing a structured form and linking it to your workflow, you ensure that every submission is processed consistently and that users receive a timely professional response. This step forms the foundation of your entire automation process.
Click, Add First Step
Then search for On Form Submission from the available list of nodes, and select it to add it to your canvas.
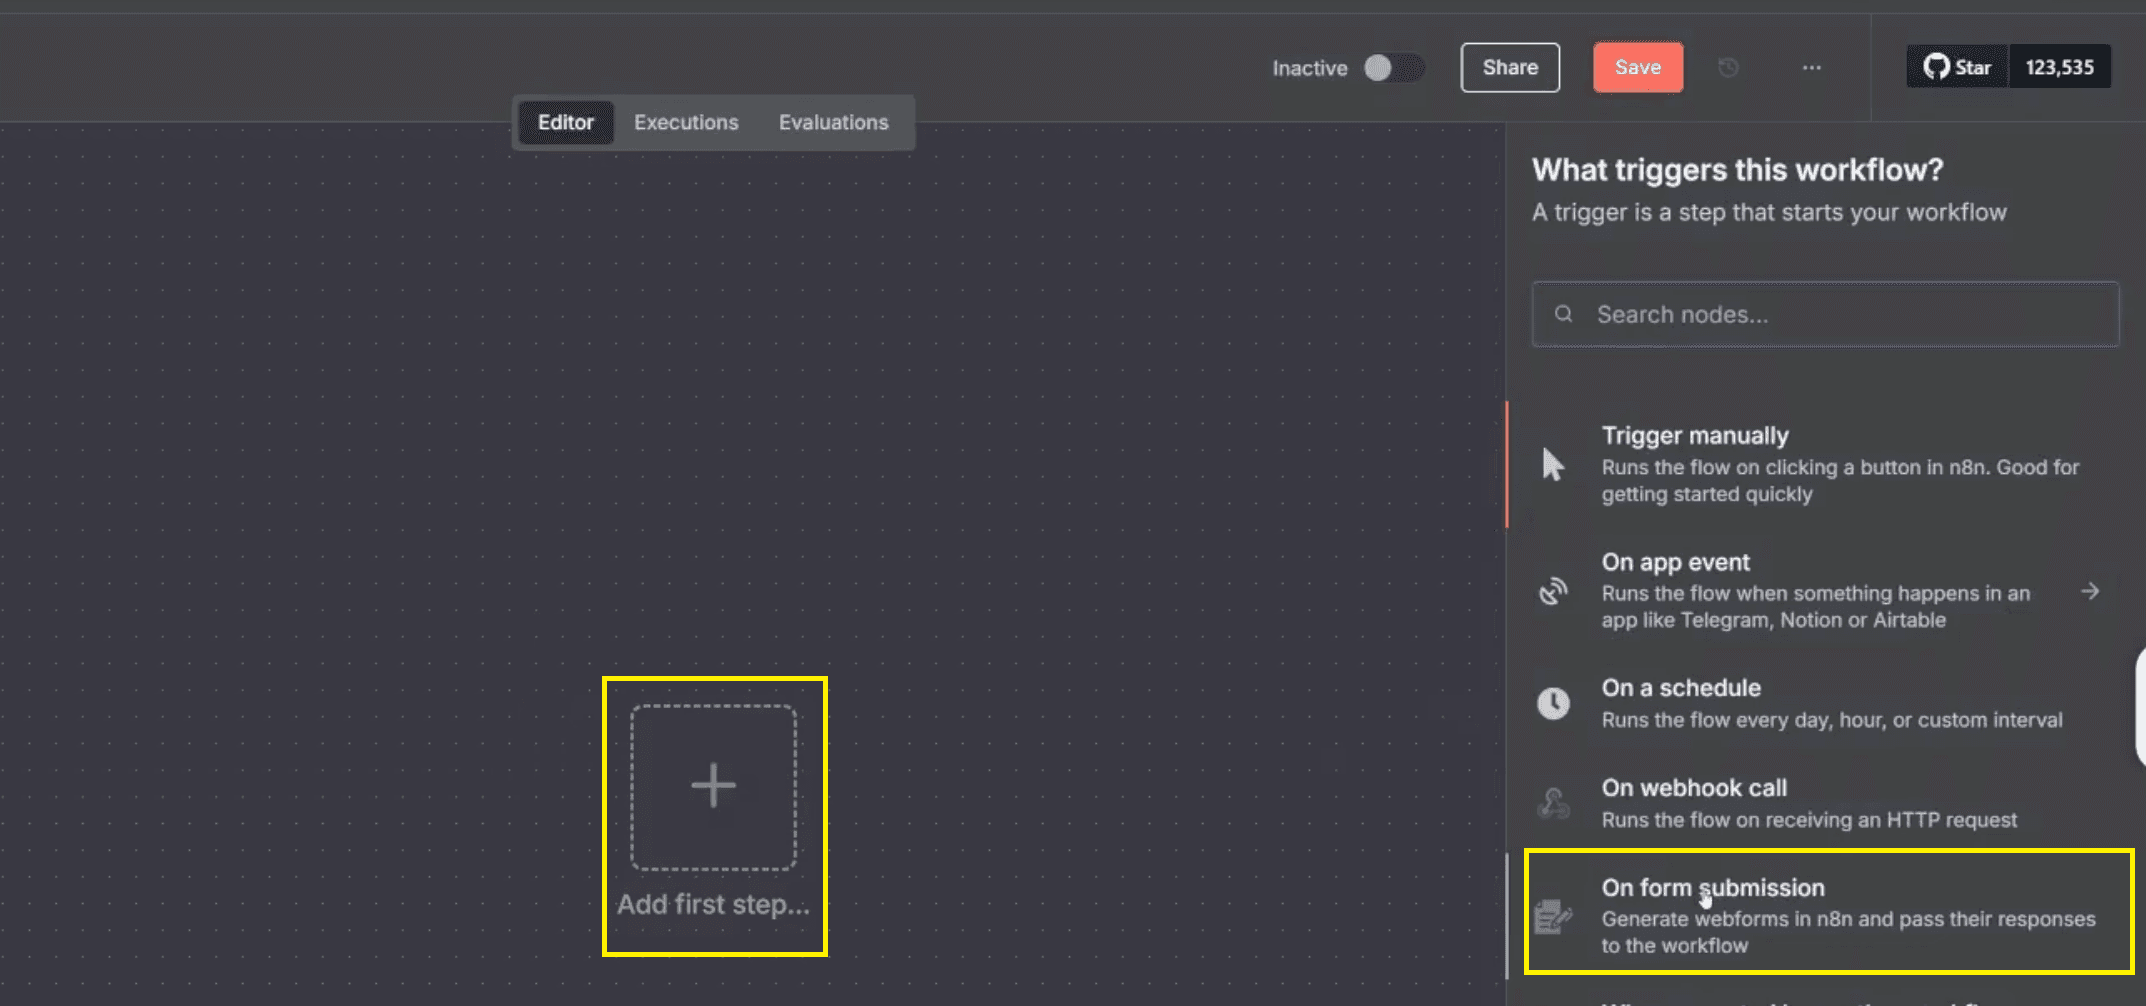
This node acts as the starting point of your workflow. It automatically listens for form submissions, captures the entered data, and activates the next steps in the sequence.
Configure Form Parameters
After clicking on the On Form Submission node, you will get to see the parameters that need to be filled. This pop-up window contains all the options you’ll use to set up the form’s basic structure and behaviour. It determines what users will see when they open the link and how n8n captures their input once they submit it. Setting these parameters carefully ensures clean data collection, a stable workflow trigger, and a professional look that inspires user trust.
(A) Understand the Parameters Panel
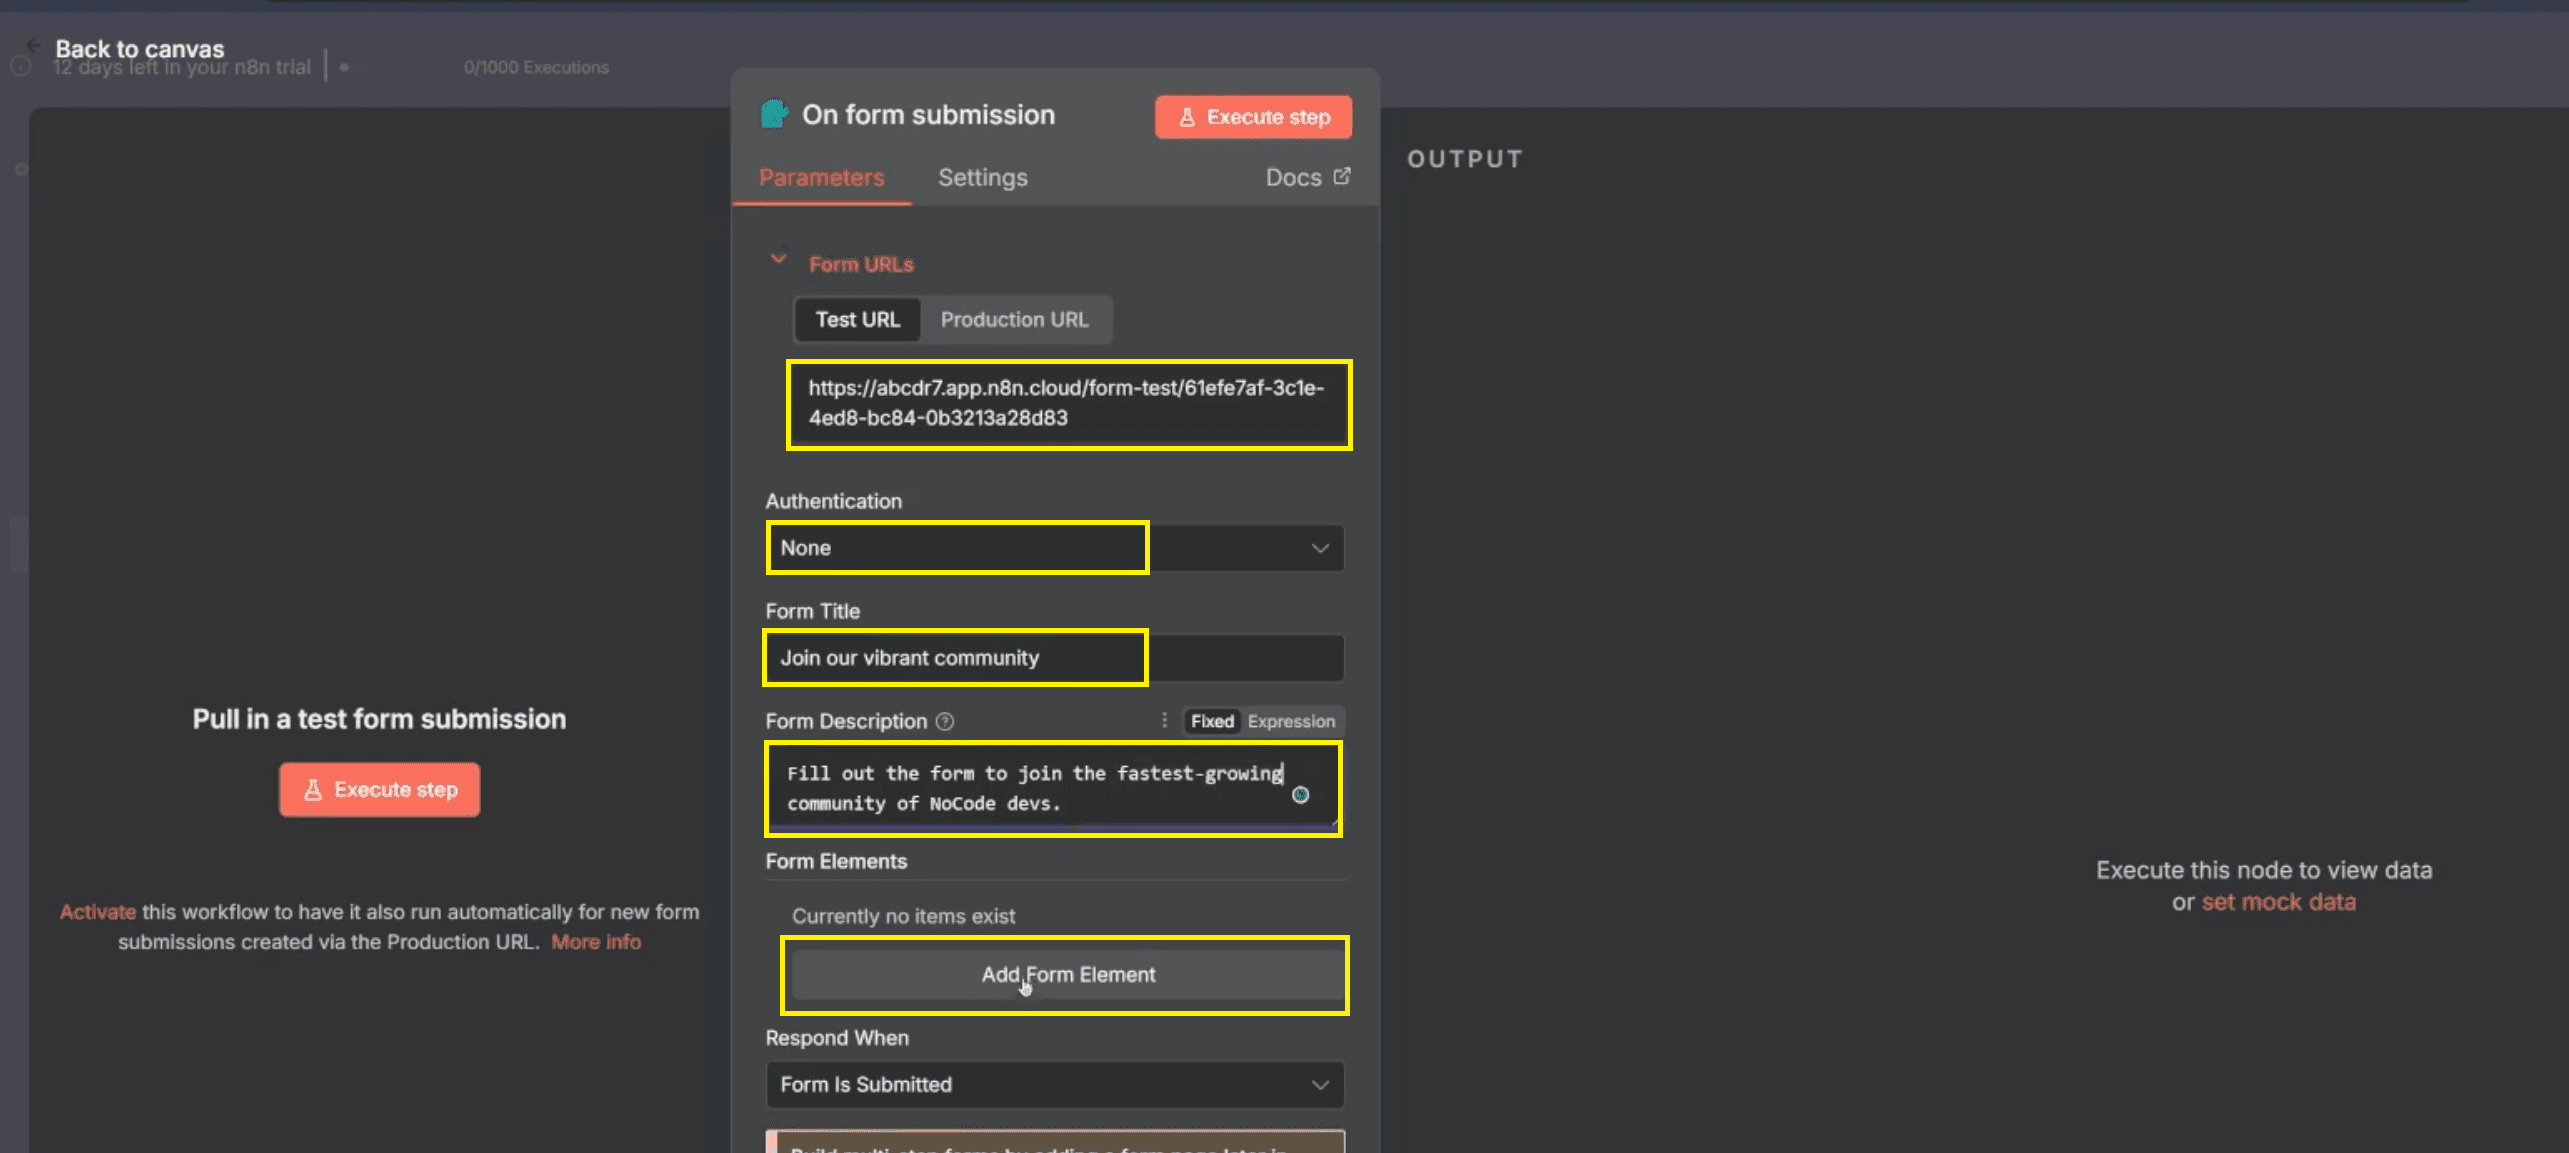
When the pop-up opens, you’ll notice several configuration options stacked vertically:
Form URLs: Two buttons — Test URL (used for internal checks) and Production URL (used for the live version).
Authentication: Controls access permissions for the form.
Form Title and Form Description: Text boxes where you define what users see at the top of the form.
Add Form Element: A button that allows you to create and customise the input fields (like name, email, or phone number).
This screen controls every aspect of your form’s appearance and function. Configuring it correctly ensures your email management system receives accurate data, prevents broken workflows, and guarantees a smooth experience for visitors.
(B) Choose Between Test and Production URLs
Test URL — Use this link during setup and experimentation. It allows you to test how the form behaves, check for field errors, and verify that submissions reach the workflow correctly.
Production URL — Once testing is complete, switch to this link for live use. Copy and share this URL publicly so that users can access and submit their information.
This dual-URL approach prevents accidental disruptions during live operations. It also ensures your response times remain quick and consistent once real users start filling out the form.
(C) Set the Core Parameters
Authentication — Keep it set to None. This setting allows anyone with the form link to submit their details without needing login credentials. It’s ideal for open-access forms like community registrations, event sign-ups, or customer inquiry forms.
Form Title — Enter a simple, clear title such as “Join our vibrant community.” This is the first text users see, so it should sound welcoming and align with your brand’s tone.
Form Description — Add a short line such as “Fill out the form to join the fastest-growing community of no-code developers.” This helps users understand the purpose of the form and increases their likelihood of completing it.
When these details are in place, your form immediately looks professional, approachable, and trustworthy. A well-defined title and description can significantly improve completion rates and deliver better-quality contact details for your automation.
(D) Use the Sample Website Form as a Reference
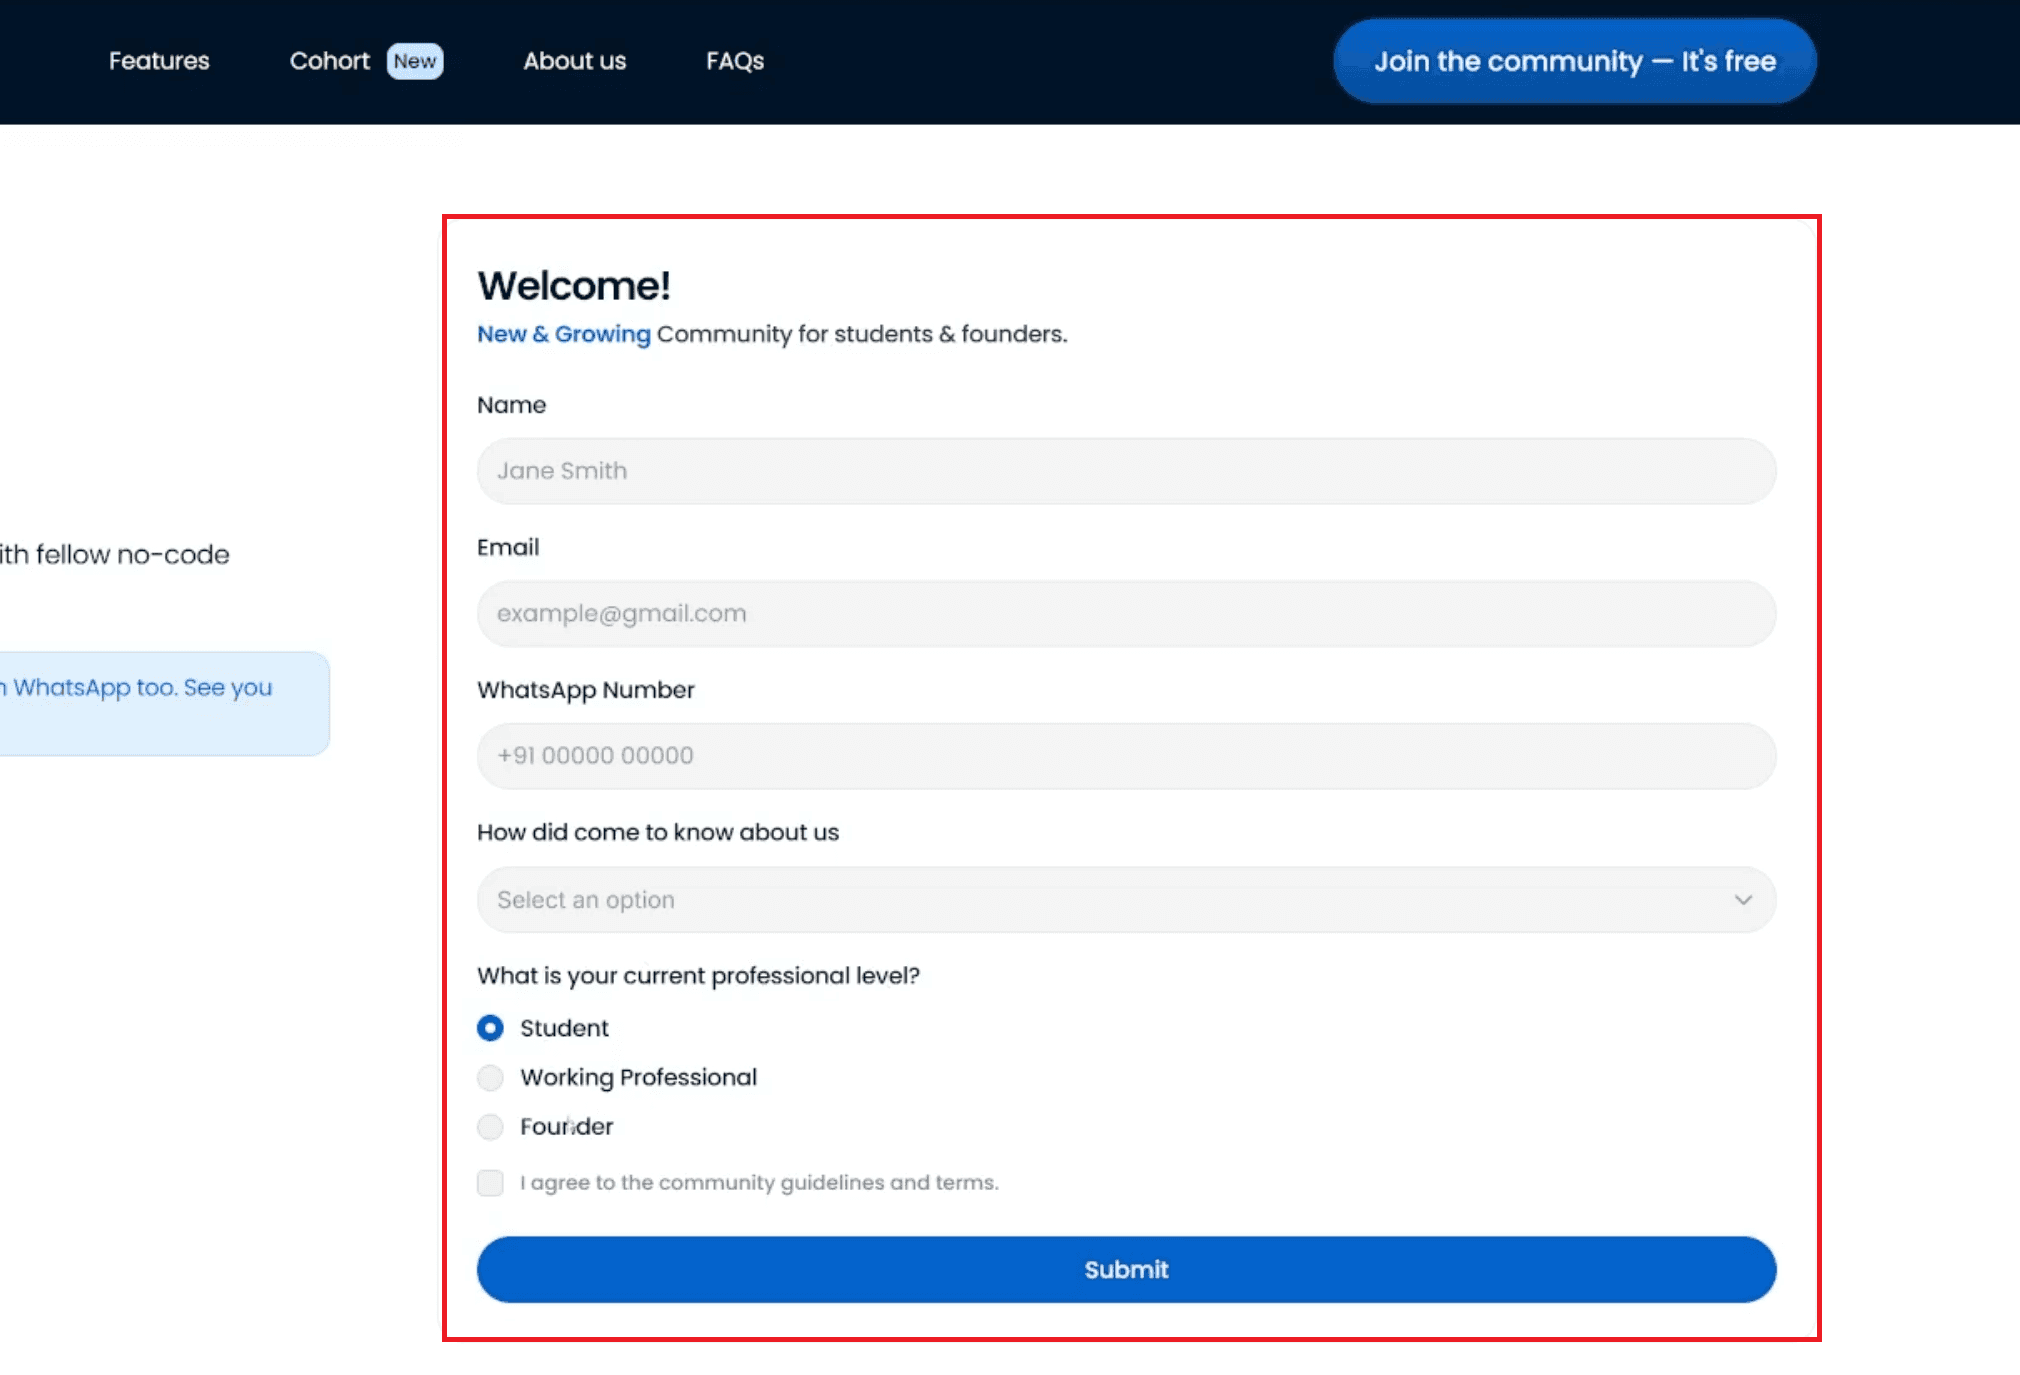
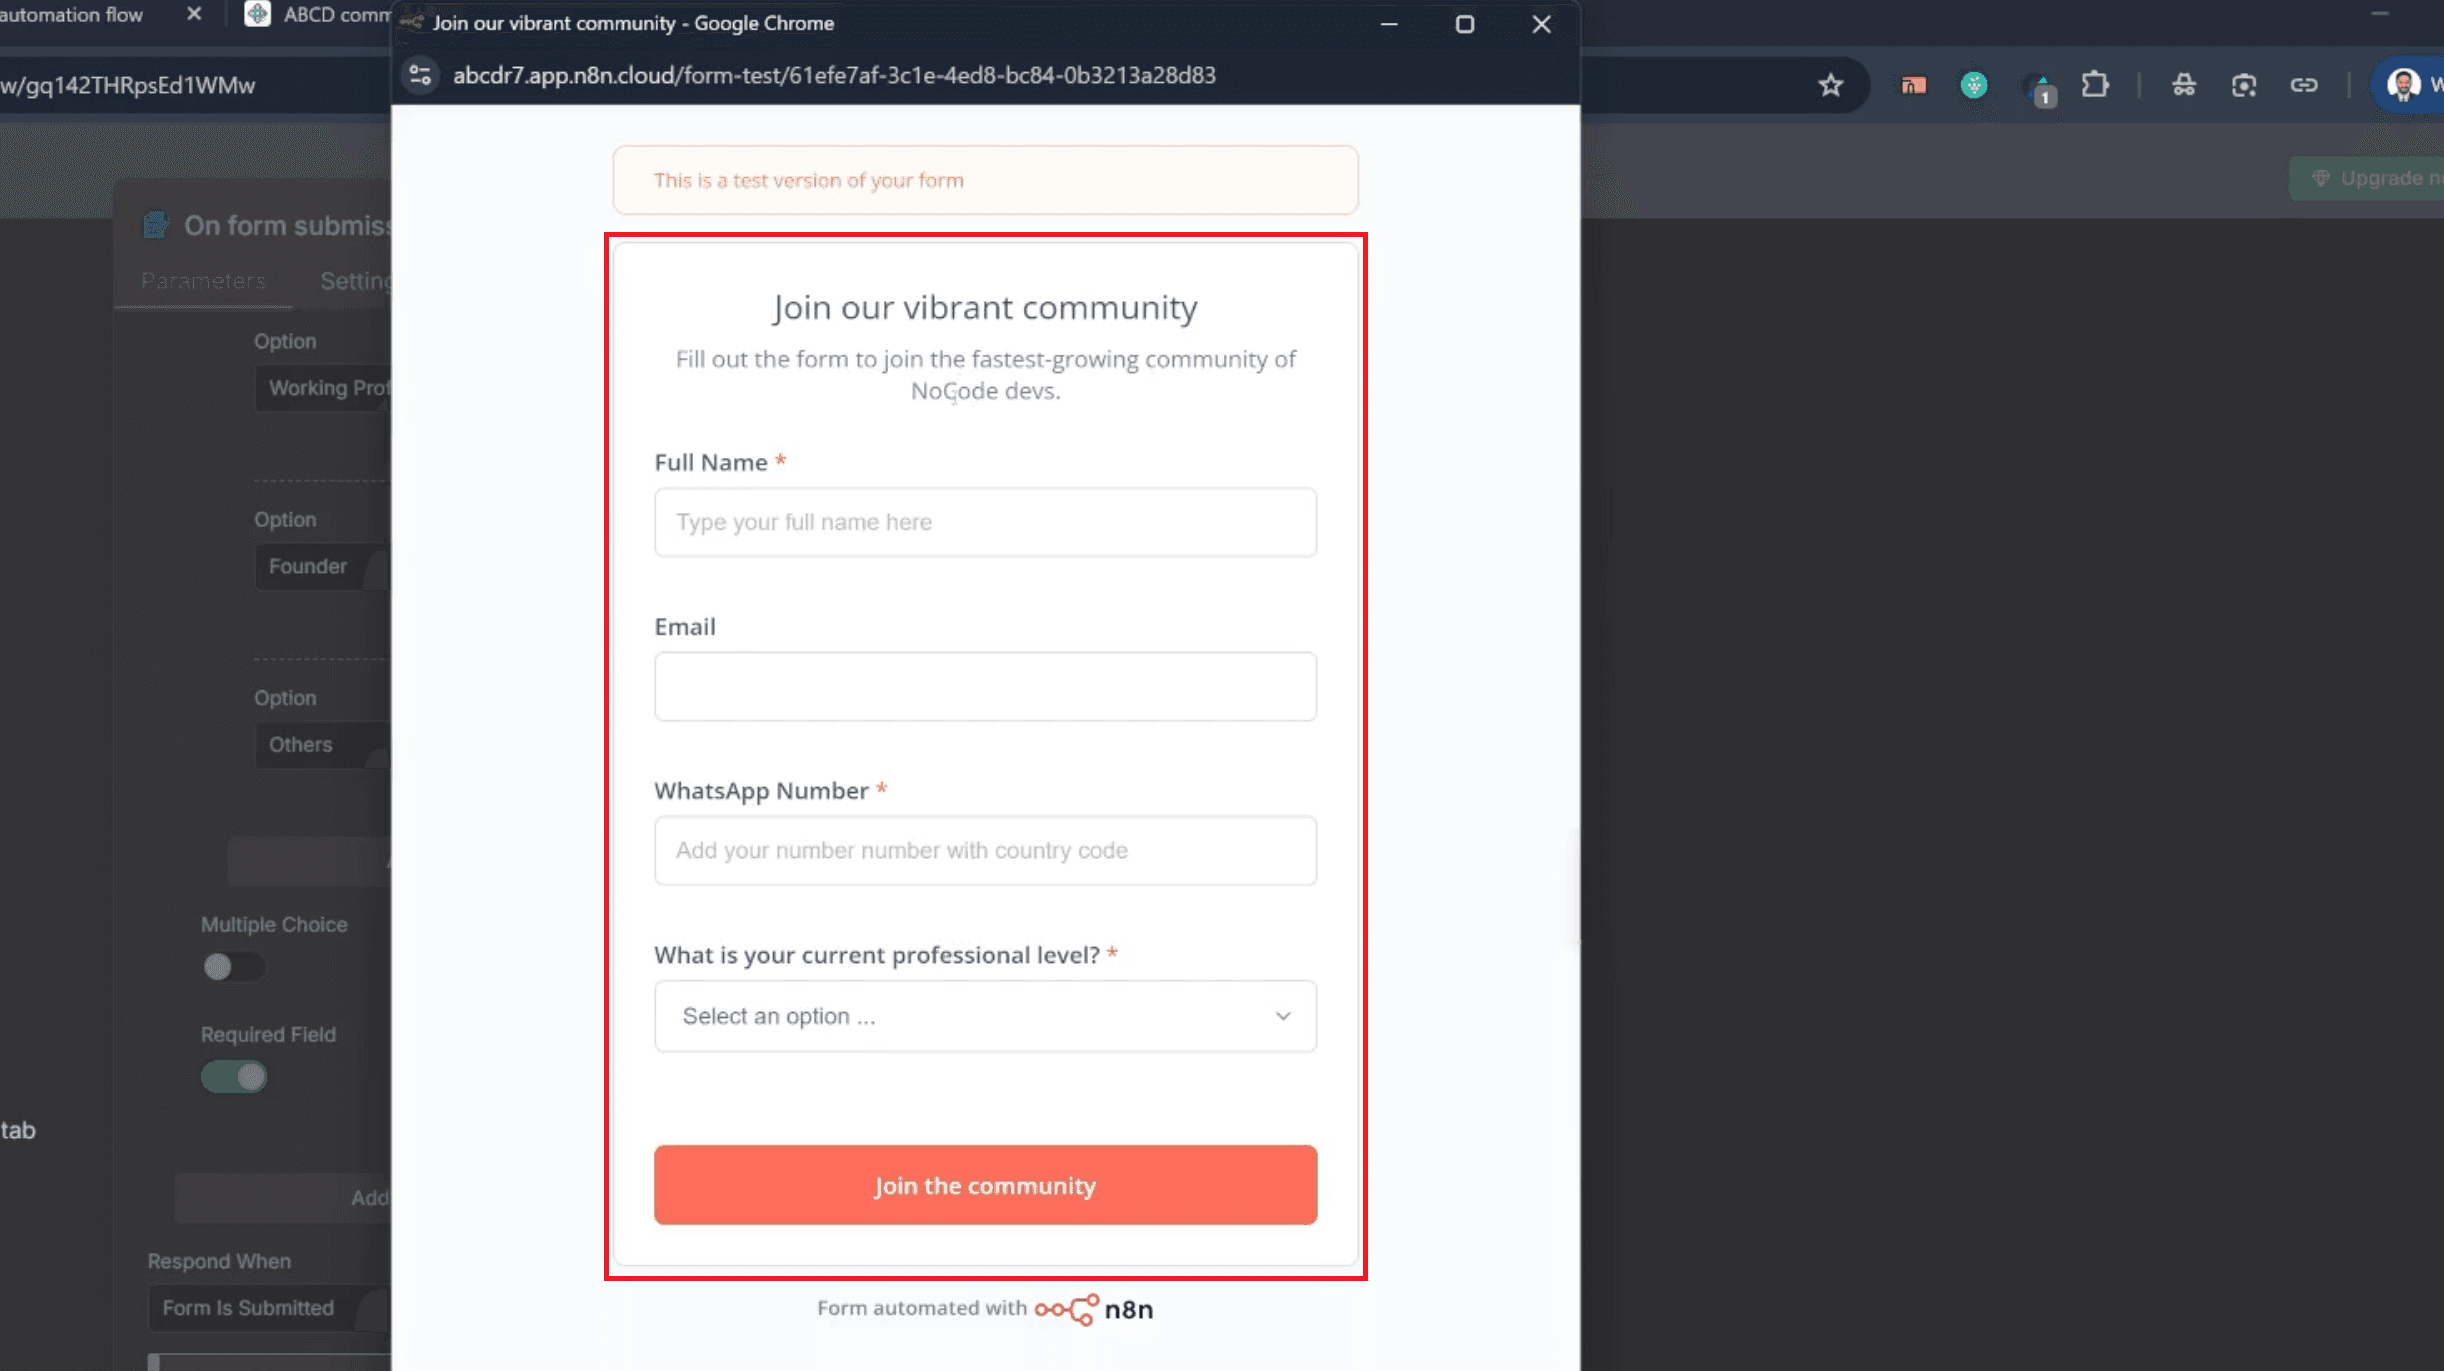
To visualise how your final form should look, refer to the image.
,
The sample includes the following fields: Full Name, Email, WhatsApp Number, and Current Professional Level.
It features a clean layout, clear labels, and a visible submit button titled “Join the Community.”
This example represents a real-world structure used for community registrations. You can replicate the same setup or modify it based on your own project’s requirements.
For instance, you may add fields for company name, job title, or preferred communication channel, depending on your automation goal. The idea is to maintain clarity, simplicity, and consistency across your form and future auto emails.
(E) Proceed to Field Creation
Once all basic parameters are saved, click Add Form Element at the bottom of the panel to begin creating individual input fields. Each element you add — such as name, email, or contact number — will directly feed into the automation steps that follow. Designing these fields thoughtfully ensures every professional email your workflow sends is accurate, personalised, and automatically triggered at the right moment.
This structure guarantees your n8n form configuration is clean, testable, and ready for the next phase of automation setup.
(F) Add the Following Form Fields
Each field in your form captures unique user data required for your automation. Properly naming and defining fields ensures data accuracy and makes your future auto emails more personalised. Follow the details below for every field configuration.
1. Full Name Field
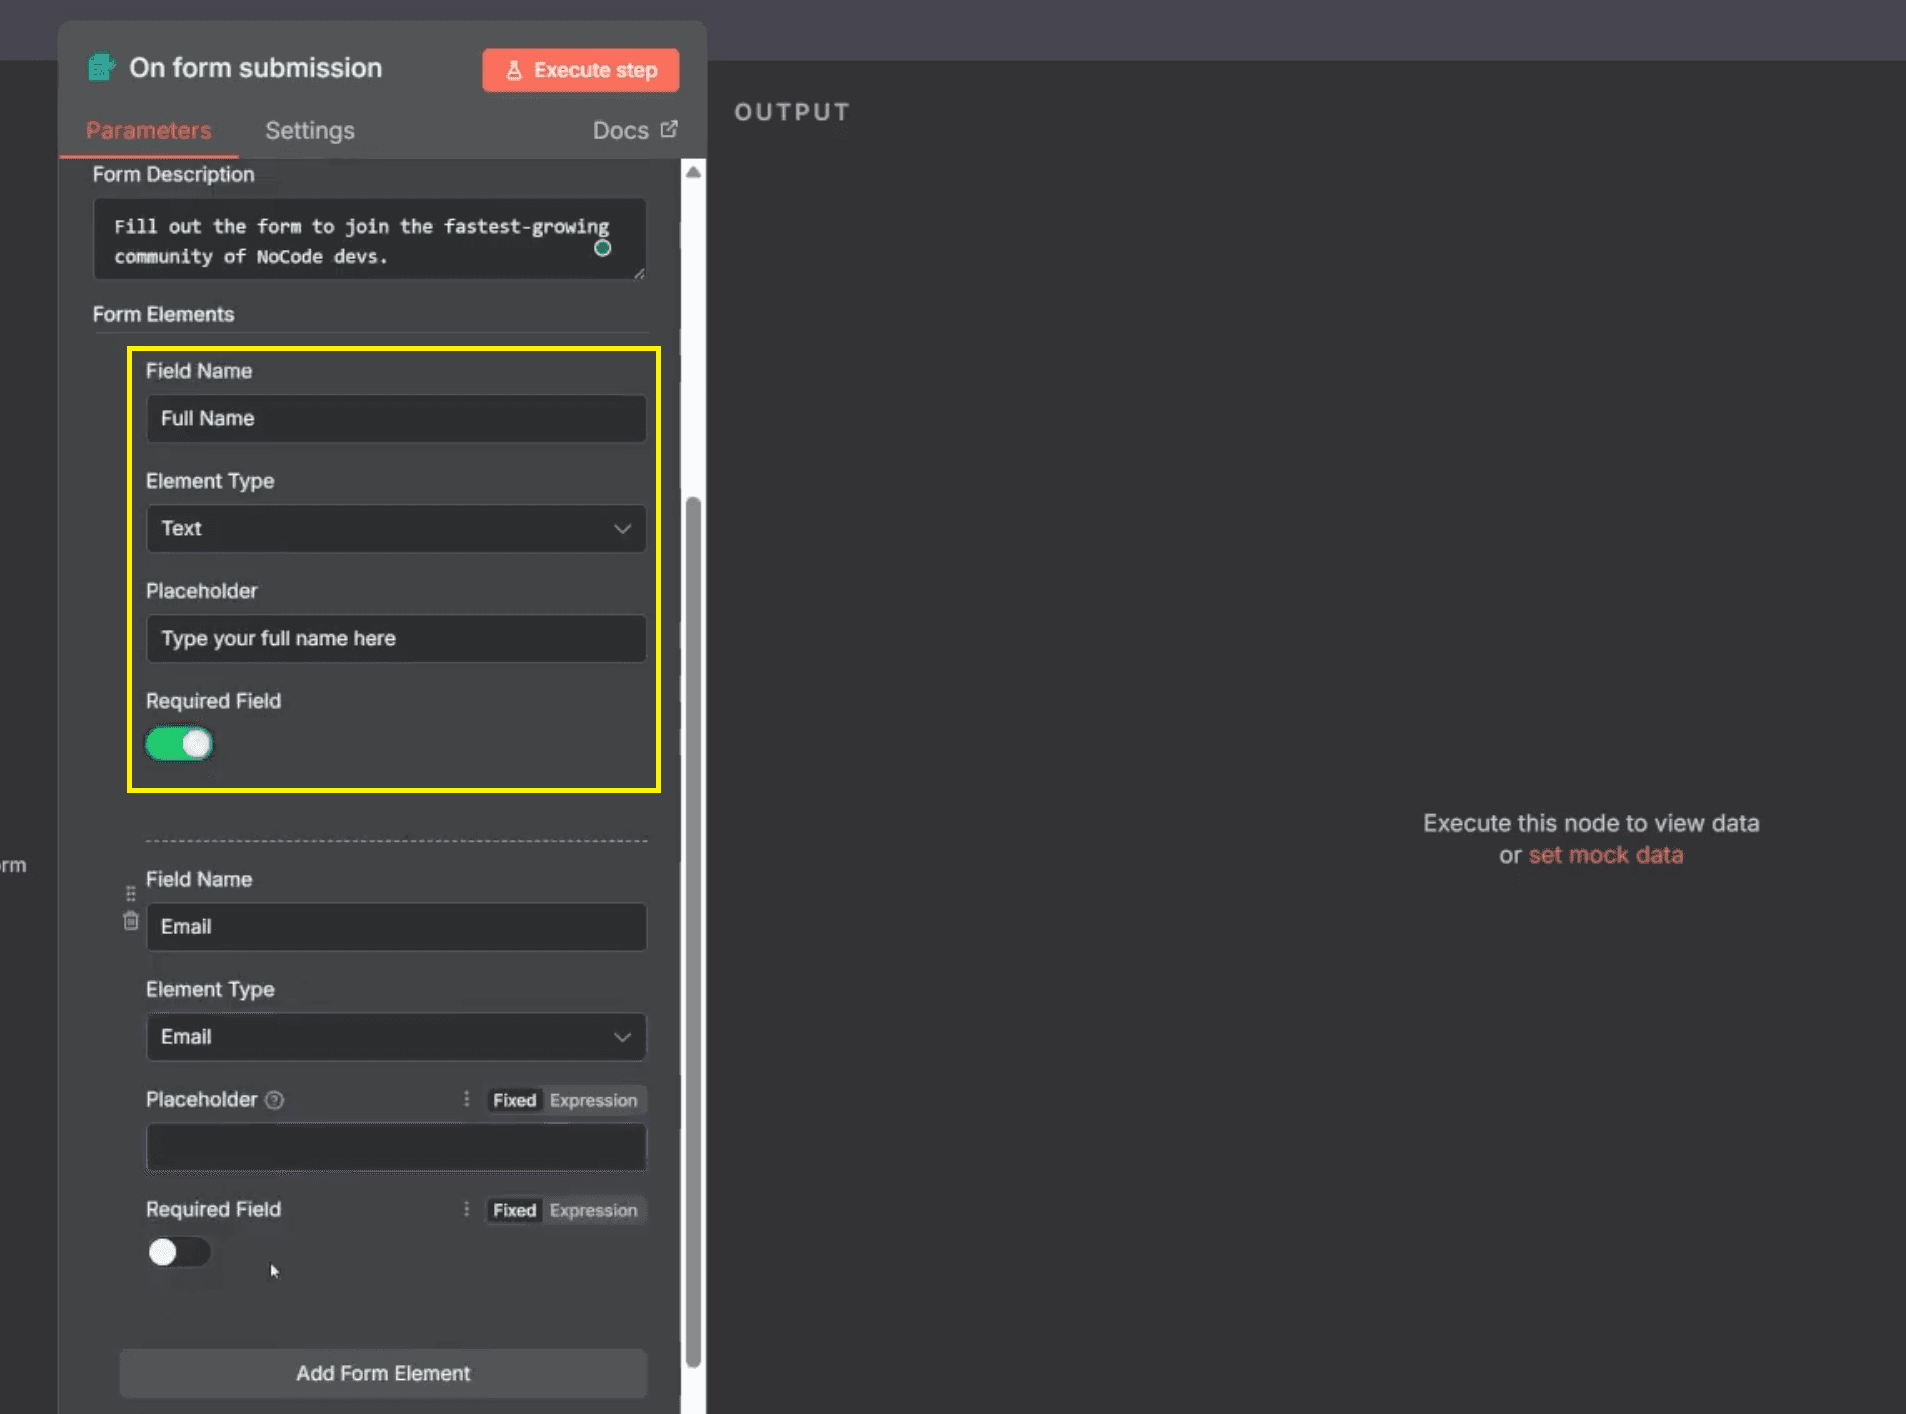
Field Name: "Full Name". This is the first field where the user types their complete name. Capturing their name correctly is essential for personalisation in your professional email.
Element Type: "Text". Choose Text since names are simple text entries.
Placeholder: "Type your full name here". This guides users on what to enter, making the form intuitive.
Required Field: "ON". Turn this on to prevent incomplete submissions.
This field ensures you always have the user’s correct name for a personalized greeting in your automated messages.
2. Email Field
Field Name: "Email". This field captures the user’s contact email, which is crucial for sending auto emails.
Element Type: "Email". Selecting this option ensures that only valid email formats are accepted.
Placeholder: example@gmail.com The placeholder serves as a visual cue for the user.
Required Field: Optional (turn ON if every user must enter an email).
Accurate emails are essential because they directly determine where the automation sends your messages and whether your response times stay consistent.
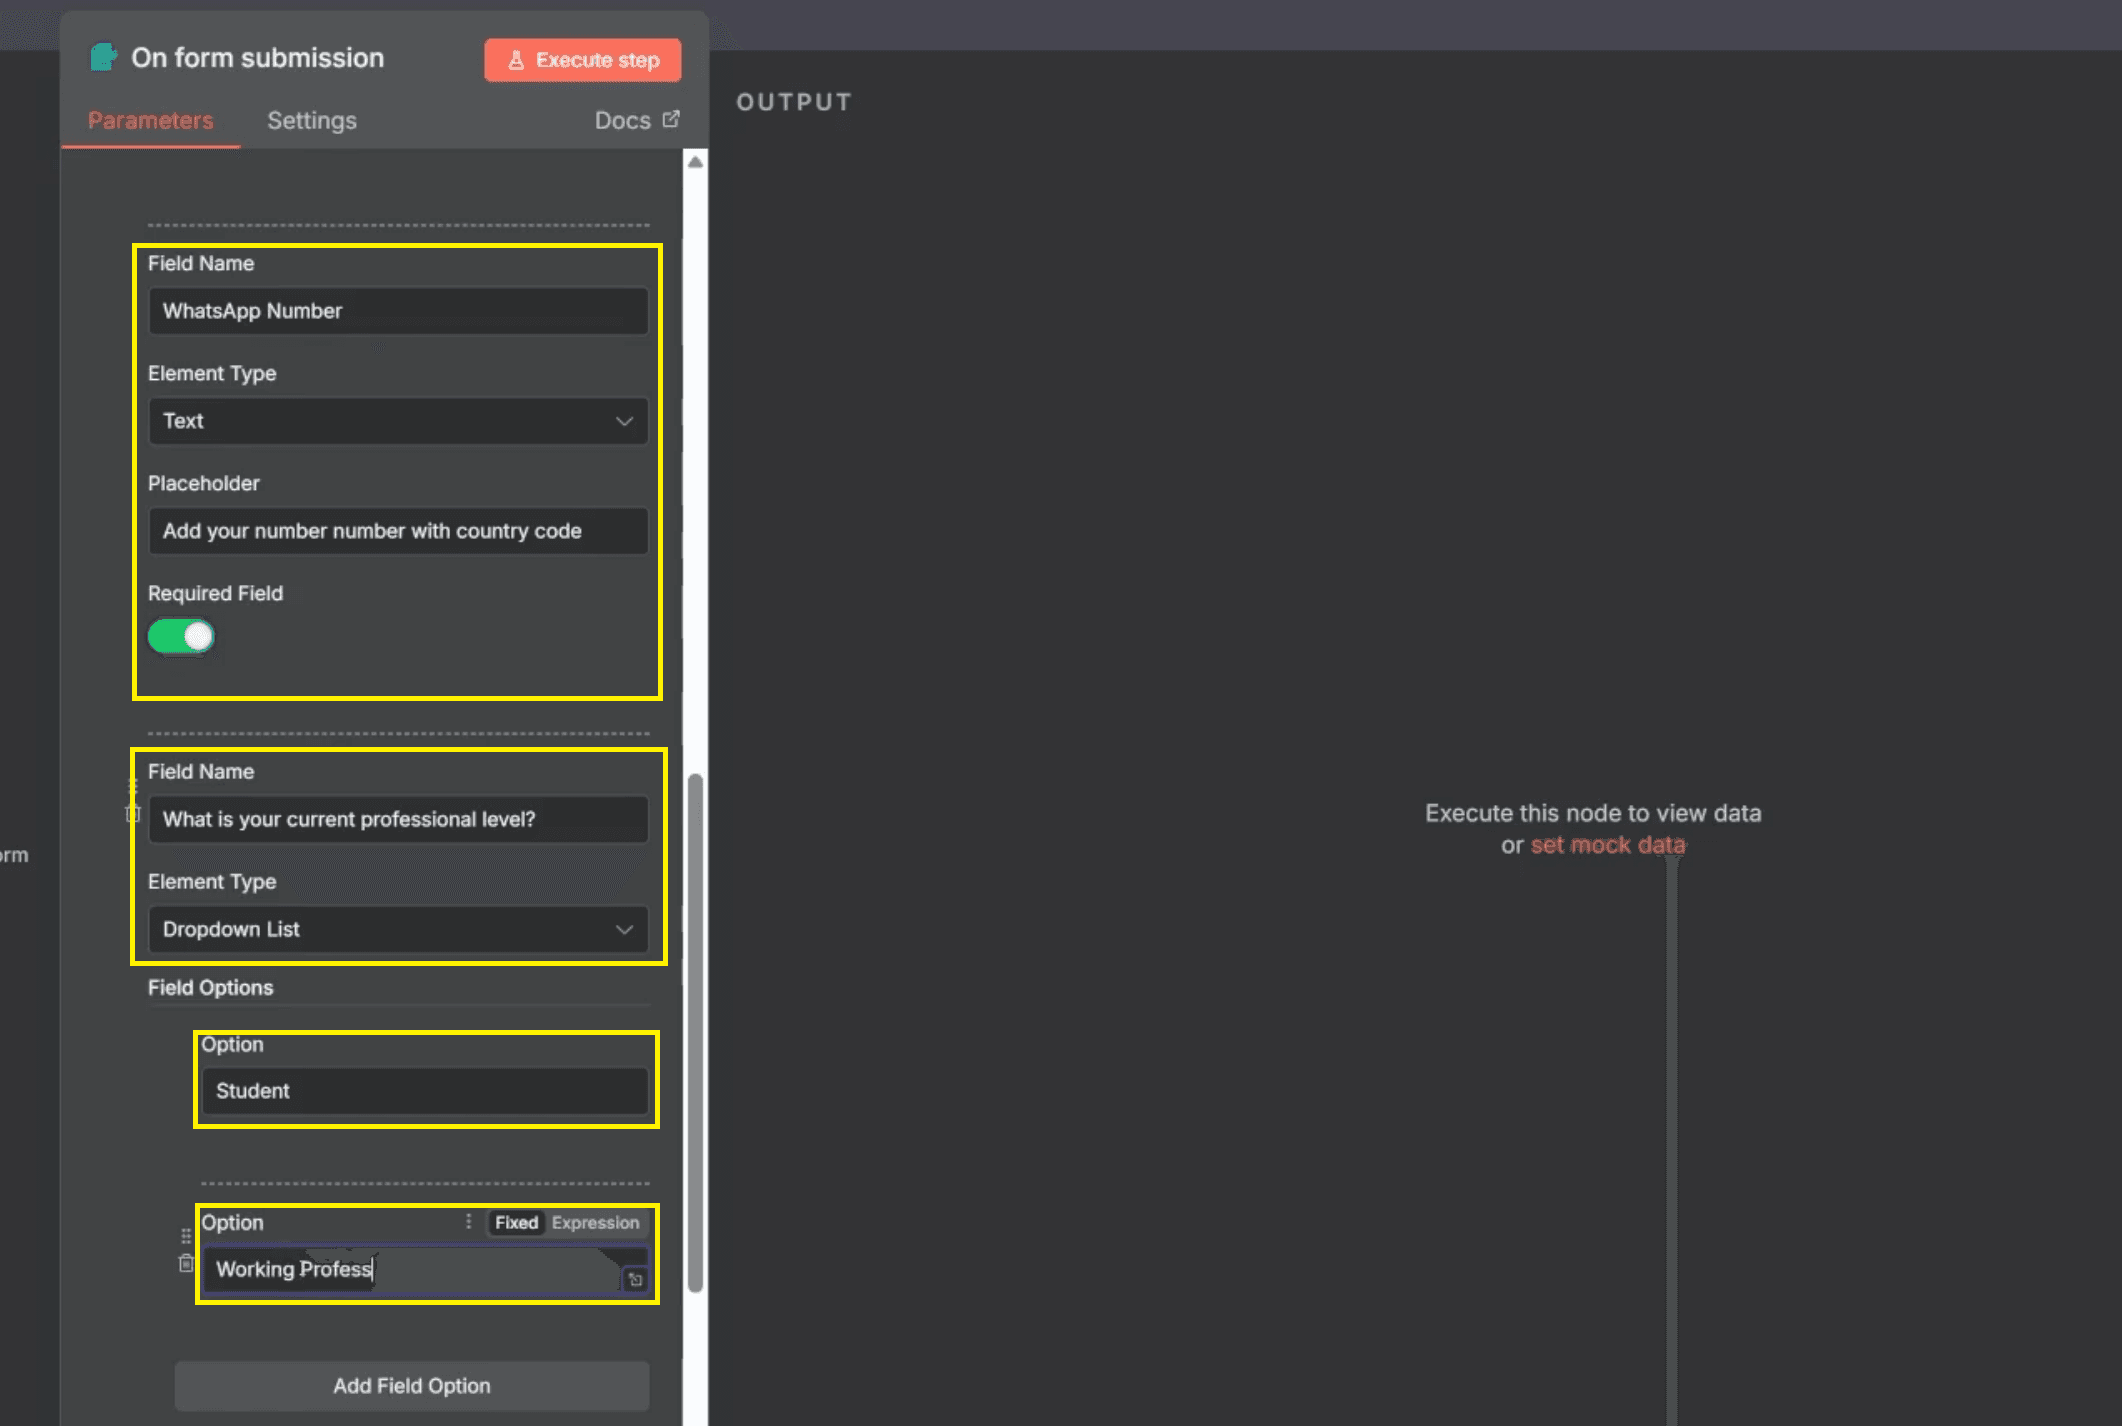
3. WhatsApp Number Field
Field Name: WhatsApp Number Use this field to collect the user’s active WhatsApp contact for real-time communication.
Element Type: "Text". Select Text, as phone numbers may include country codes or symbols like “+91”.
Placeholder: "Add your number with country code". This clarifies the format users should follow.
Required Field: "ON". Turn this on to make sure no submission lacks a number.
Gathering WhatsApp numbers enhances your community engagement and provides multiple contact options beyond just email.
4. Current Professional Level Field
Field Name: "What is your current professional level?" This question helps categorise users for better-targeted automation.
Element Type: "Dropdown List" - Choose Dropdown List to give users a quick selection of predefined roles.
Options: Student, Working Professional, Founder, Others.
Required Field: "ON"
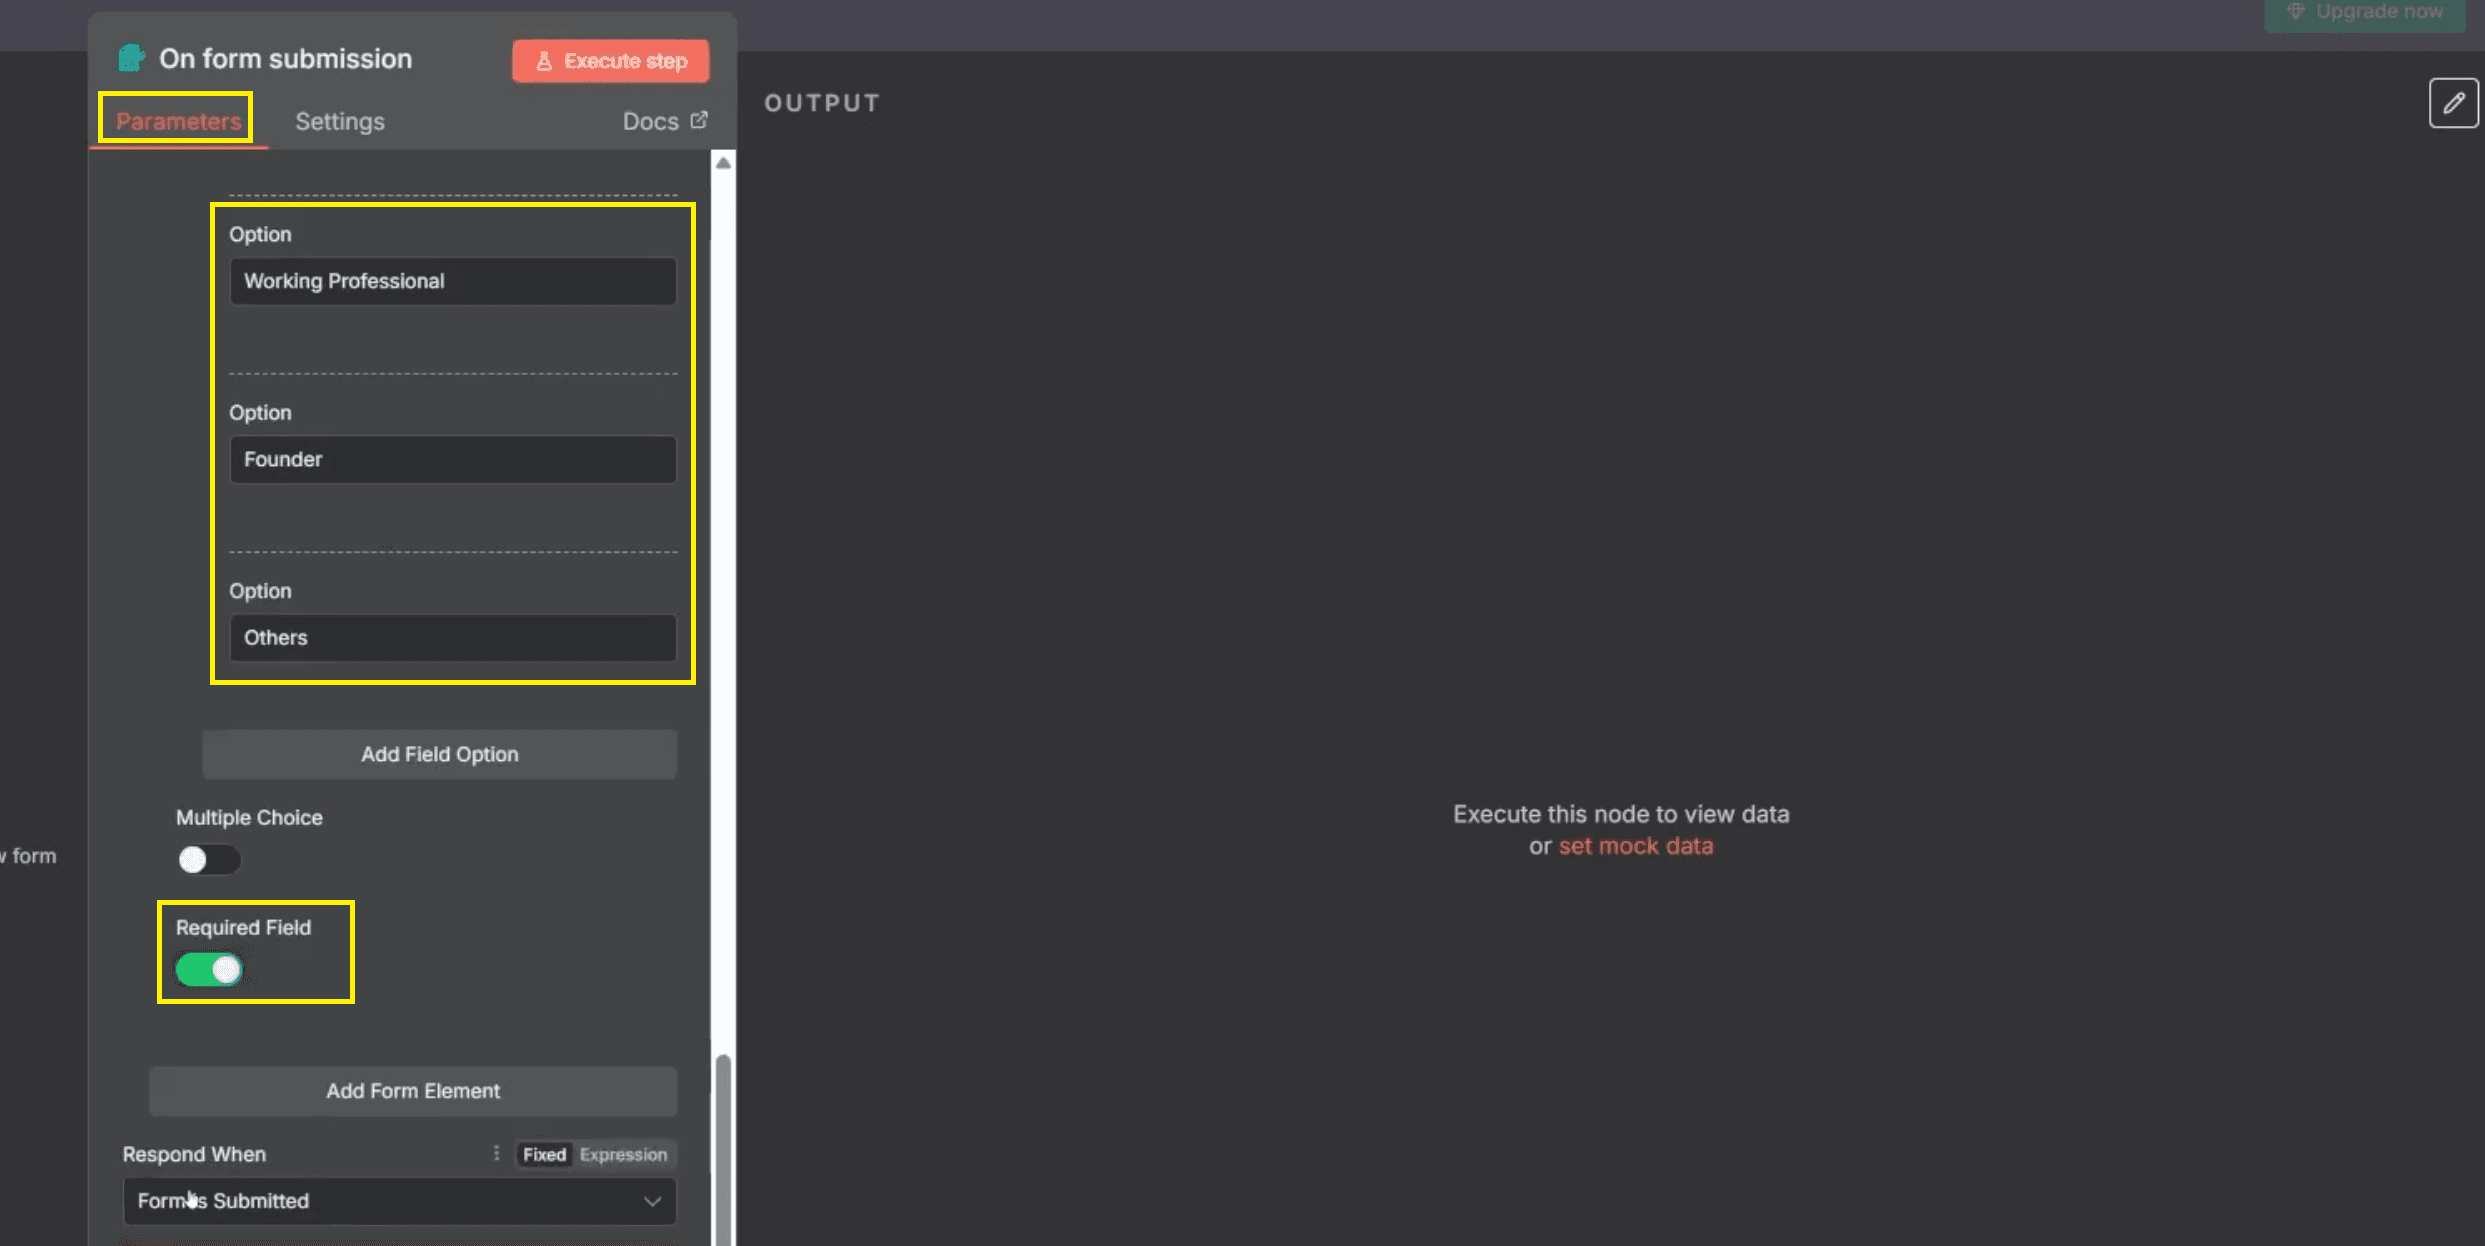
By using dropdown menus, you ensure clean, standardised data collection that helps personalise follow-ups or segmented email templates later.
(G) Preview and Test the Form
After building the form, always test it. Testing verifies that fields are functional and all data inputs are recorded correctly.
The Following are the Steps:
Click Execute Step in the form node.
Fill the form with test data and click “Join the Community.”
Ensure all inputs appear correctly.
Testing guarantees the workflow triggers properly each time a submission occurs and prevents errors during live execution.
(H) Review the Final Form Layout
Once you’ve tested the form, review its final layout. A clean, simple design builds trust and increases submission rates. Compare your layout with the reference form. Make sure all fields—Full Name, Email, WhatsApp Number, and Current Professional Level—are aligned correctly with the “Join the Community” button. Once you confirm everything looks correct, you’re ready to connect Outlook to automate professional email responses instantly.
Also Read: n8n Tutorial: How to Create an OpenAI Assistant (easy guide)
Step 2: Set Up Microsoft Outlook for Automated Emails
Now that your form is ready and can collect data, it’s time to automate your email responses. Connecting Microsoft Outlook allows n8n to send automatic emails immediately after form submission. This integration ensures fast communication, professional delivery, and consistent response times—all crucial for strong email management and user satisfaction.
(A) Adding the Outlook Node to the Workflow
To connect your form submission to the email sending function, follow these steps:
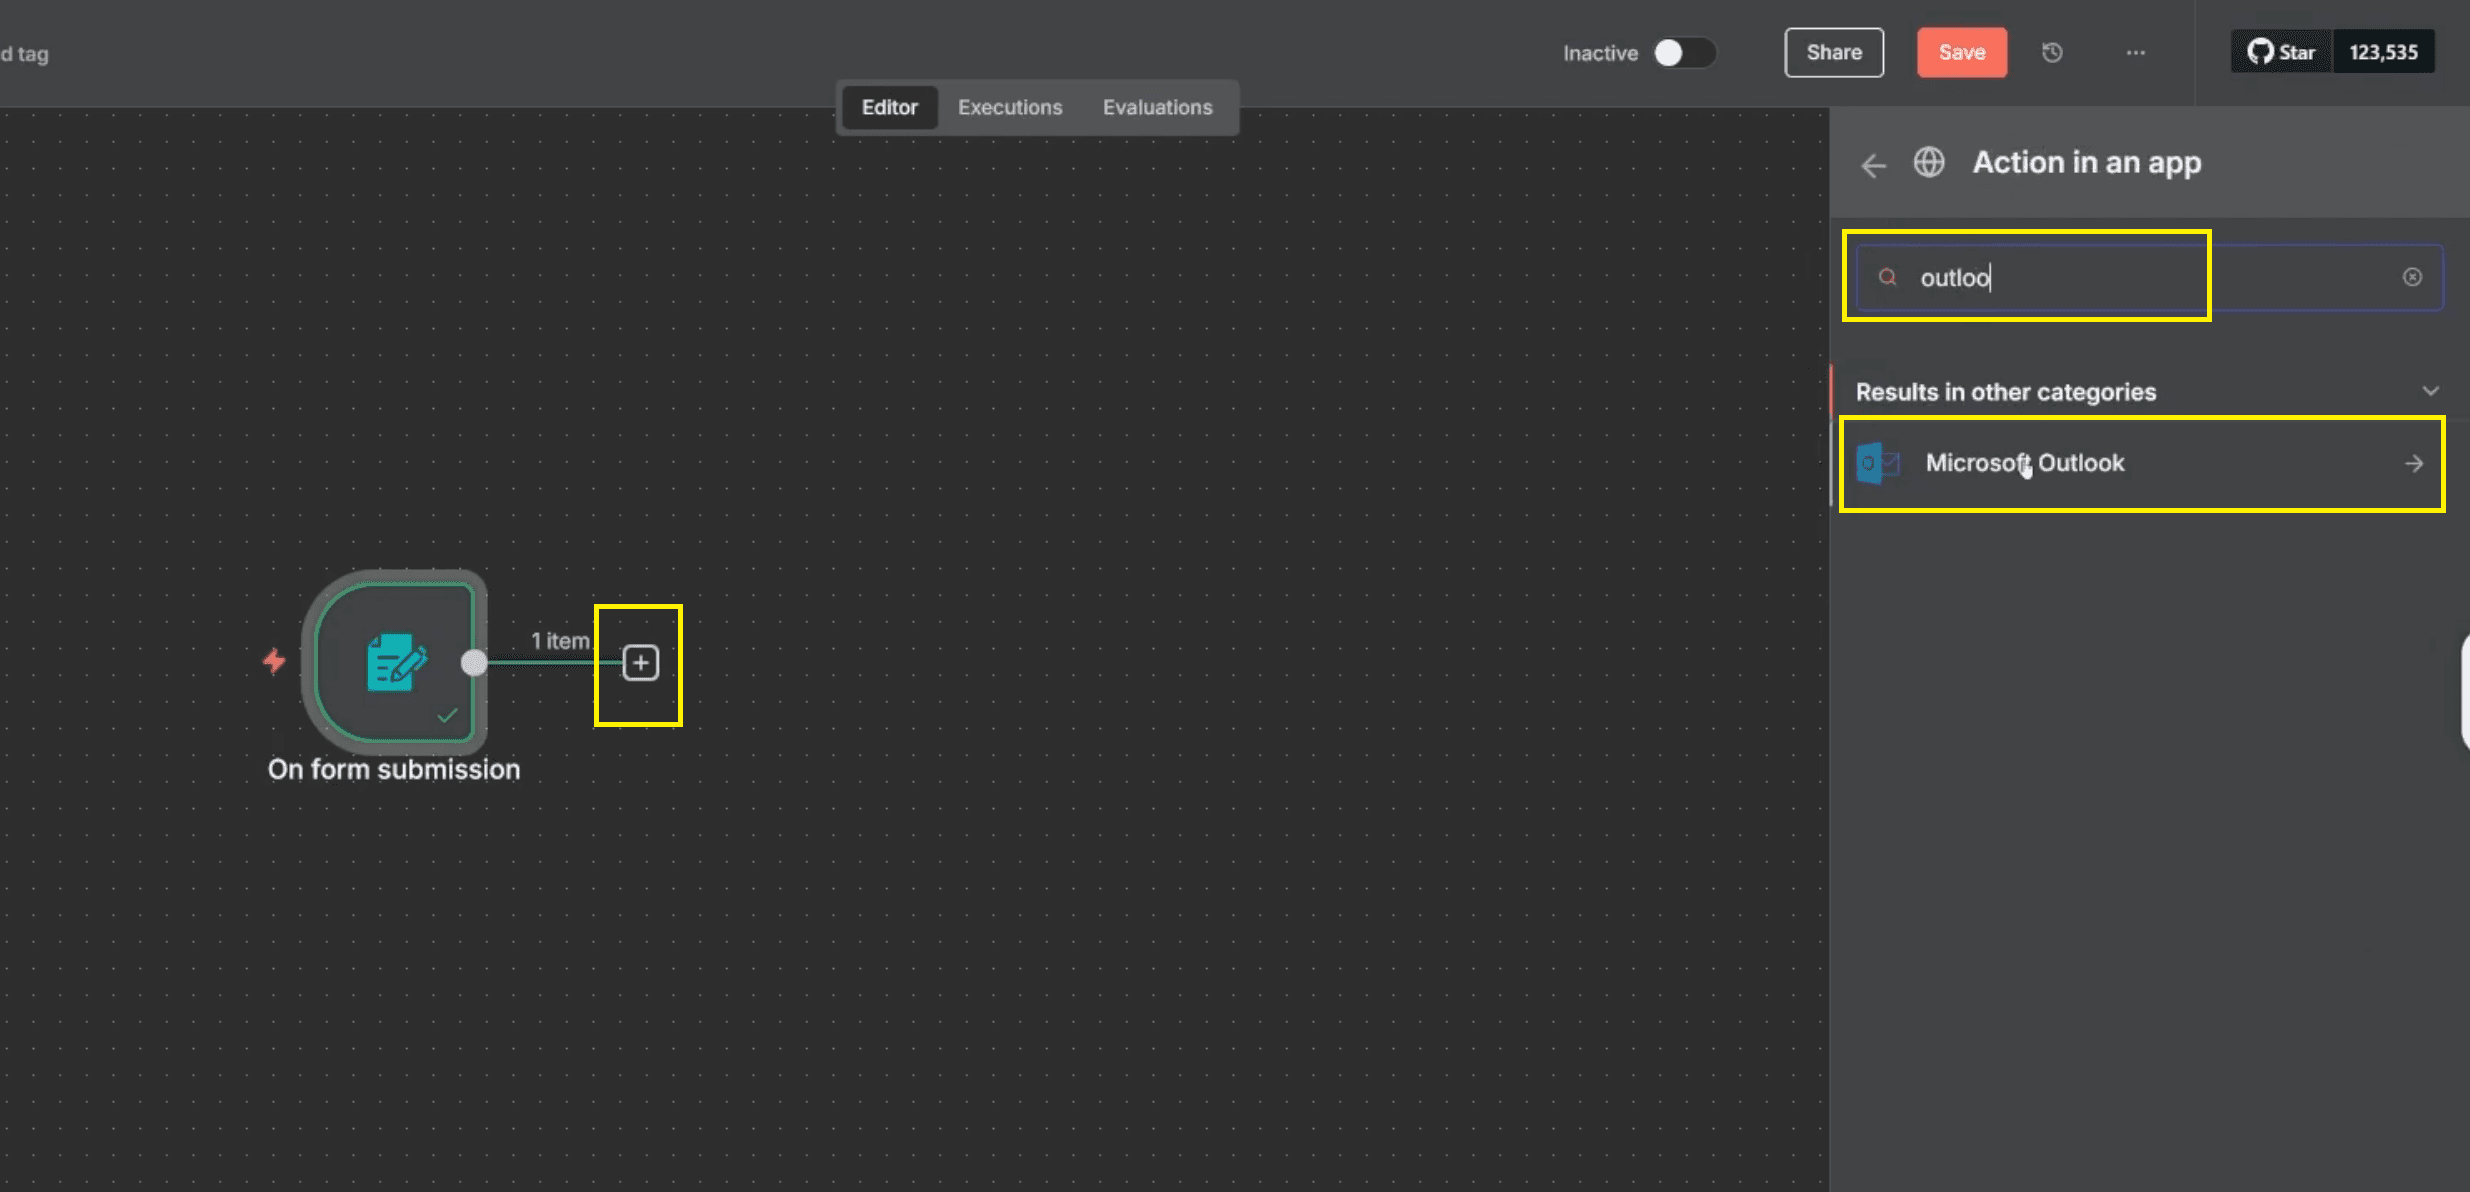
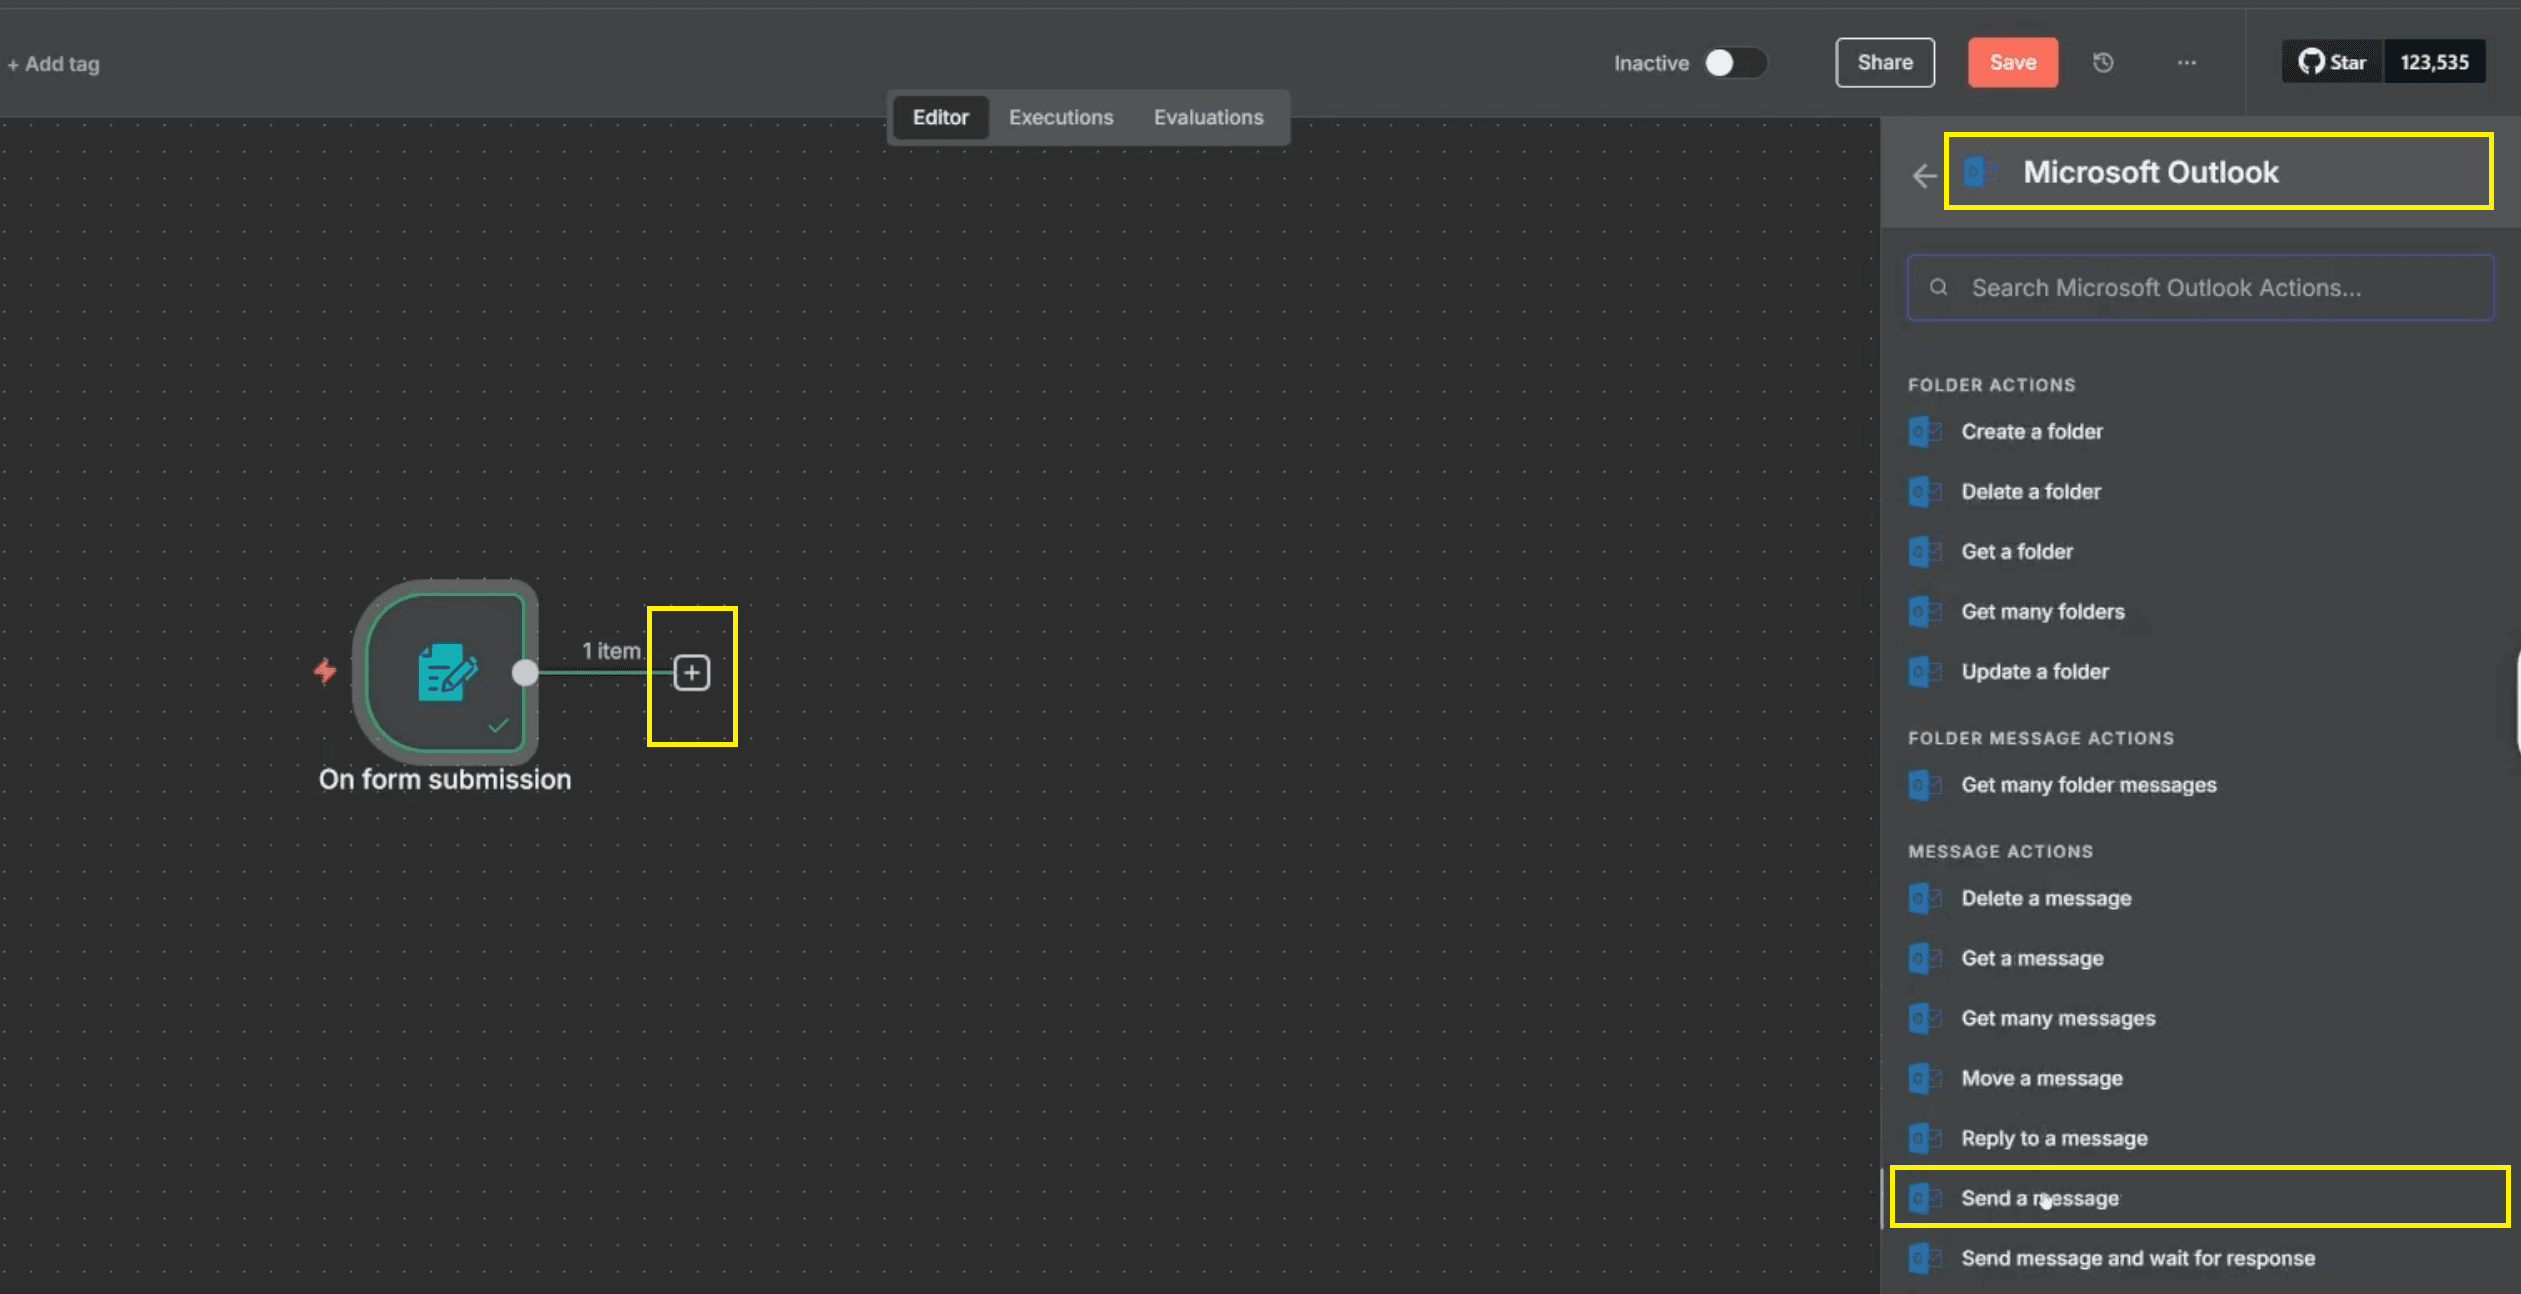
Click the plus (+) icon to insert the next action in your workflow sequence.
In the search bar that appears, search for "Outlook".
Select "Microsoft Outlook" from the app results.
- In the list of Microsoft Outlook actions, select "Send a message" under the 'MESSAGE ACTIONS' heading.
This specific node is essential as it acts as the bridge between the successful form submission and the outgoing emails. Its function is to ensure every user receives an instant confirmation email, thereby increasing the reliability of your automation and strengthening your professional networking efforts.
(B) Connect Your Outlook Account
For the workflow to send emails, you must connect n8n securely to your Microsoft Outlook account.
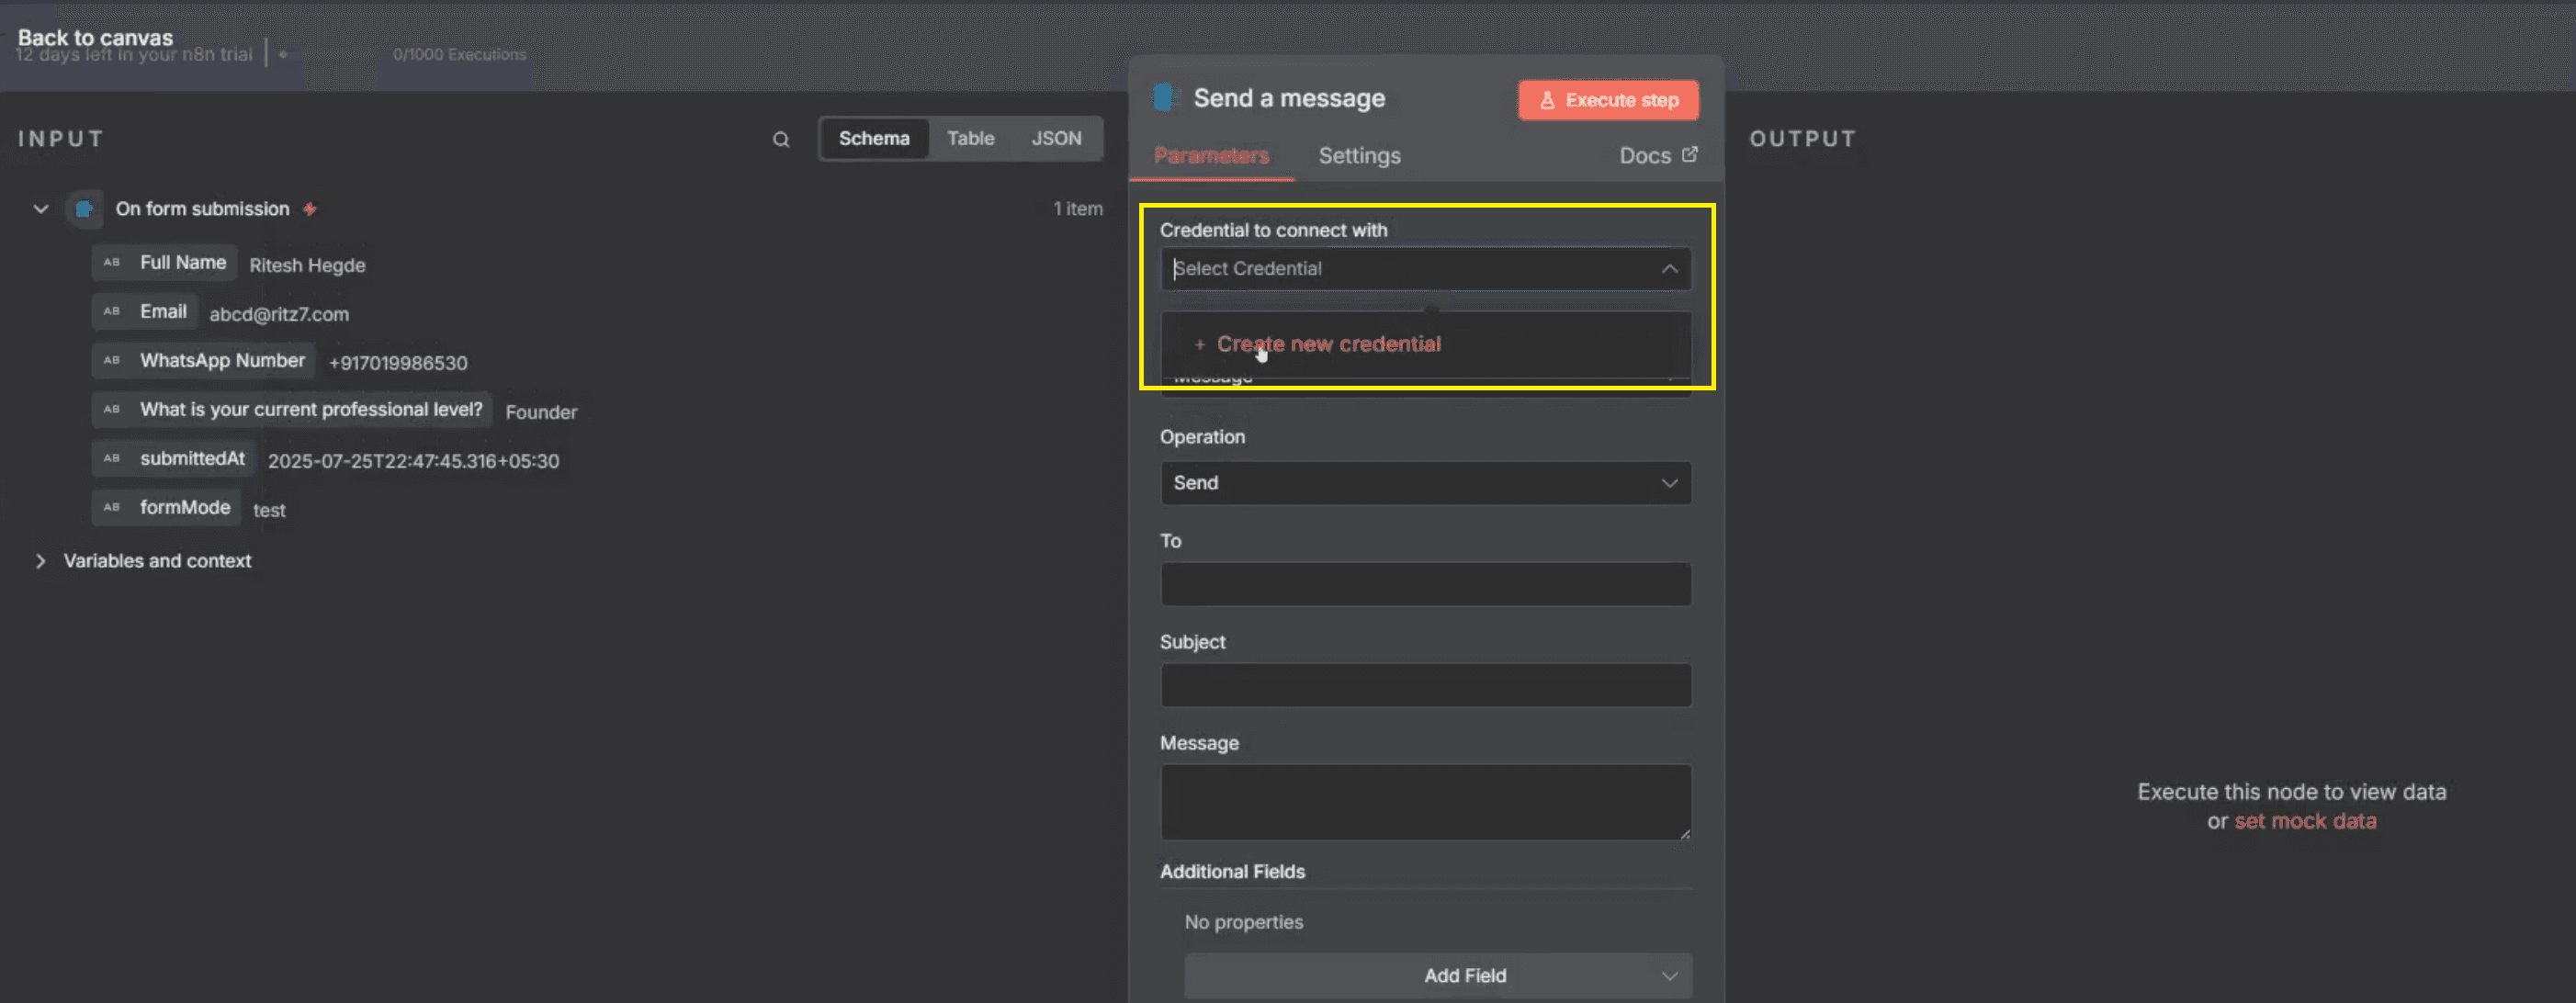
In the Outlook node's Parameters tab, click the "Credential to connect with" dropdown, and select Create new credential.
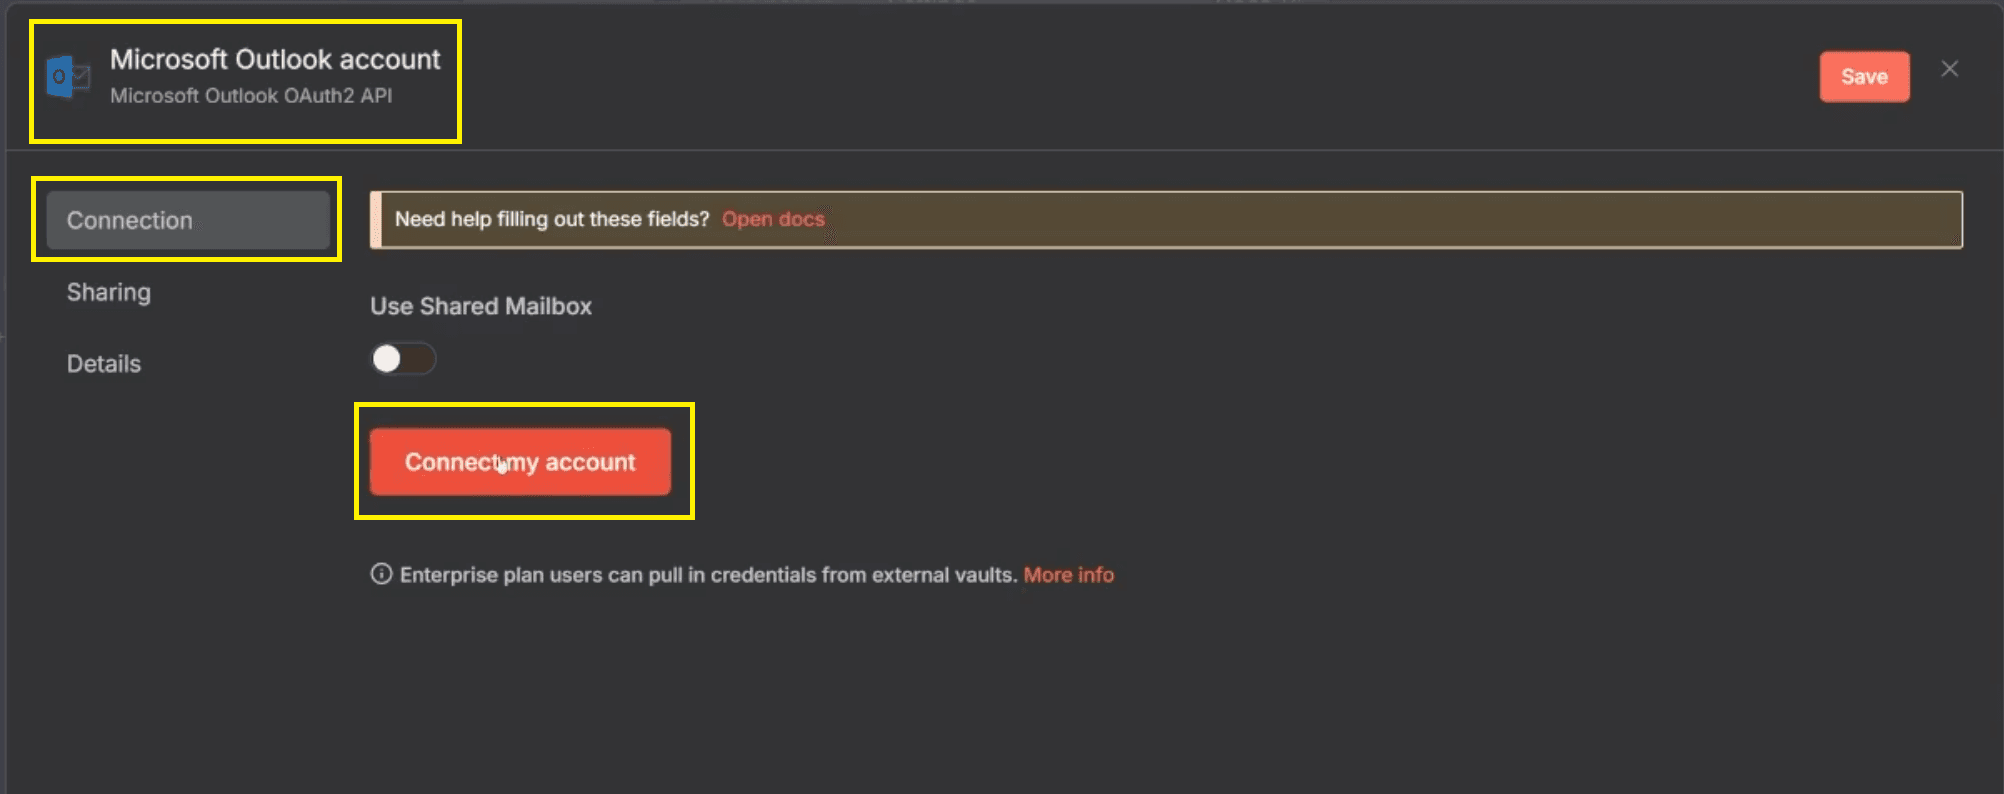
Click Connect My Account and sign in using your Microsoft login credentials.
Approve all necessary permissions.
Click Save once connected.
After linking, your Outlook account will automatically handle all outgoing messages, ensuring they are sent from your official address with consistent branding and a professional tone.
(C) Map the Recipient Emails
Mapping ensures that each form submission is sent to the correct recipient.
Open the Outlook node’s Parameters tab.
Drag the Email field from the "On Form Submission" node's input and drop it into the To field.

This mapping dynamically connects each form input to its corresponding email, ensuring personalised messages are delivered without manual effort.
(D) Write and Format the Email Message
Compose the message users will receive upon form submission.
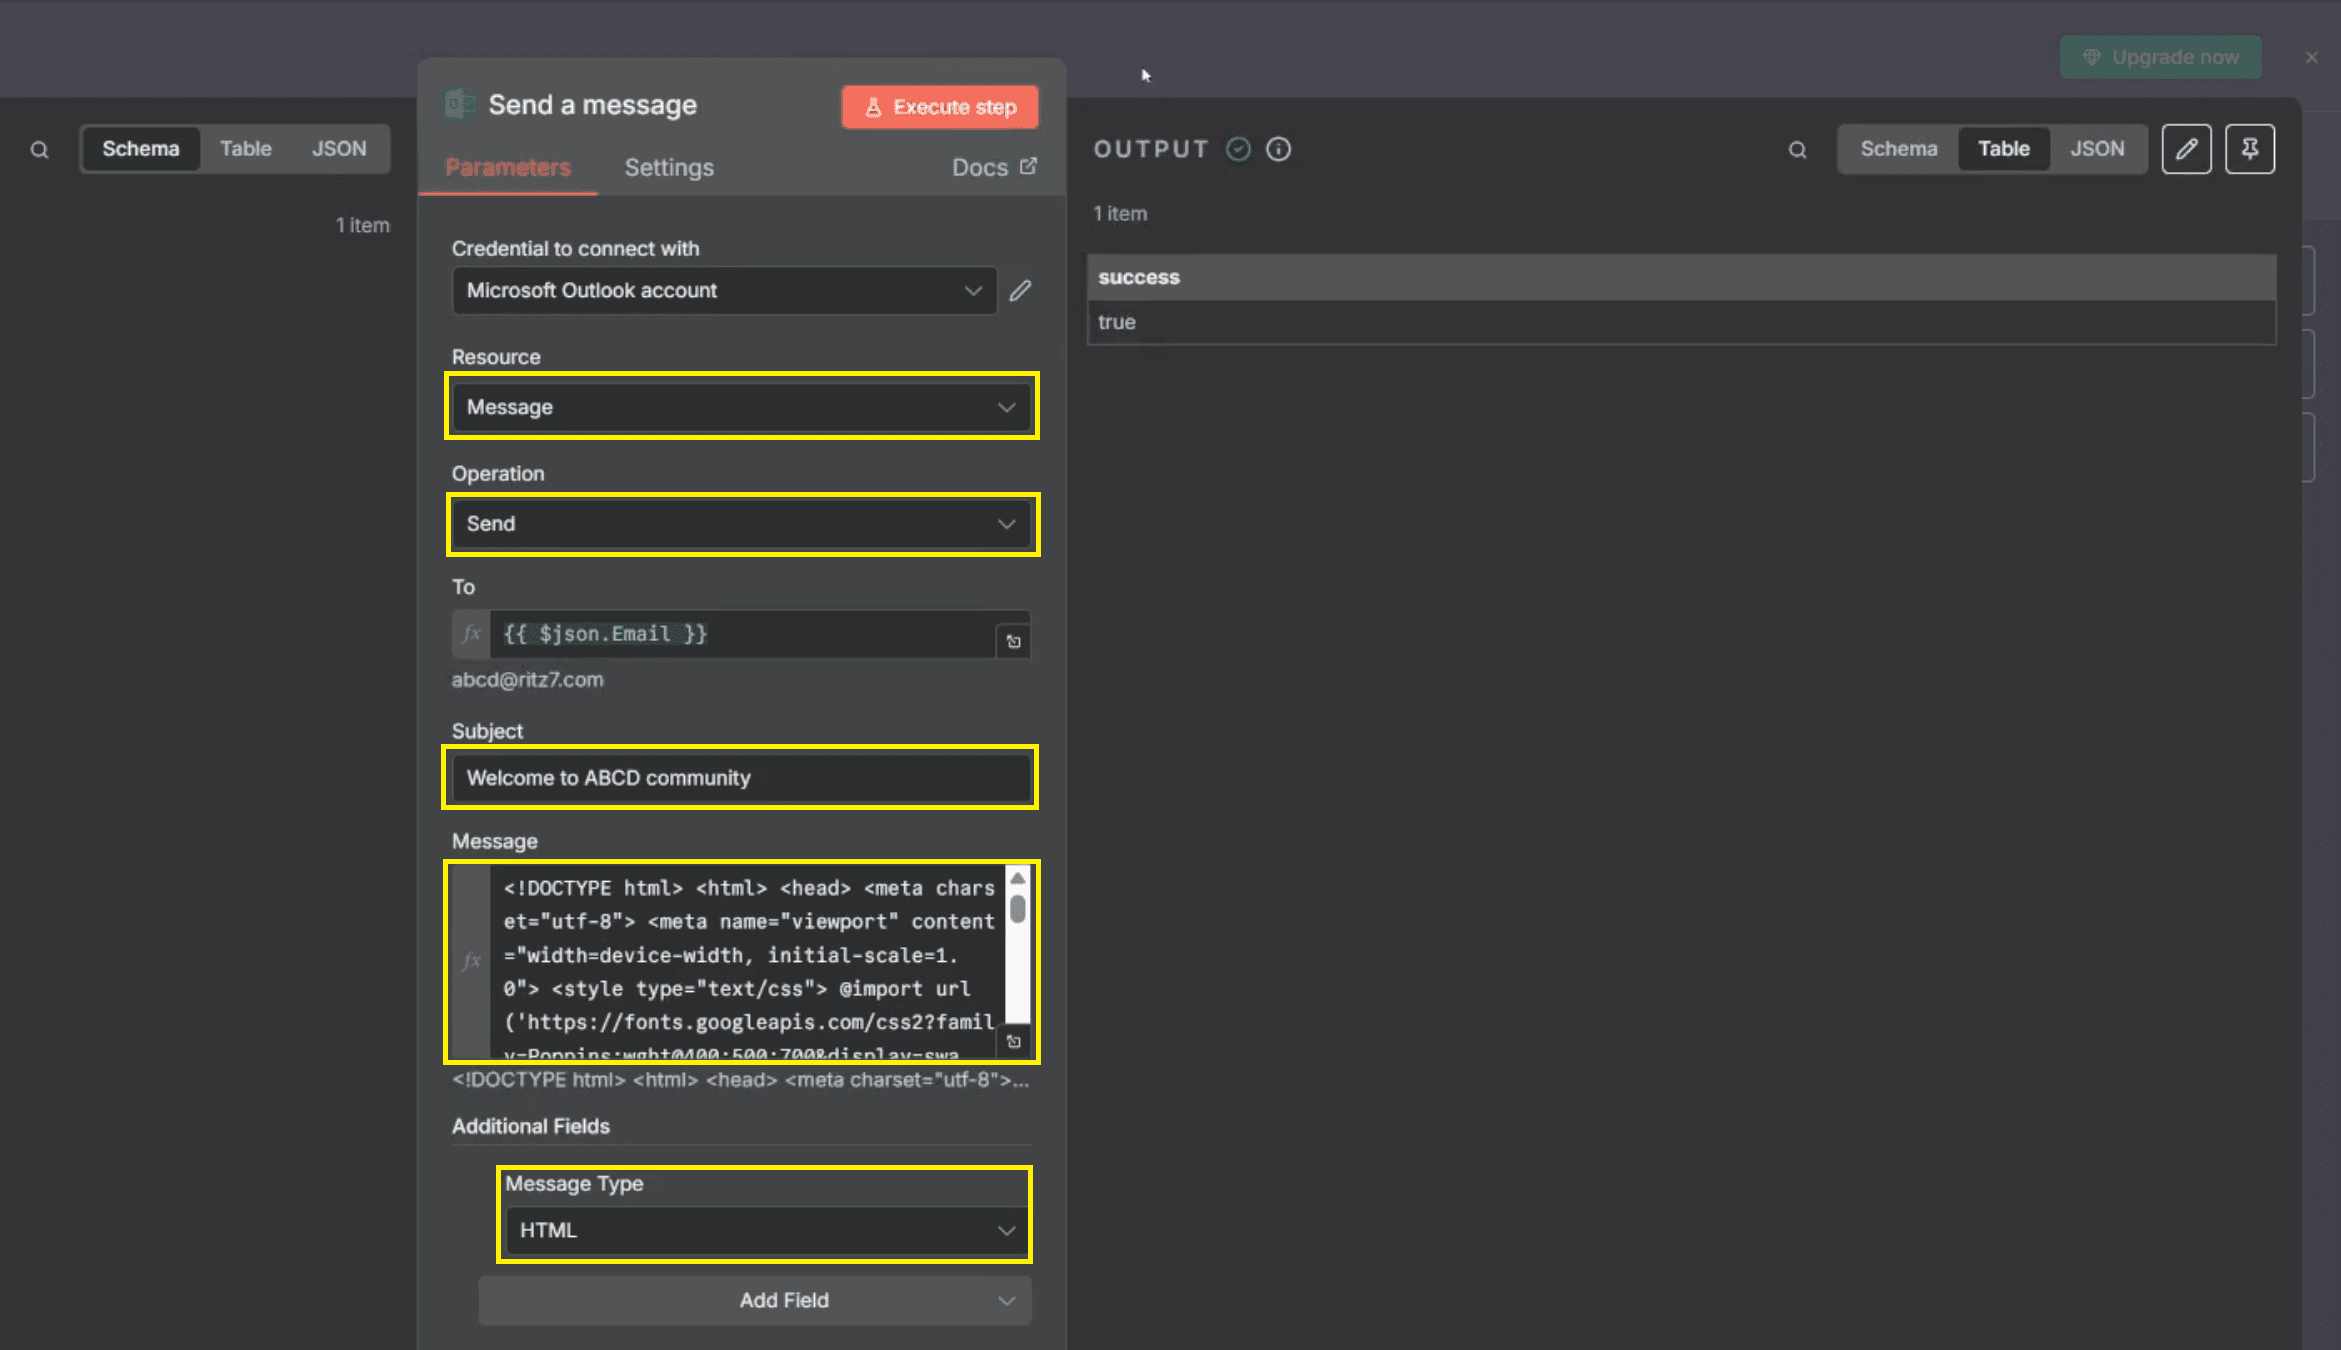
Subject: Enter
.plaintextWelcome to ABCD CommunityResource: Ensure the dropdown is set to
.plaintextMessageMessage Type: Set the type to HTML.
Message (HTML format): Input your desired HTML content, such as:
HTMLplaintext<h2>Welcome to ABCD!</h2><p>We’re thrilled to have you join our no-code community.</p><p>Join our WhatsApp group and connect with other members today.</p><p>– The ABCD Team</p>Click Execute Step to preview the output.
send a message
This message gives a professional and engaging first impression to your new members and ensures all outgoing auto emails are formatted consistently.
(E) Activate the Workflow
Once all nodes are configured and saved, activate your workflow by toggling the switch in the upper bar from 'Inactive' to 'Active'.

Activate workflow
You Might Also Like: 5 Ways to Make Money with n8n AI Automation | Ritz7
Step 3: Monitor and Manage Executions
Now that your automation is active, it’s essential to monitor its executions regularly. n8n logs every form submission and email sent so you can track performance and ensure reliability.
Click Executions in the top navigation bar.
You’ll see a list of all completed workflow runs with timestamps.
Click any record to view submission data and delivery details.
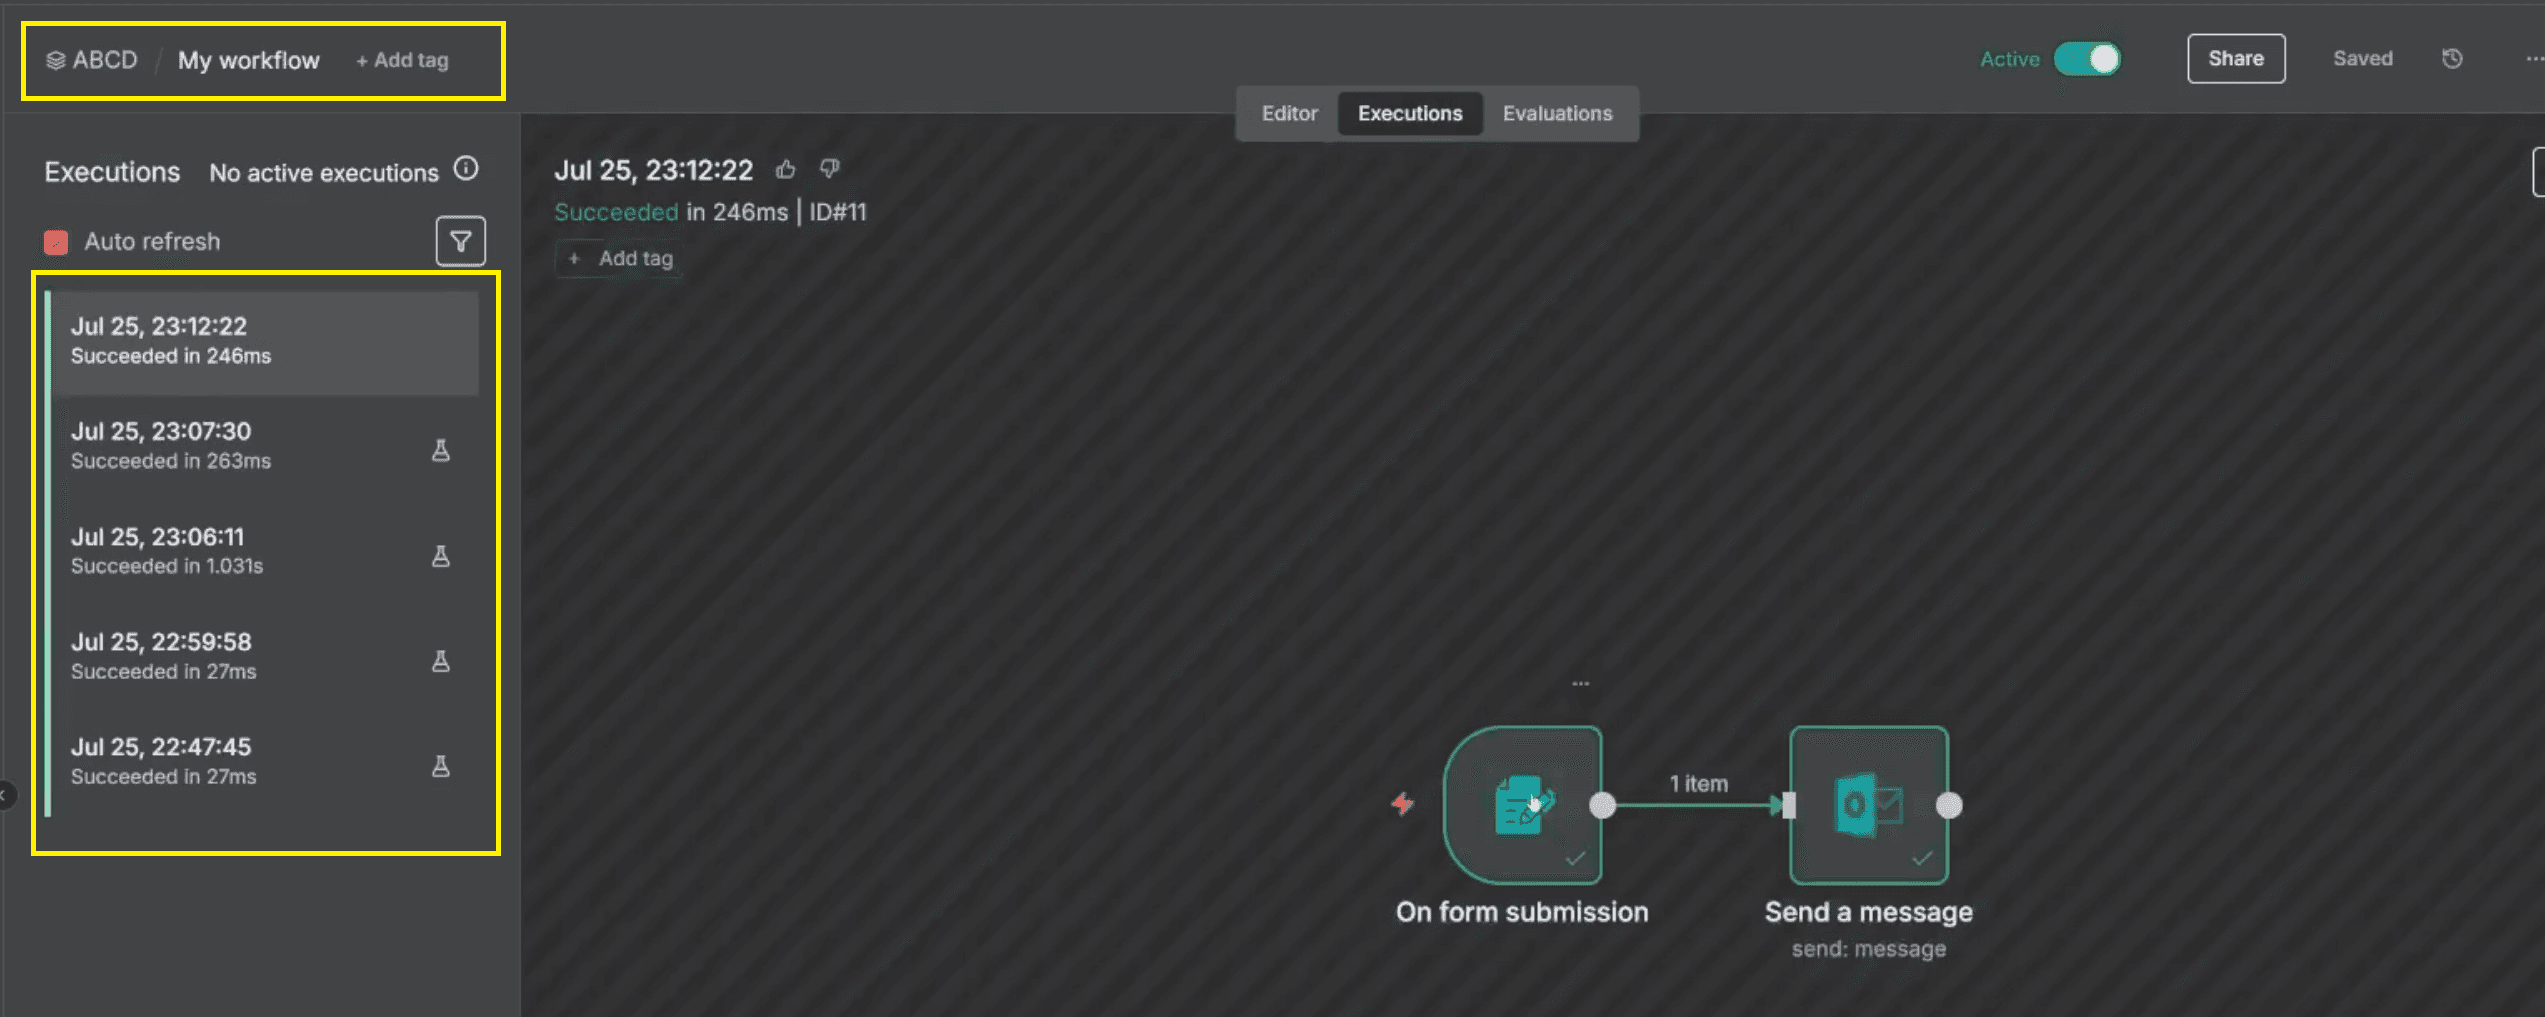
By monitoring executions, you maintain control and transparency, ensuring your workflow continues to deliver accurate and timely auto emails.
Conclusion: A Smarter Way to Handle Email Responses
You’ve now built a complete automatic email workflow using n8n and Microsoft Outlook. It collects contact details, sends personalised professional emails, and maintains consistent response times—all without writing a single line of code. This system simplifies your communication, reduces manual workload, and helps scale your engagement efficiently.
With further customisation, you can expand it by adding fields like a designated reply-to email address, integrating dynamic content for a large number of users, or ensuring all correspondence includes standardised email signatures. Whether managing hundreds of signups or small interactions, your automation ensures every response is fast, reliable, and professionally executed, greatly improving your email management.
Frequently Asked Questions
Everything you need to know about this topic.