

Don’t Just Read About AI - 🤫Secretly Implement It.
The secret to doing 10 hours of business work in 10 mins? Master AI & automation basics in just 3 hours. Apply to ANY field! 🚀
Save My Spot 🙋♂️/🙋♀️Key Pointers:
Make Learning Fun: Turn boring study notes into fun, interactive quizzes instantly.
Smart Memory: The bot acts like a real teacher and remembers your score as you play.
Bot Teamwork: One bot asks the questions, while a hidden bot marks your answers.
Instant Grades: You don't have to wait—the system checks your answers right away.
Cool Scorecards: Get a beautiful visual card at the end to show off your results.
Are you looking to create a custom quiz that goes far beyond simple, static Google Forms? OpenAI’s new Agent Builder transforms the way we design interactive quizzes by allowing users to construct complex logic flows visually, without needing a background in software engineering. In this tutorial, we will guide you through building a sophisticated quiz application that acts as an intelligent AI quiz generator. Unlike standard bots, this agent can track scores in real-time, manage exam sessions, and display polished visual results at the end.
For educators aiming to significantly improve learning outcomes or developers prototyping a robust quiz app, this guide is your blueprint. It demonstrates exactly how to leverage artificial intelligence to automate the tedious content creation process. You will learn how to process an uploaded file to create questions dynamically, track user performance precisely using automated grading, and provide personalised feedback instantly. Best of all, you can achieve this sophisticated workflow without writing complex code or managing a Python virtual environment.
Why Use an AI Question Generator?
Traditional quiz makers are often inefficient and labour-intensive. They require manual input for every single item, question, and answer key. This manual drudgery wastes valuable time and limits how much you can scale your training programmes. However, by using OpenAI as your question generator, you can drastically accelerate this workflow. It allows you to quickly create multiple-choice tests from diverse sources like training materials, academic notes, or even complex policy documents.
This shift does more than save time; it enhances the learning experience by creating a dynamic loop where users receive interactive user feedback in real time. Instead of waiting for a graded paper, the user learns immediately. Furthermore, AI engines can generate various question types, ensuring that the assessment checks for deep understanding rather than just rote memorisation.
Getting Started with the Agent Builder
To begin your journey, head over to platform.openai.com/agentbuilder. Before you start, ensure you have sufficient credits available to utilise the API Access capabilities of the platform. Since these agents run on powerful LLMs, having active credits ensures your agents can process logic and run without interruption.
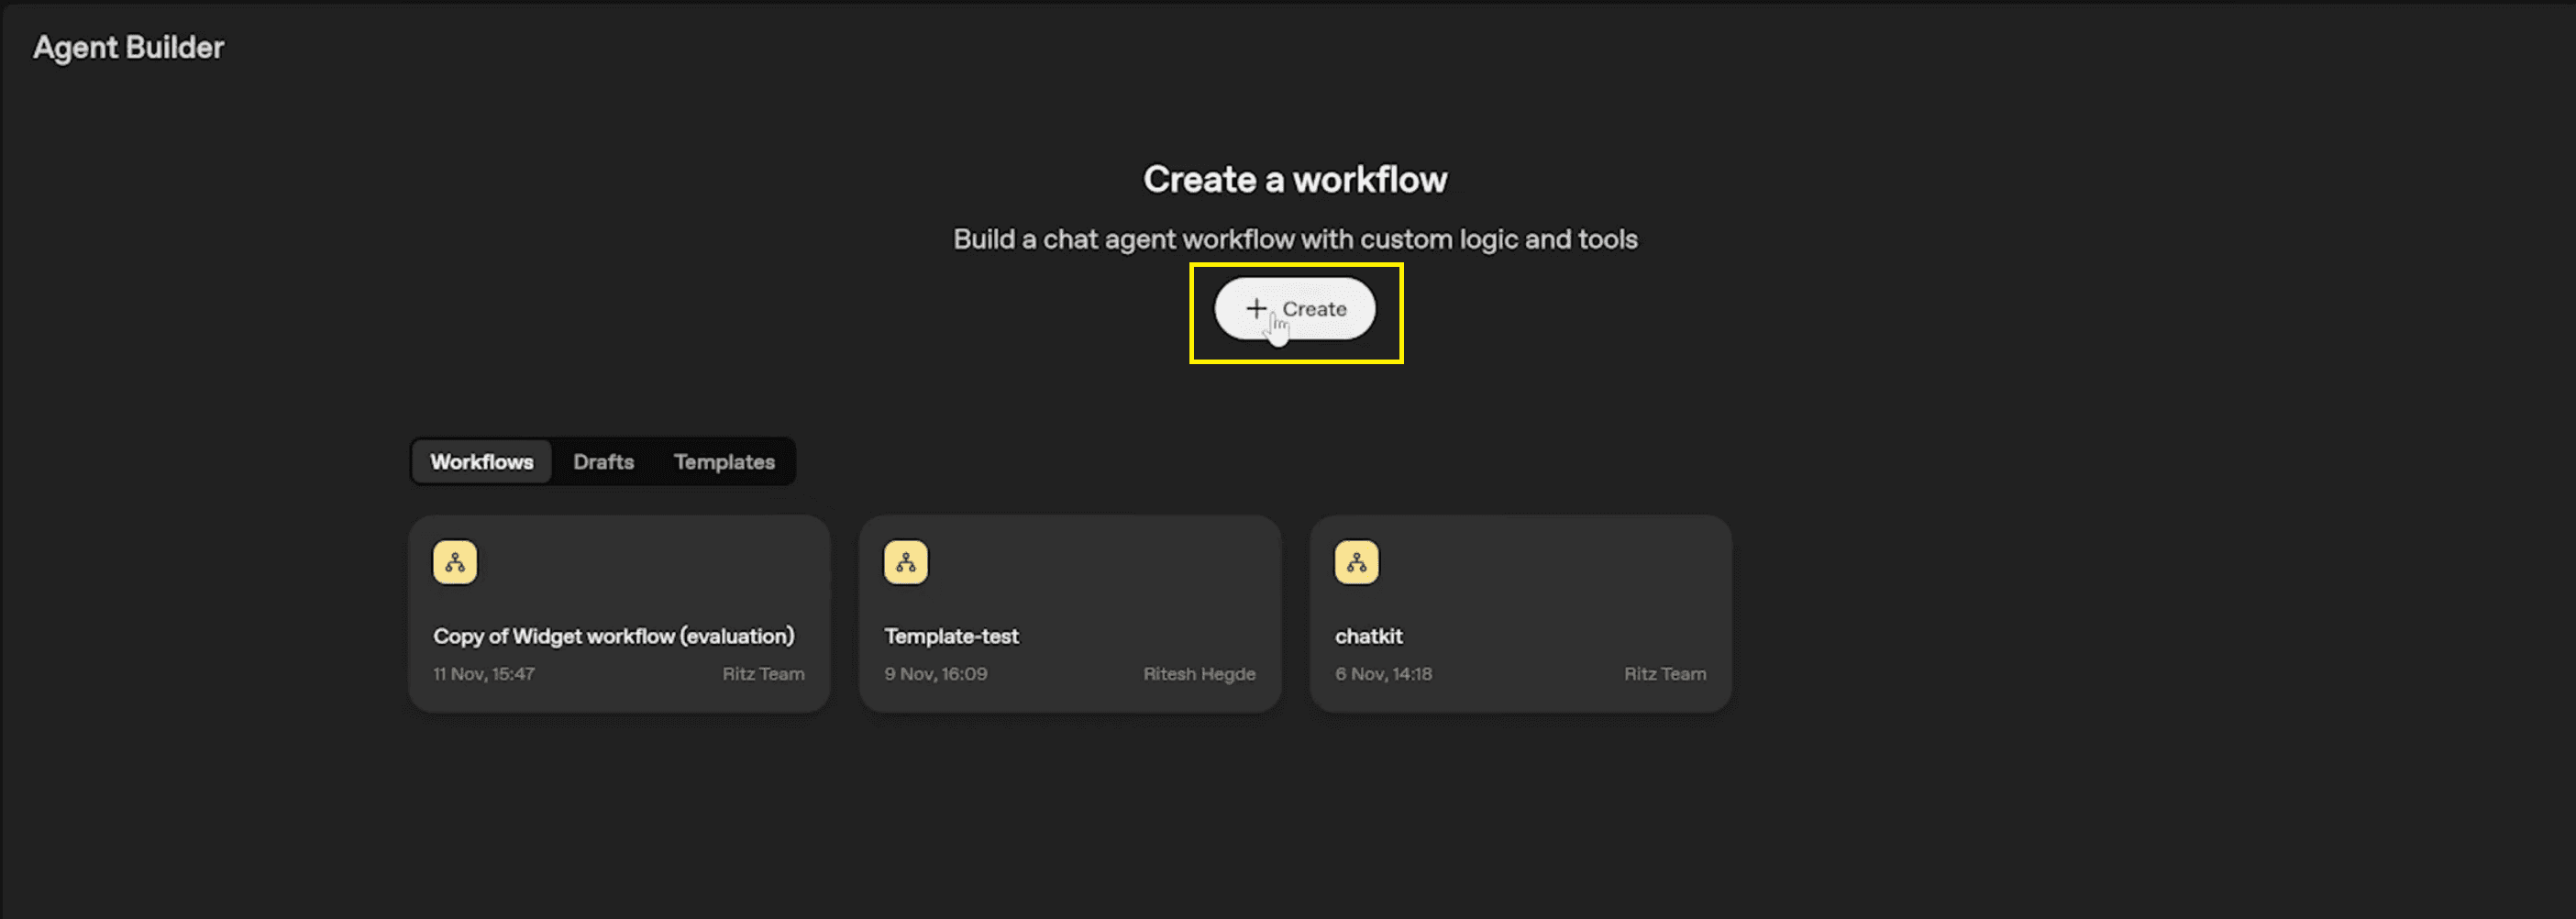
This interface is the command centre where you will orchestrate your agents. Once you click Create, you will see the default components on the canvas: usually a "Start" node and a "My Agent" node. We will transform this blank slate into a sophisticated quiz generator capable of handling structured quiz questions with high accuracy.
Also Read: How to Use OpenAI Agent Builder: Beginner’s Guide
Step 1: Setting Up State Variables
We need to set up state variables for automated grading. To build a true interactive quiz, your agent needs a persistent memory. Without this, the agent would have "amnesia," forgetting the user's score after every single interaction. We need to track the score summary as the user progresses through the assessment.
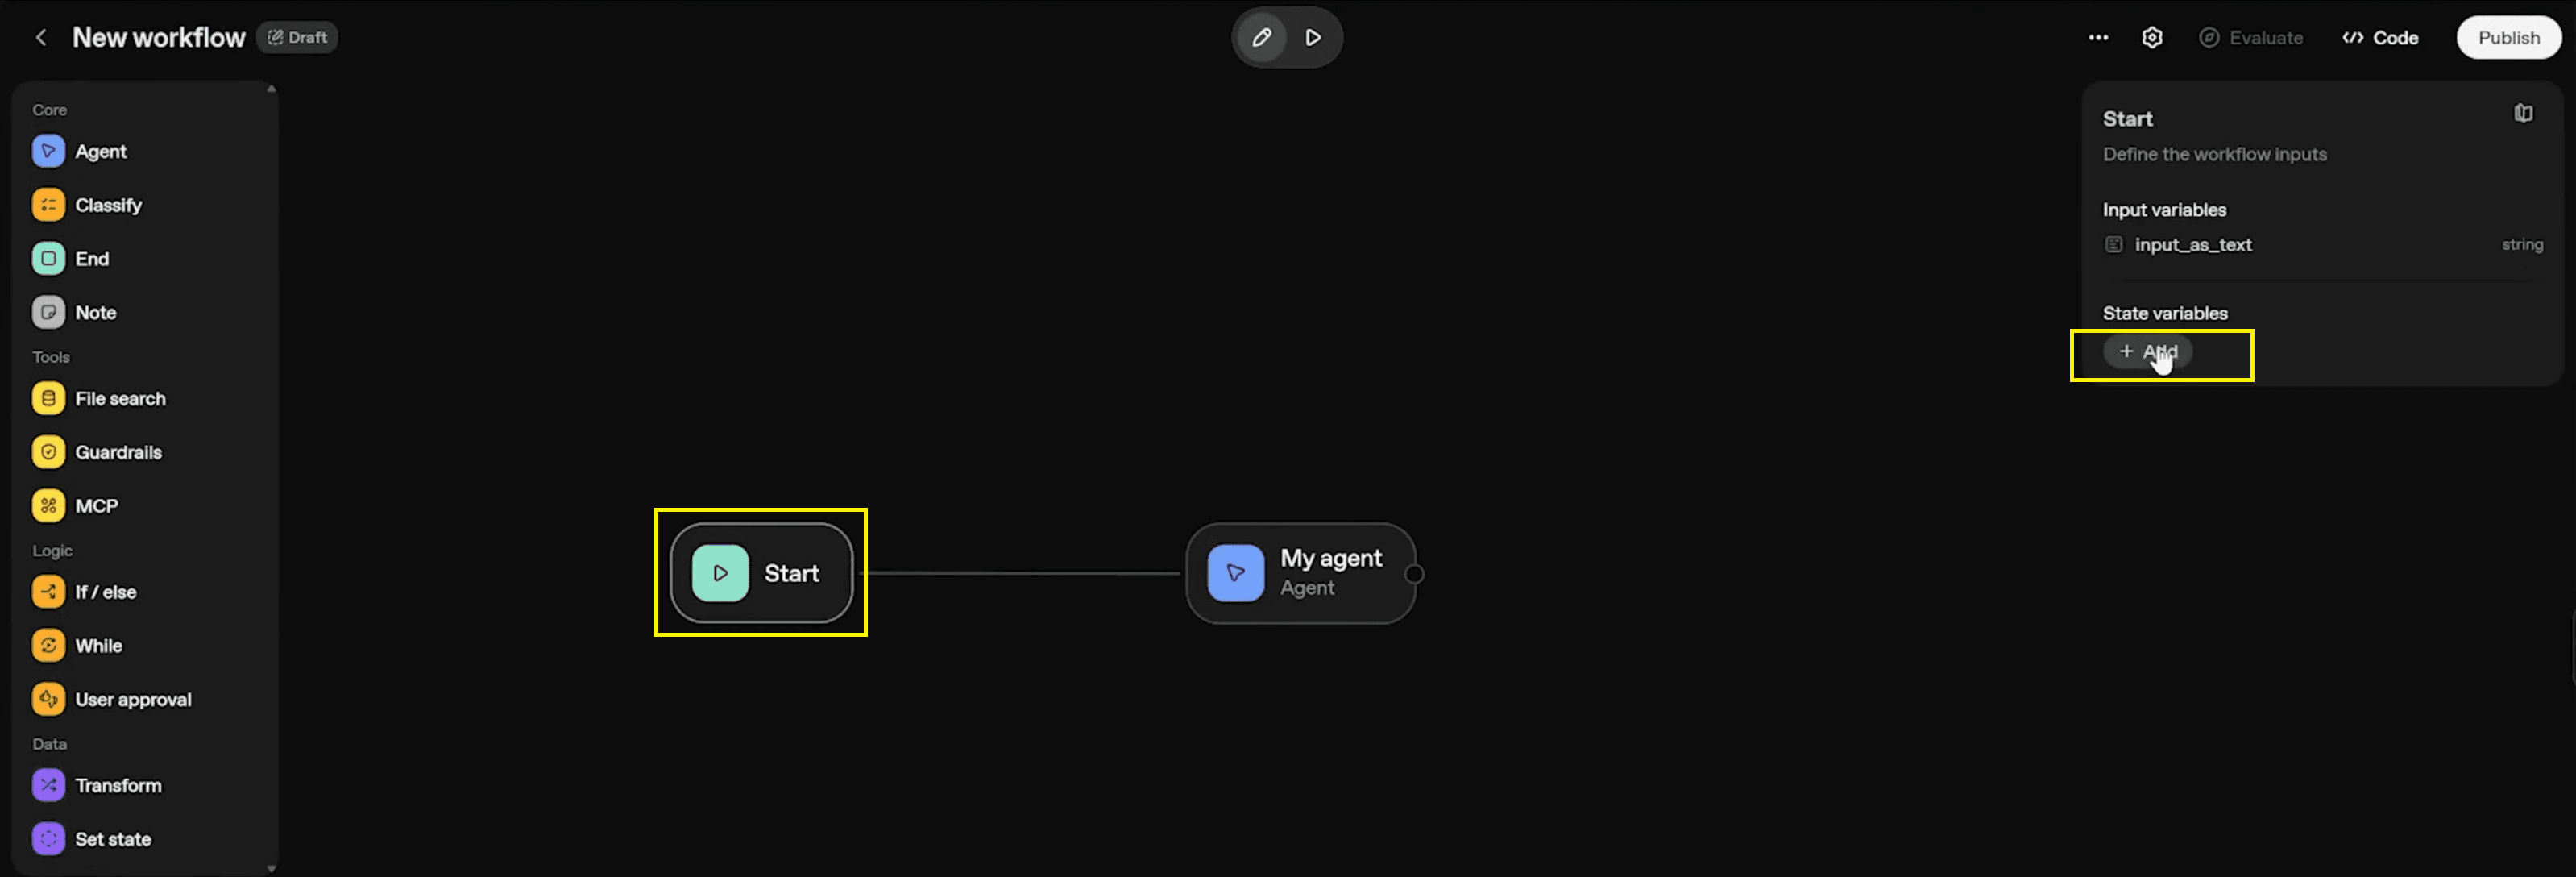
You must create three specific state variables to handle the data in the Start node. These variables act as the backbone of your quiz application, ensuring the state persists throughout the interaction.
1. Total Questions
Purpose: Tracks the total number of questions generated and asked of the user so far.
Action: Click the + Add button under State Variables.
Settings: Select Type: Number and name it
. Leave the default value empty and click Save.plaintexttotal
2. Correct Answers
Purpose: Powers the automated grading logic by counting right answers.
Action: Repeat the process. Select Type: Number and name it
.plaintextcorrectans

3. Wrong Answers
Purpose: Identifies specific gaps in learning outcomes.
Action: Repeat the process. Select Type: Number and name it
.plaintextwrongans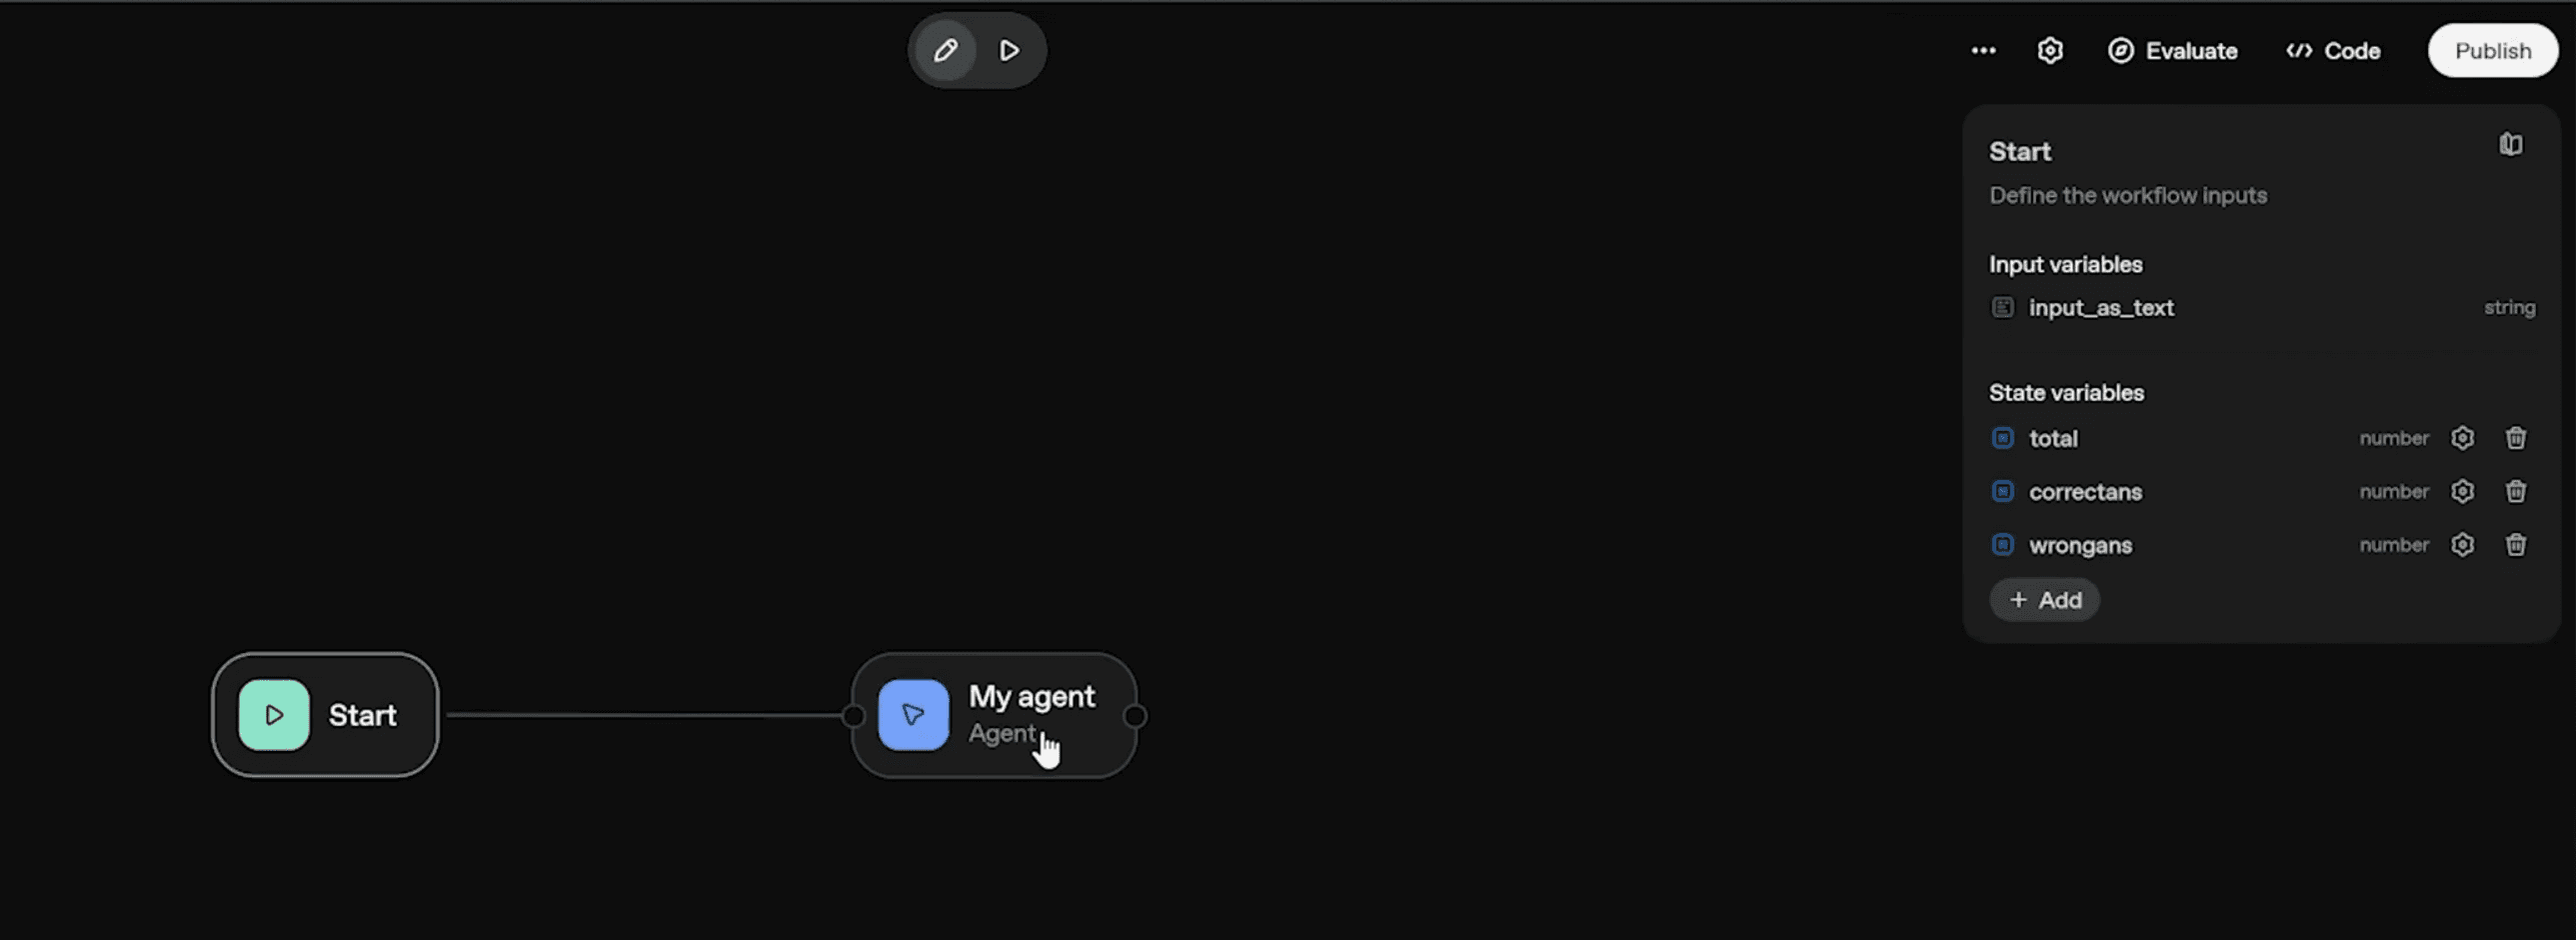
5. add variable - wrong answer
Also Read: WhatsApp Automation (Part 1): Set Up Meta Business API
Step 2: Configuring the Agents
We will split the logic into two distinct roles to maximise accuracy. This separation of concerns ensures one agent handles the maths (grading) while the other handles the conversation (asking questions).
1. The Quiz Tracker Agent
This agent acts as the backend scorekeeper. It doesn't talk to the user directly; it talks to the system to update the scoreboard.
Name: Rename the default agent to Quiz Tracker.
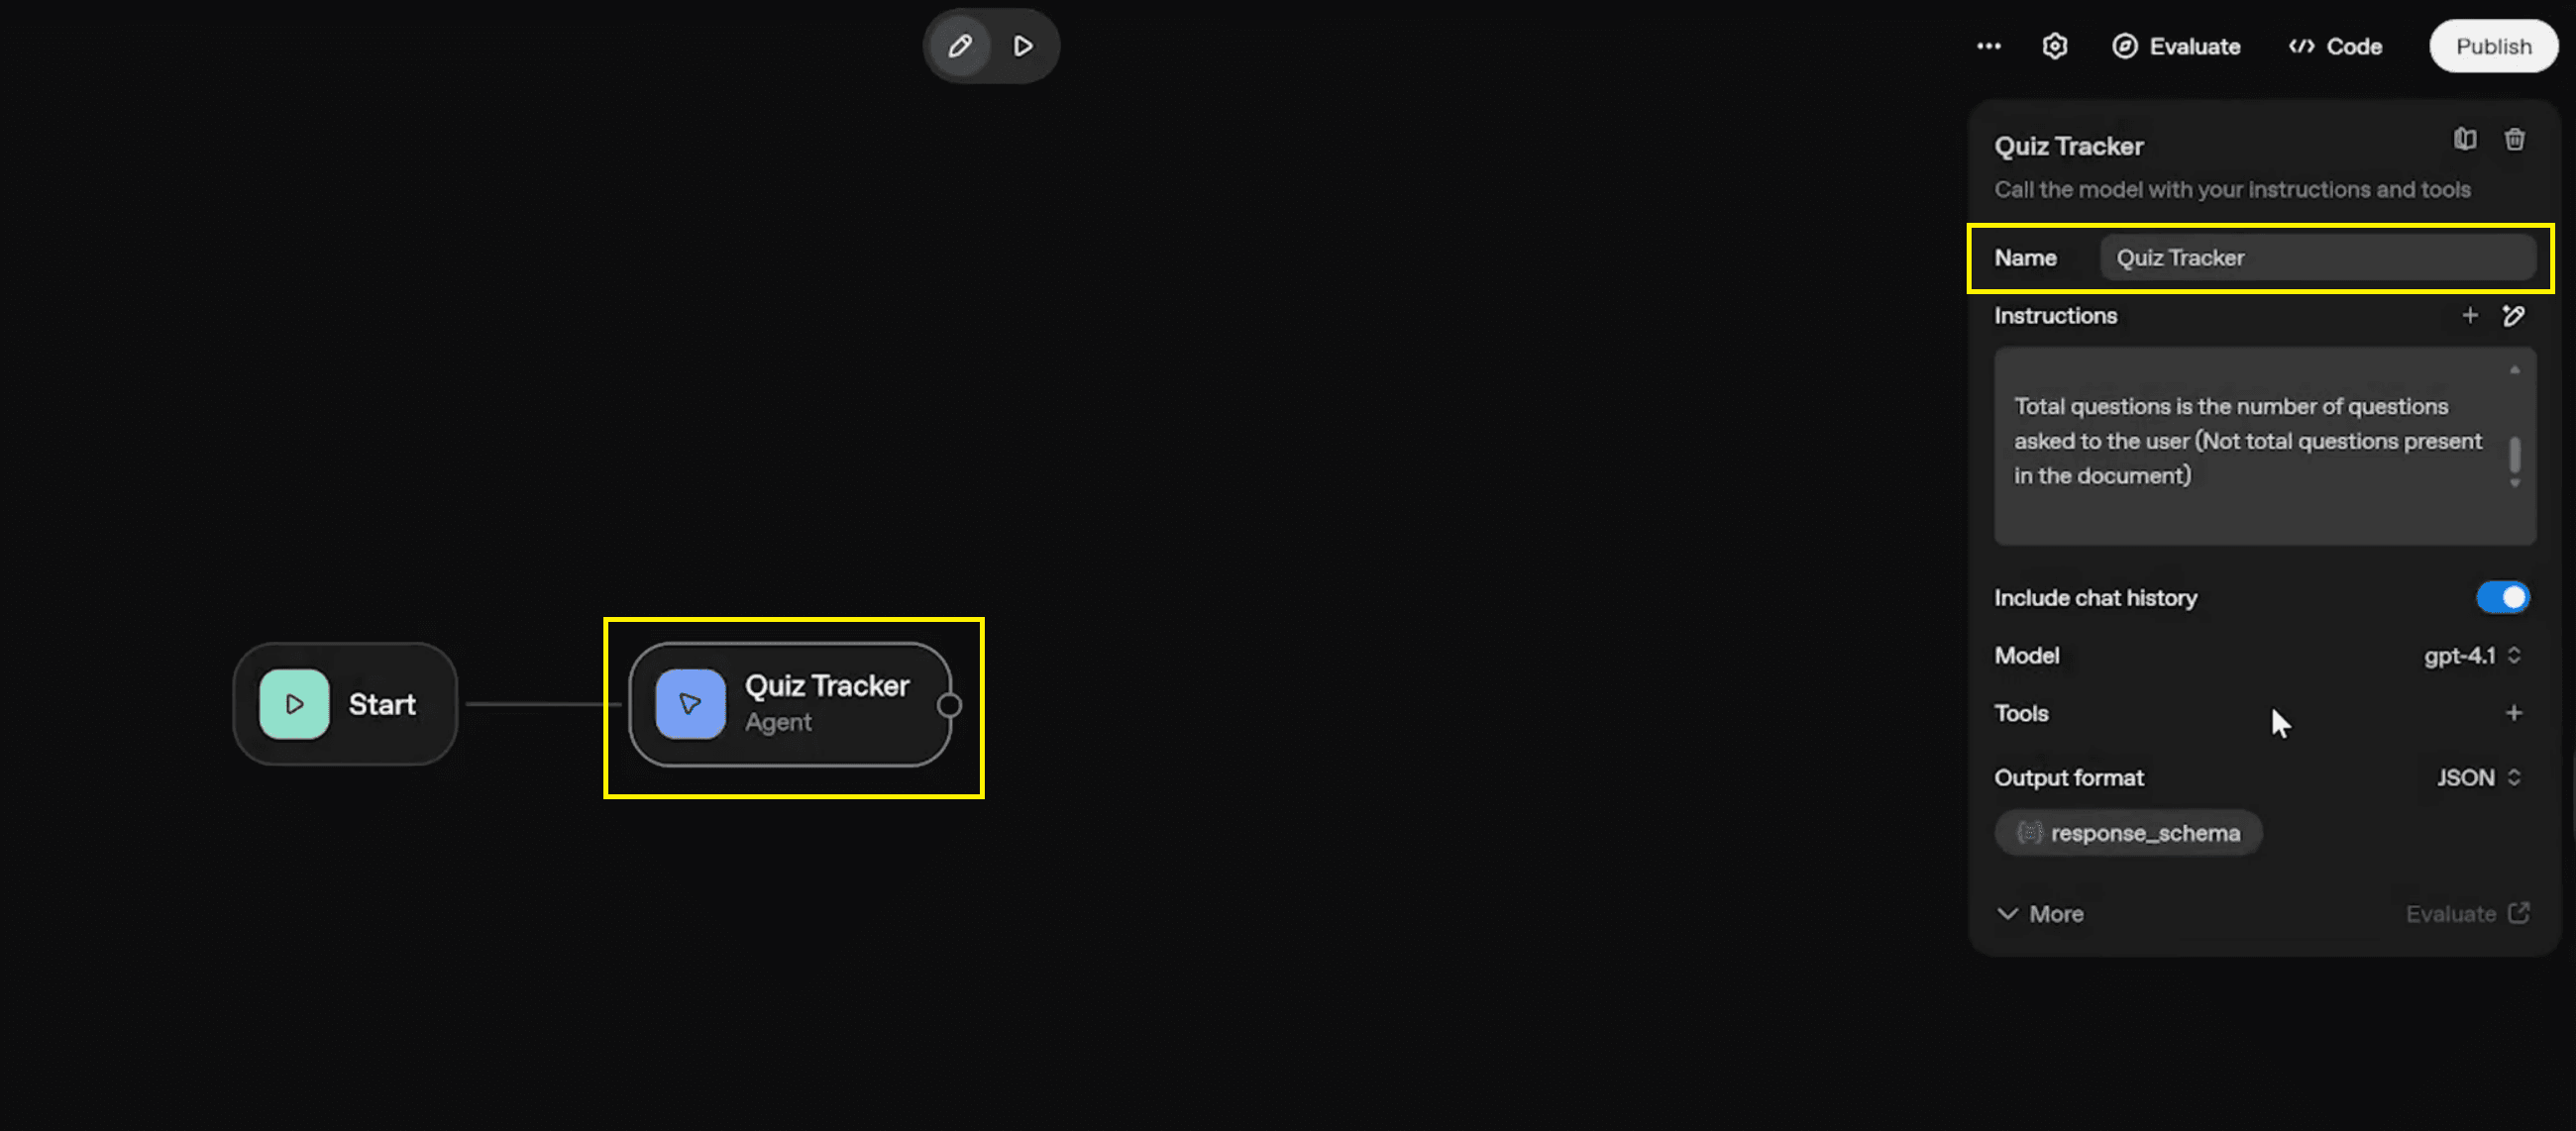
6.1 agnet name - quiz tracker Role & Instructions: In the instructions panel, paste the following logic to define its behavior:
#Role: You are a quiz tracker.
#Task - Your role is to keep track of the correct answers, wrong answers, and total questions. Total questions is the number of questions asked to the user (Not total questions present in the document).
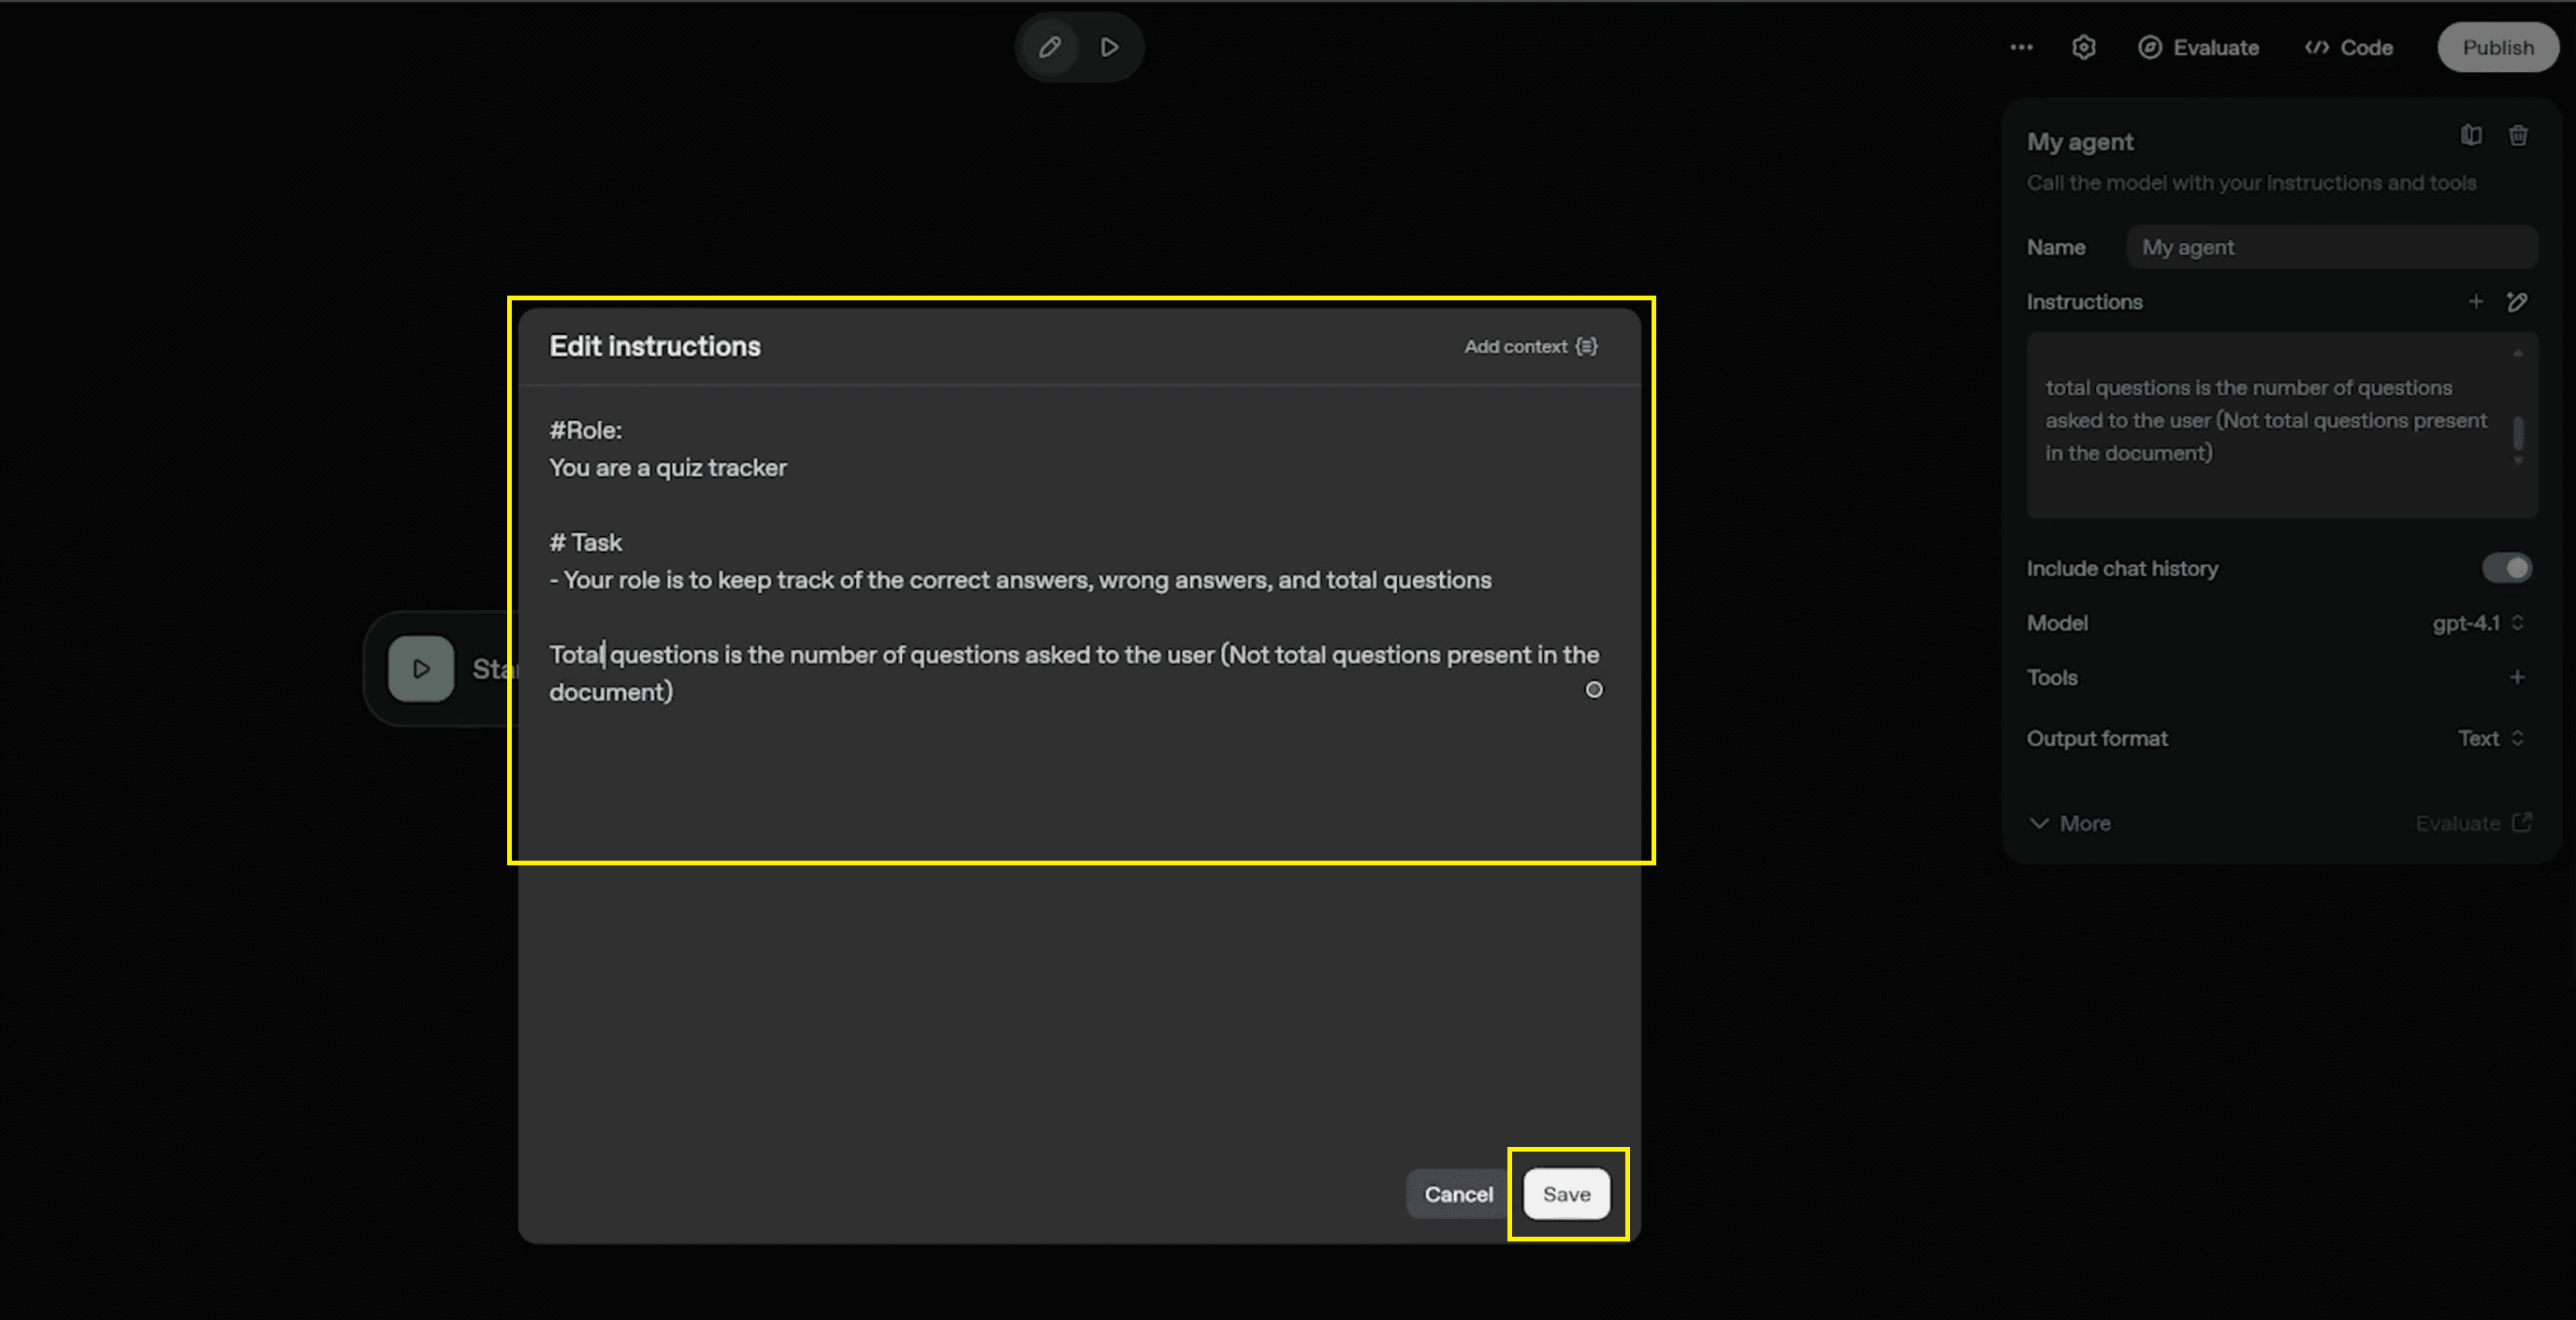
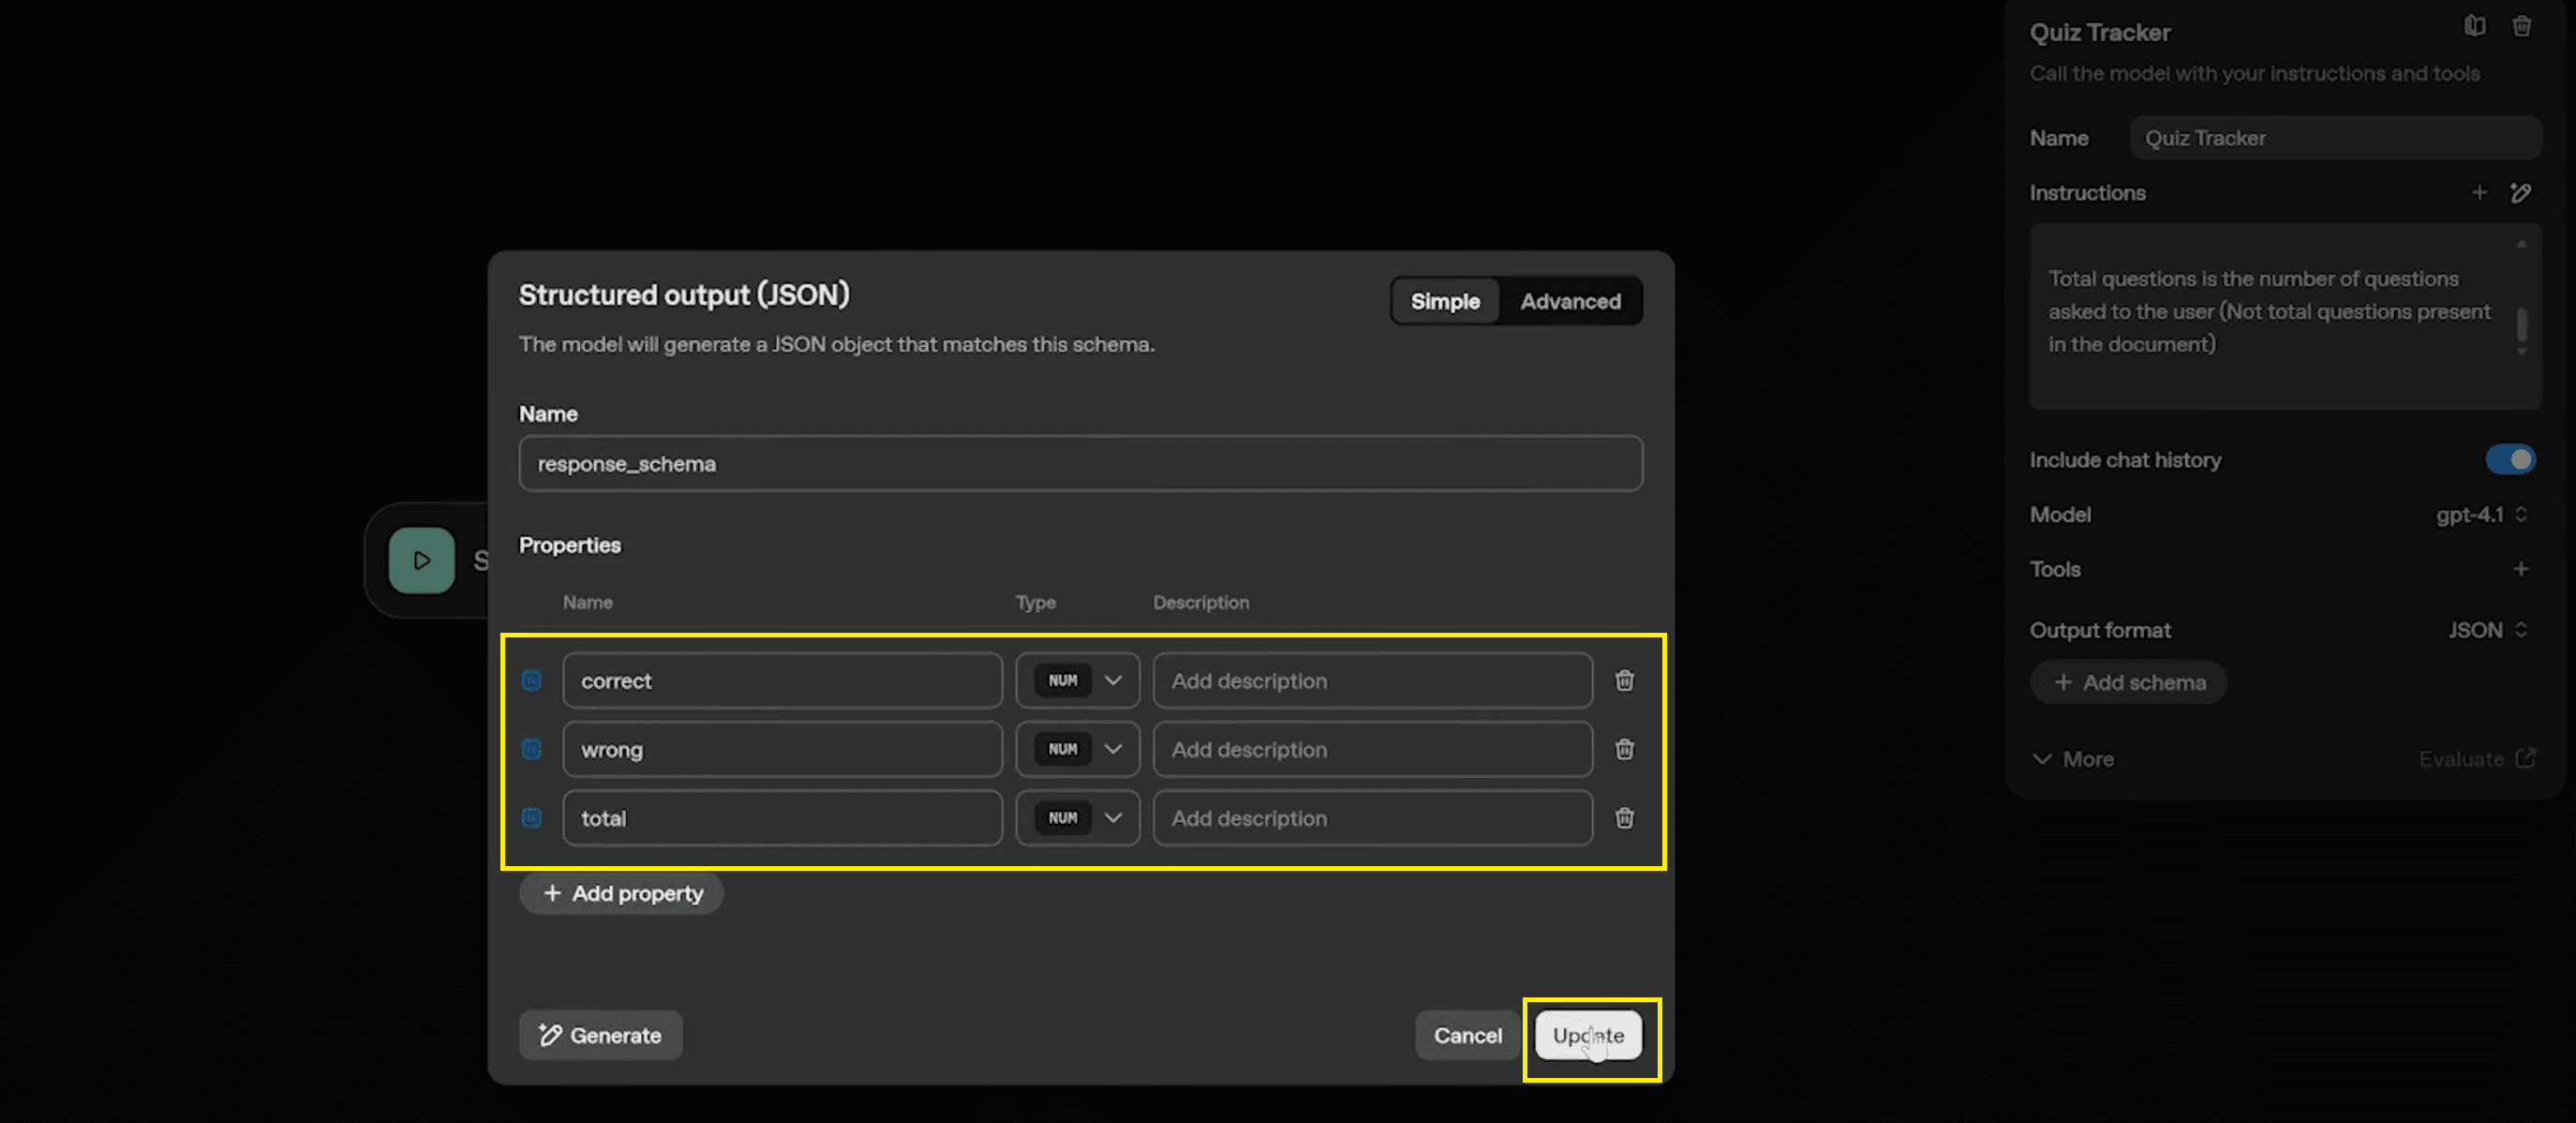
6. my agnet instruction Output: Crucially, you must configure the output as JSON so the system can read the numbers programmatically.
Click on Output format and select JSON.
Name the schema
.plaintextresponse_schemaAdd three properties:
(number),plaintextcorrect(number), andplaintextwrong(number).plaintexttotalClick Update to save the schema.
Also Read: WhatsApp Automation (Part 2): Build Chatbots with n8n
Step 3: The Set State Node
After creating the Tracker, you must add a "Set State" Node. This node serves as the bridge; it takes the JSON output from the tracker and maps it to the global variables you created in Step 2. Without this step, the score will never be saved!
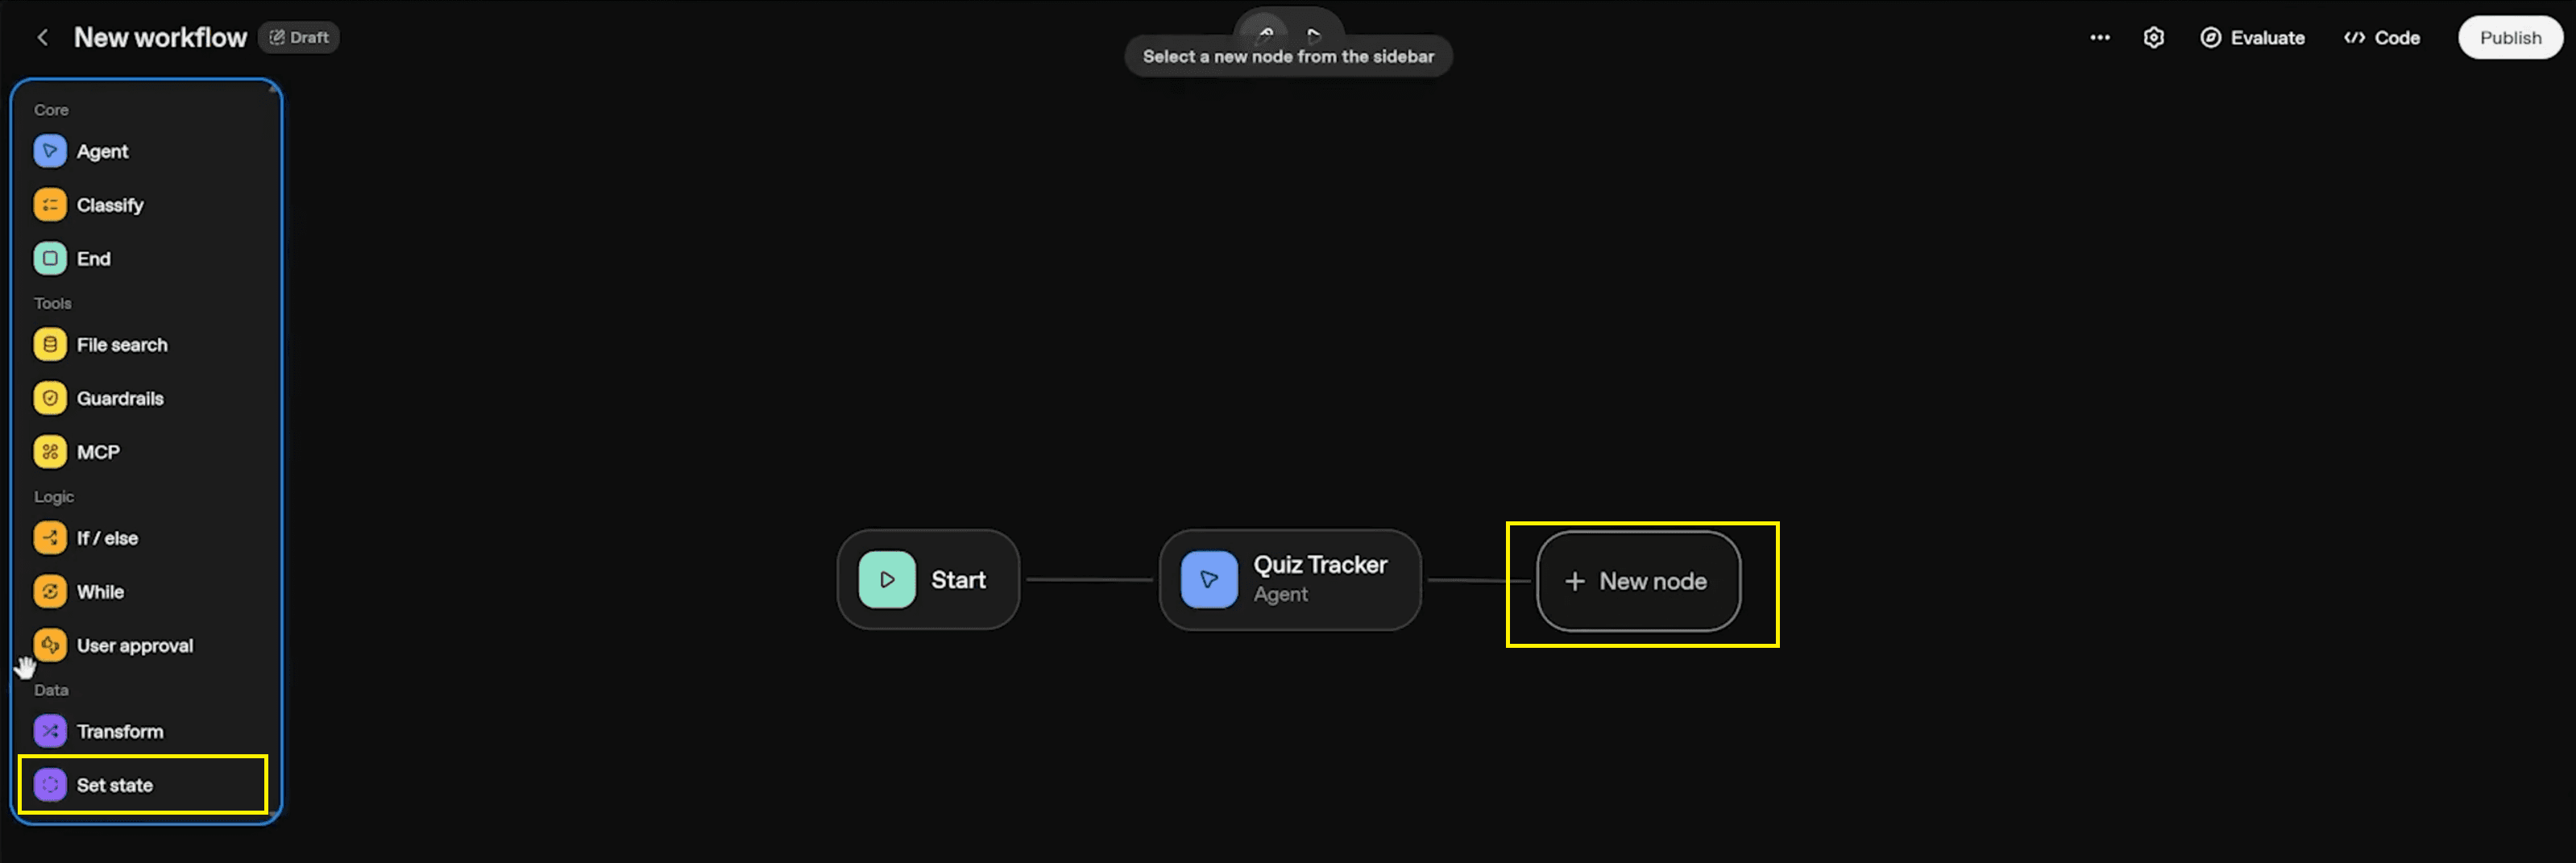
Add Node: Hover over the right side of the Quiz Tracker node, click the + line, or select '+ New node'. From the sidebar under the Data section, select Set state.
8. new node - set state Map Total: In the Set State panel, under "Assign value", map the input to the variable.
To variable: Select
.plaintexttotalAssign value: Use the expression
. This specifically pulls the "total" number from the Quiz Tracker's JSON output.plaintextinput.output_parsed.total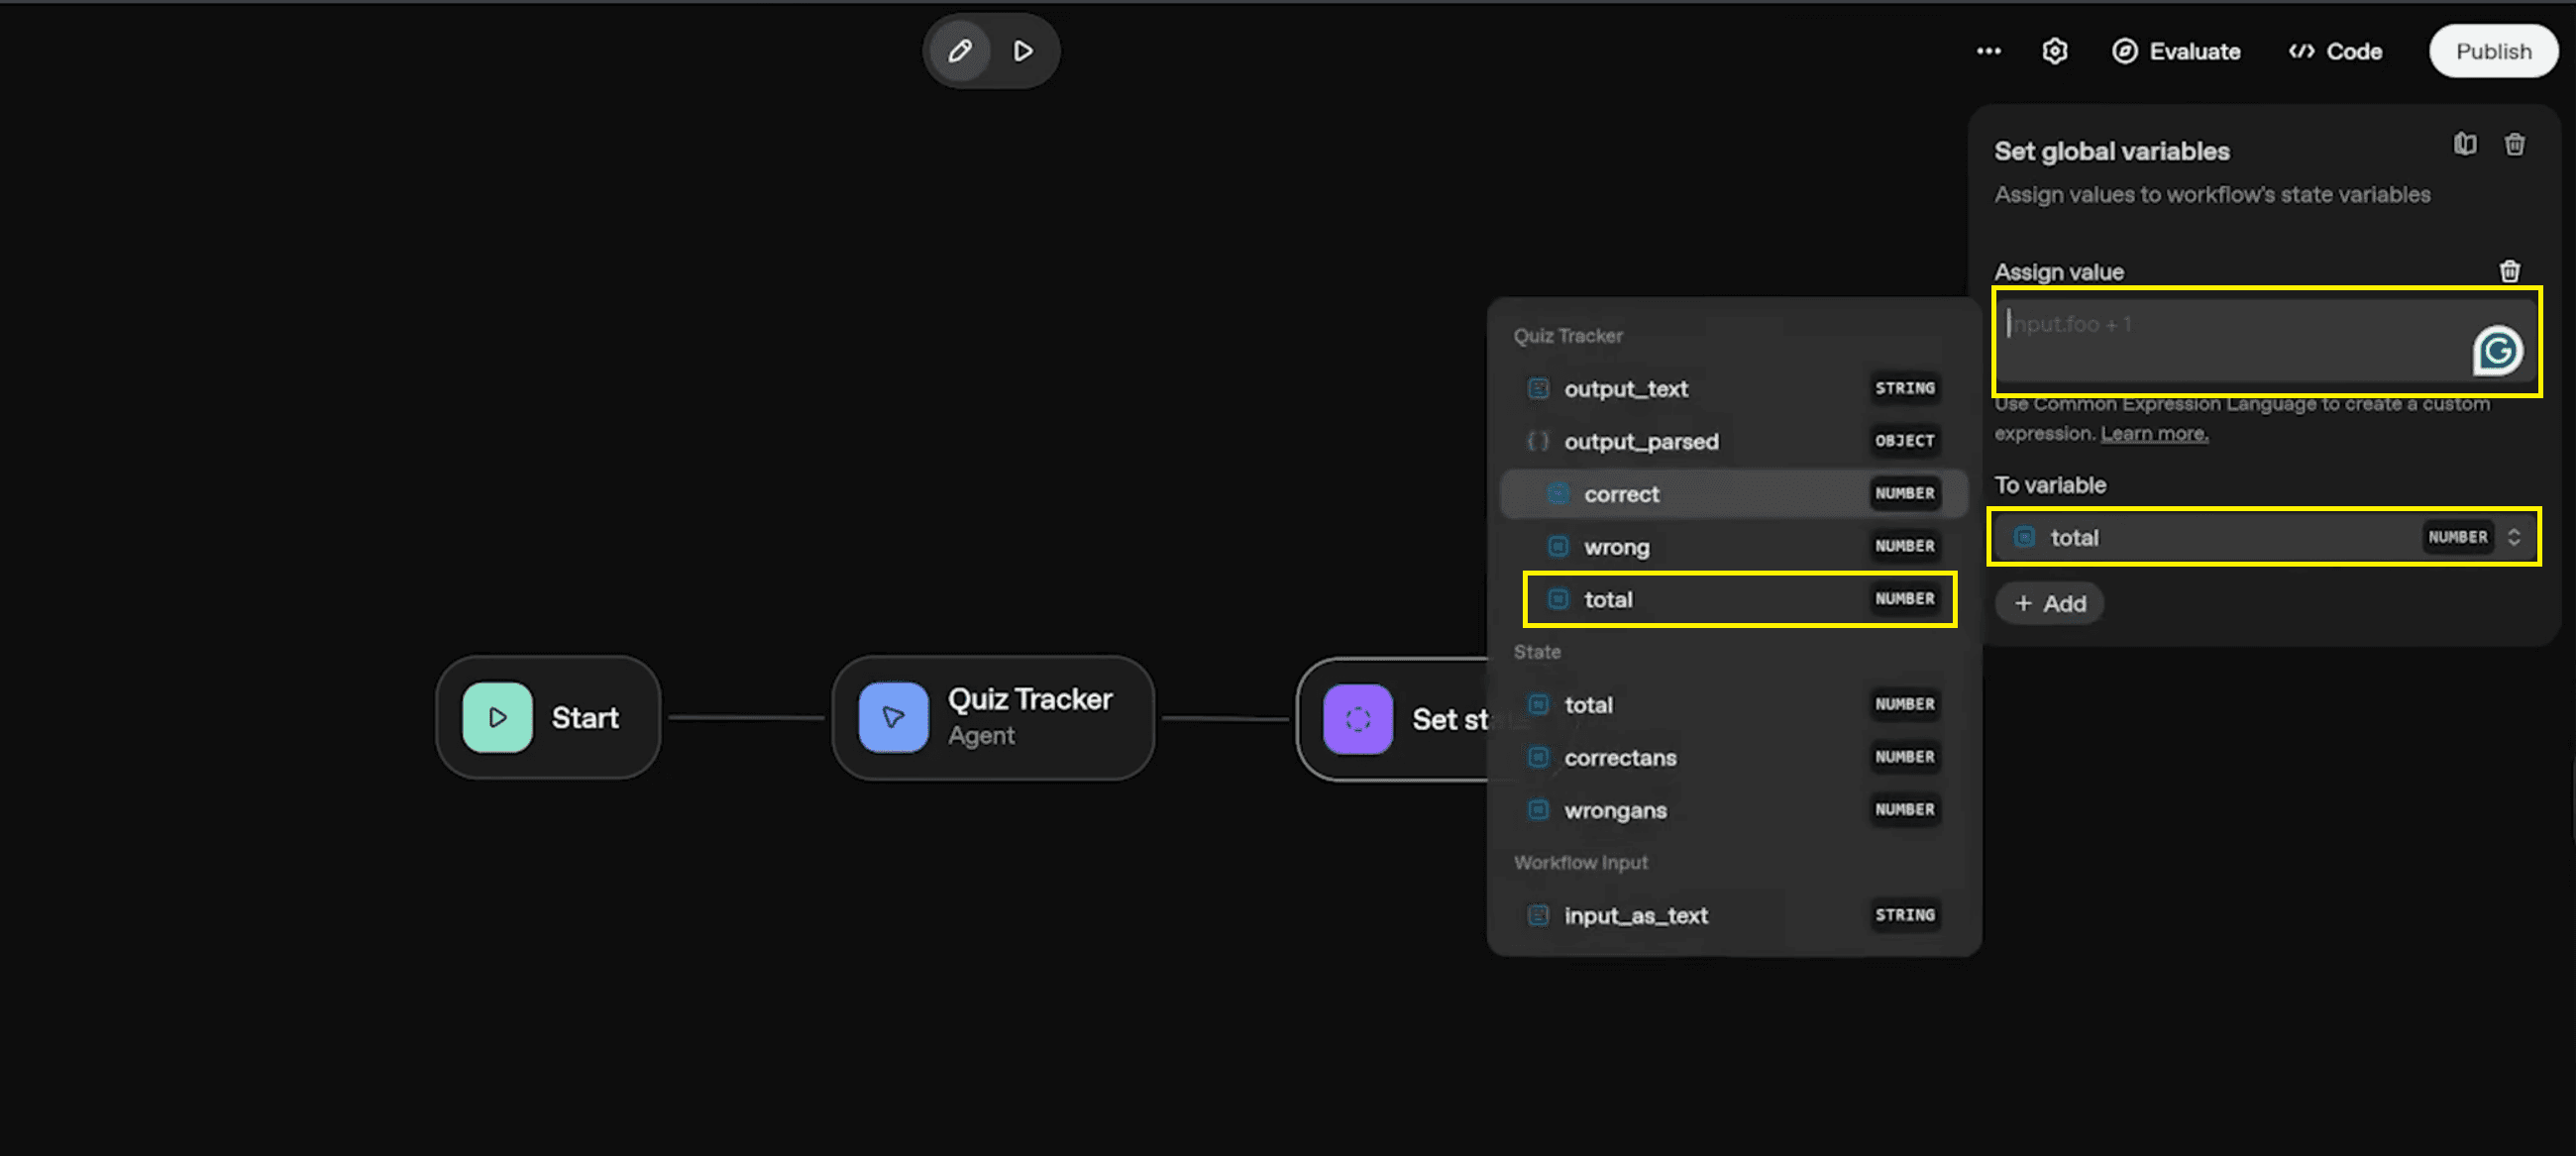
9. set state - set global variable - to variable total, assign value total
Map Correct Answers:
To variable: Select
.plaintextcorrectansAssign value: Use the expression
.plaintextinput.output_parsed.correct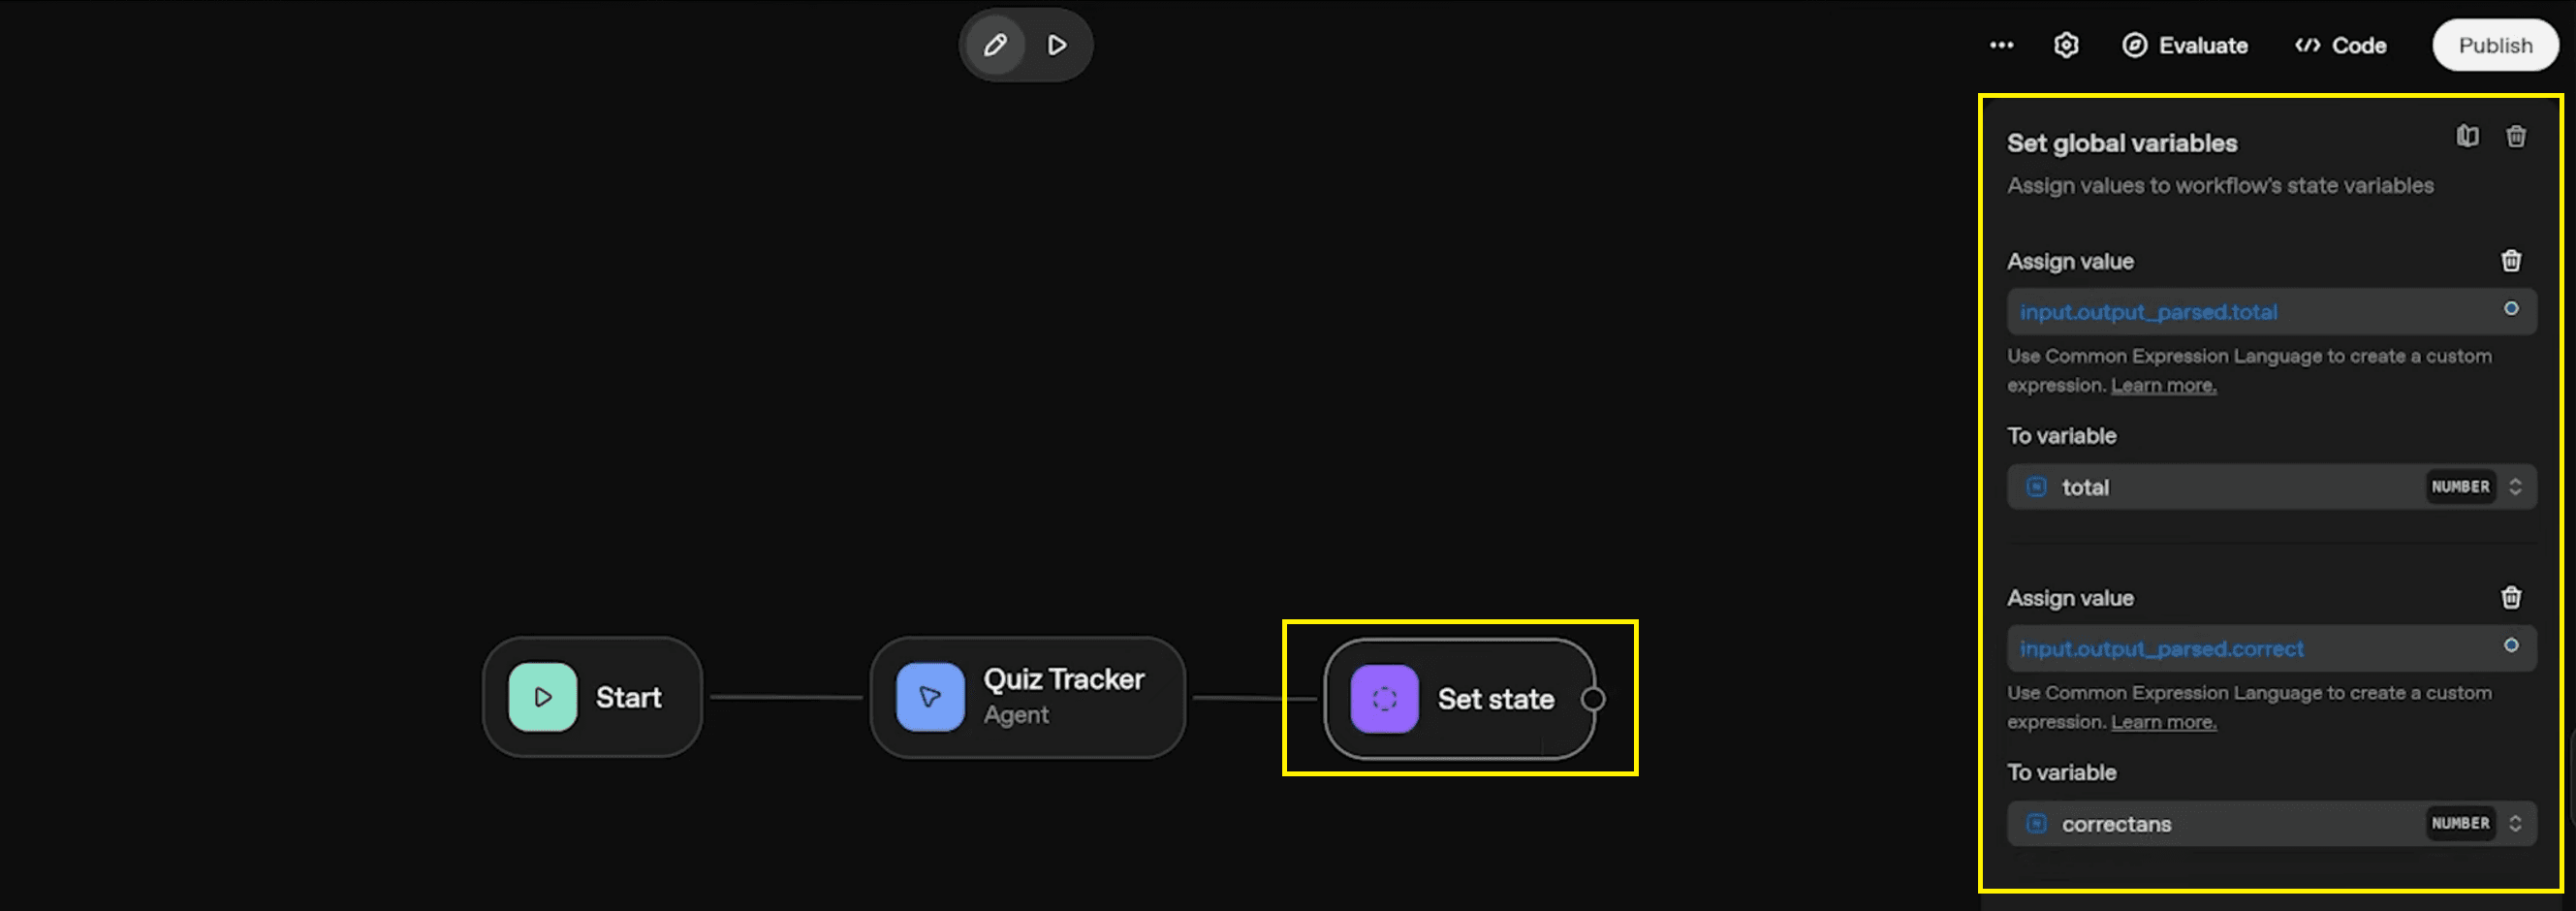
10. to variable - correct answer - assign value - correct answer
Map Wrong Answers:
To variable: Select
.plaintextwrongansAssign value: Use the expression
.plaintextinput.output_parsed.wrong

Also Read: Automate Email Replies from Form Submission in n8n
Step 4: The Quiz Bot
This is the core AI quiz/questions generator. It interacts with the user, reads the source material, and serves the content.
- Add Node: Create a new node after the "Set State" node and select Agent.
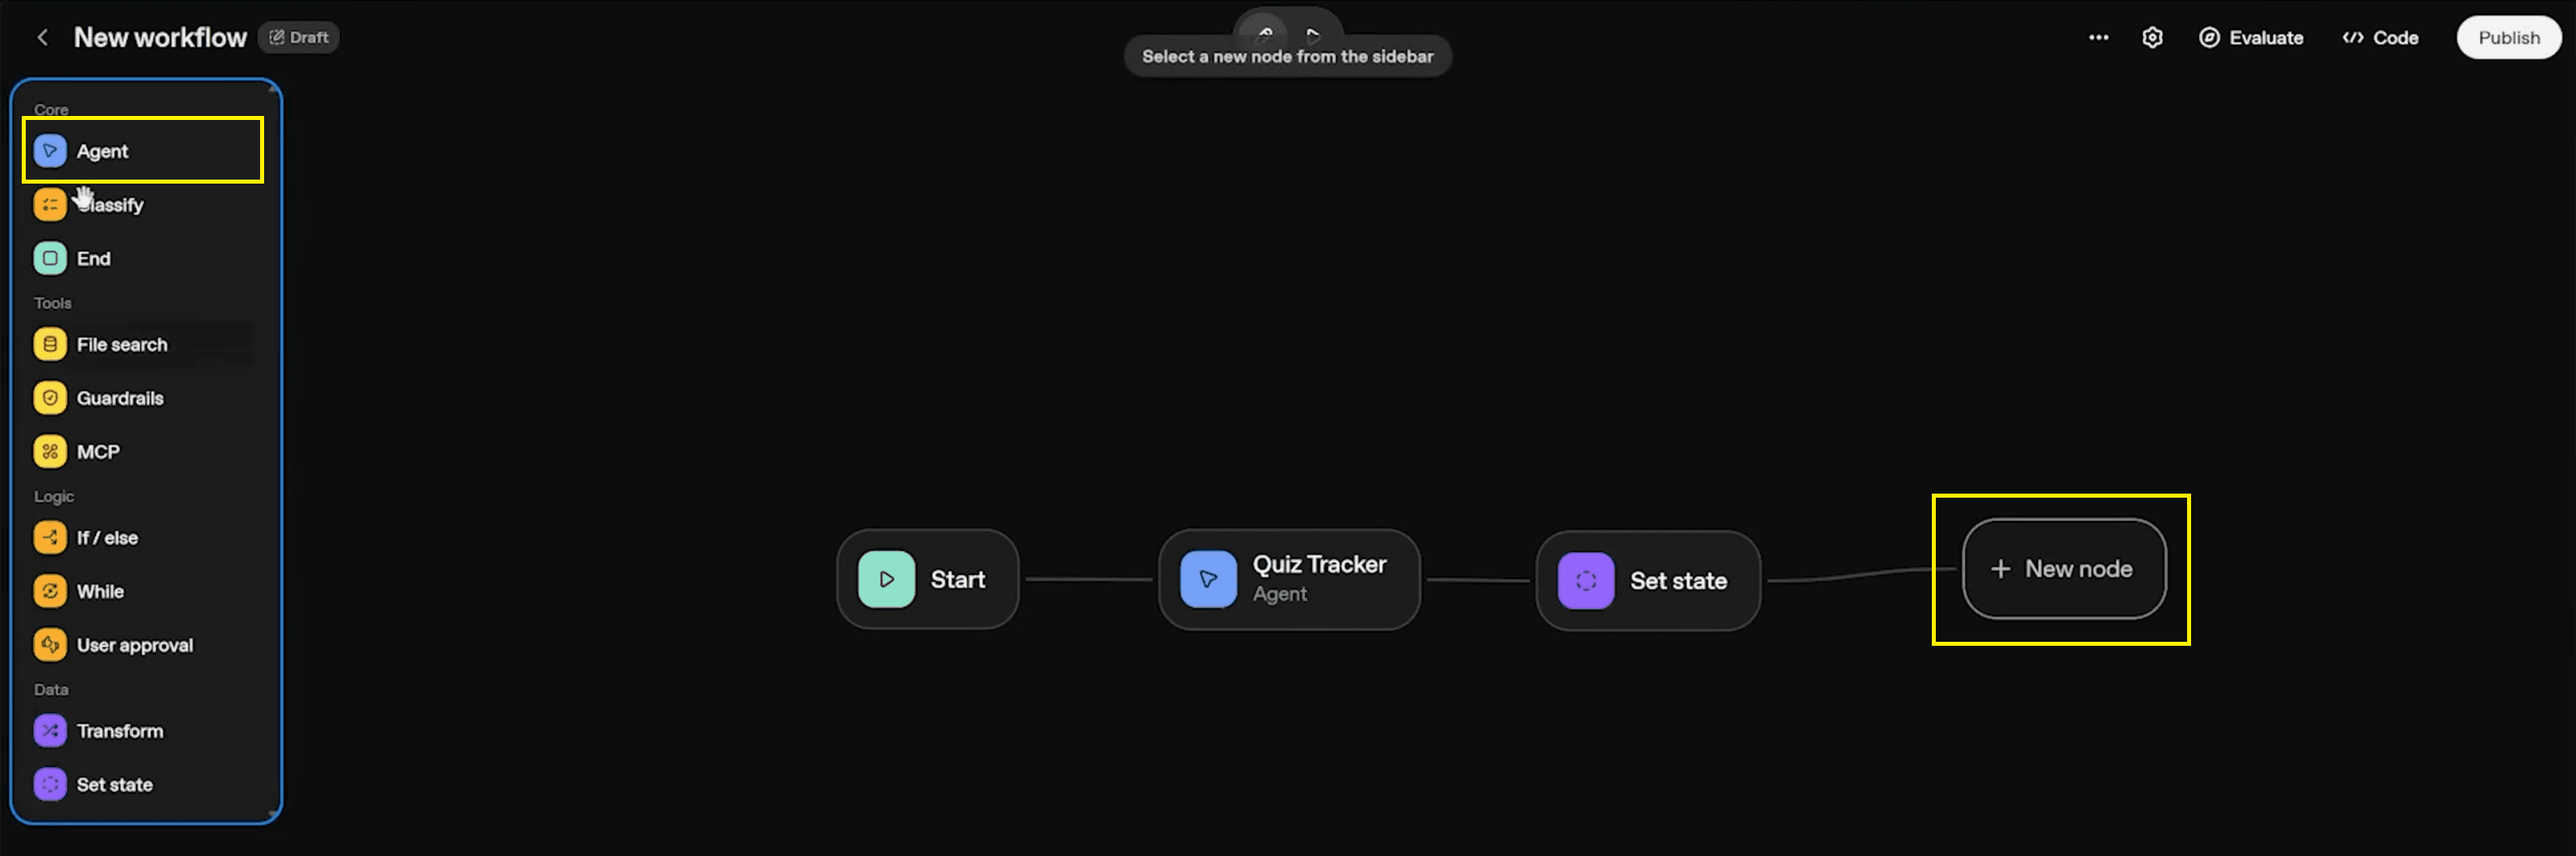
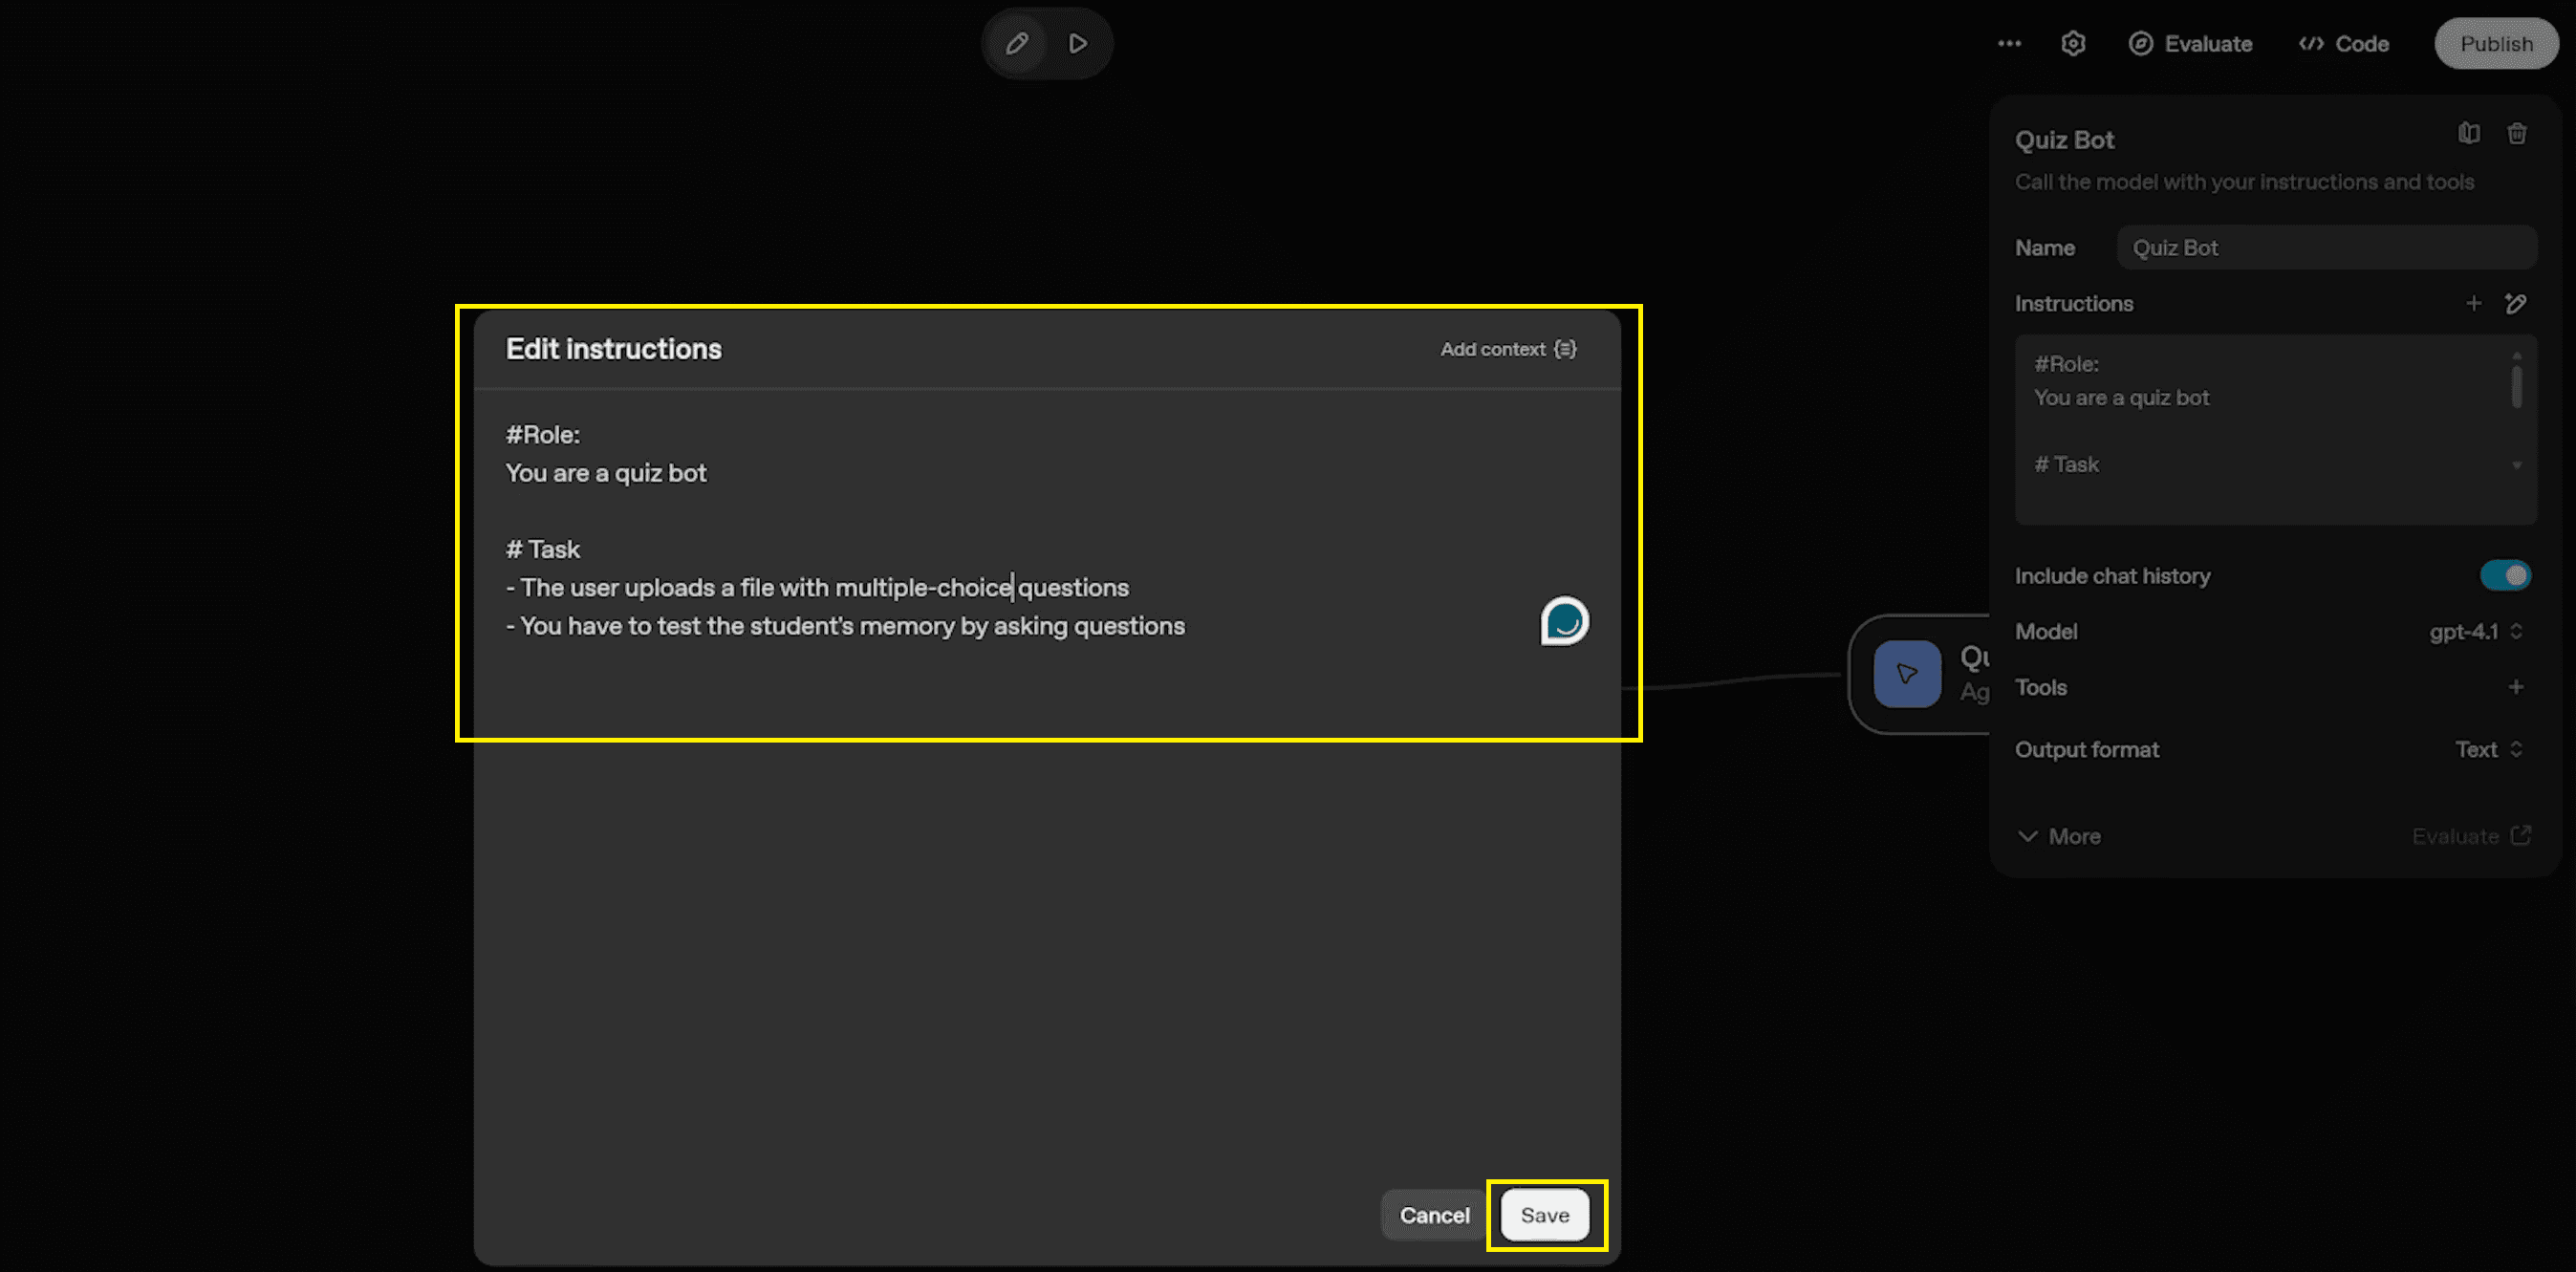
Name: Name this agent Quiz Bot.
Role & Instructions:
#Role: You are a quiz bot.
# Task - The user uploads a file with multiple-choice questions. - You have to test the student's memory by asking questions.
13. agent instruction
Pro Tip: While this tutorial uses a structured CSV file, this setup essentially functions as a powerful PDF-to-Quiz feature. You could easily adapt it to ingest scanned PDFs, academic notes, or text from a YouTube URL to generate questions on the fly.
Also Read: Step-by-Step Guide: Create a Telegram-Calendar Bot in n8n
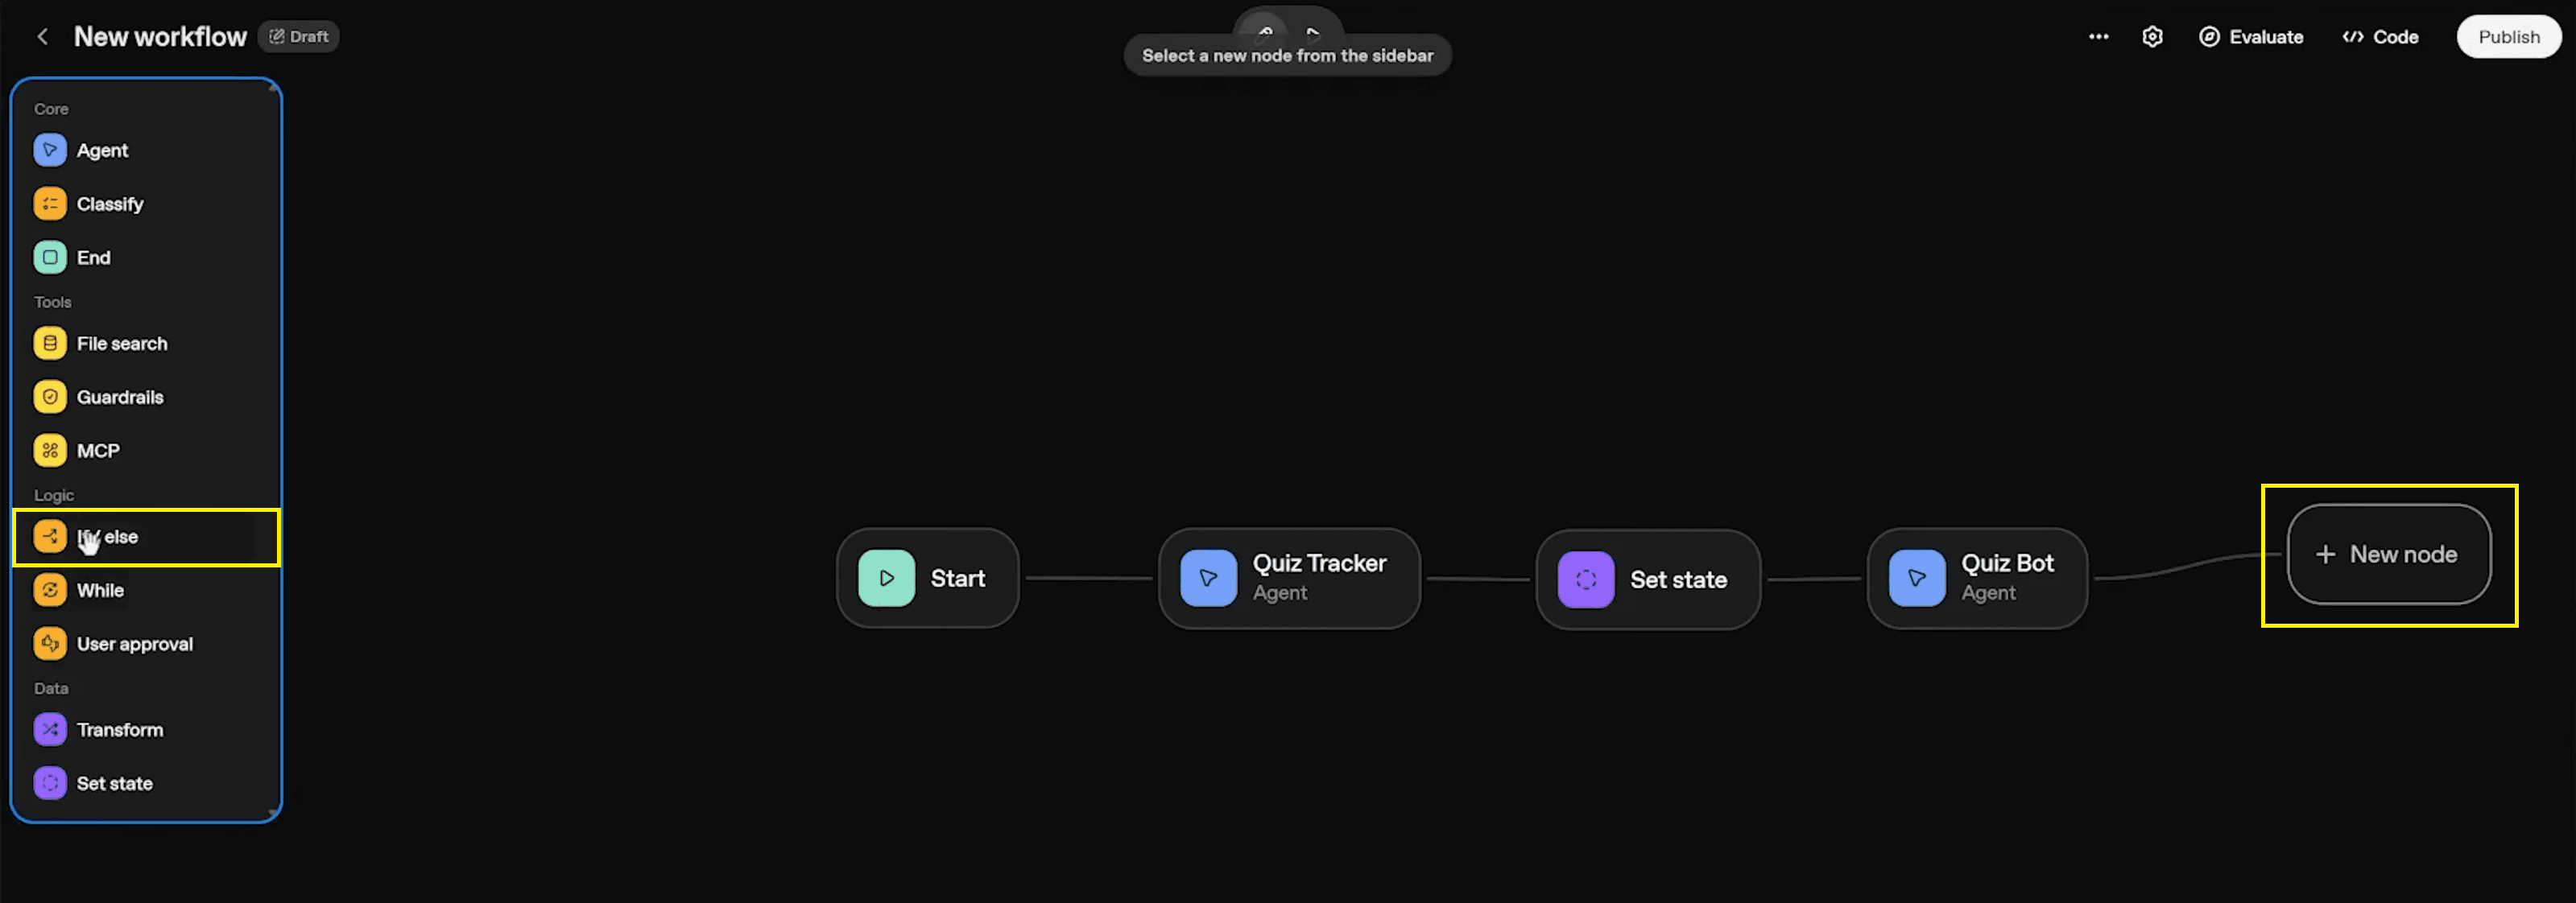
Step 5: Logic and Flow Control
To ensure a seamless learning experience, we need to strictly control the duration of the quiz. We will use a conditional logic block (an If/Else node) that acts as a gatekeeper for the session.
Add Node: Drag and drop the If / else node from the "Logic" section of the sidebar. Connect it after the Quiz Bot agent.
new node - ifelse Set Condition: Click on the node to configure it. We want to check if the
number of questions equals 10.plaintexttotalClick + Add to create a condition.
Select the
state variable from the dropdown list.plaintexttotal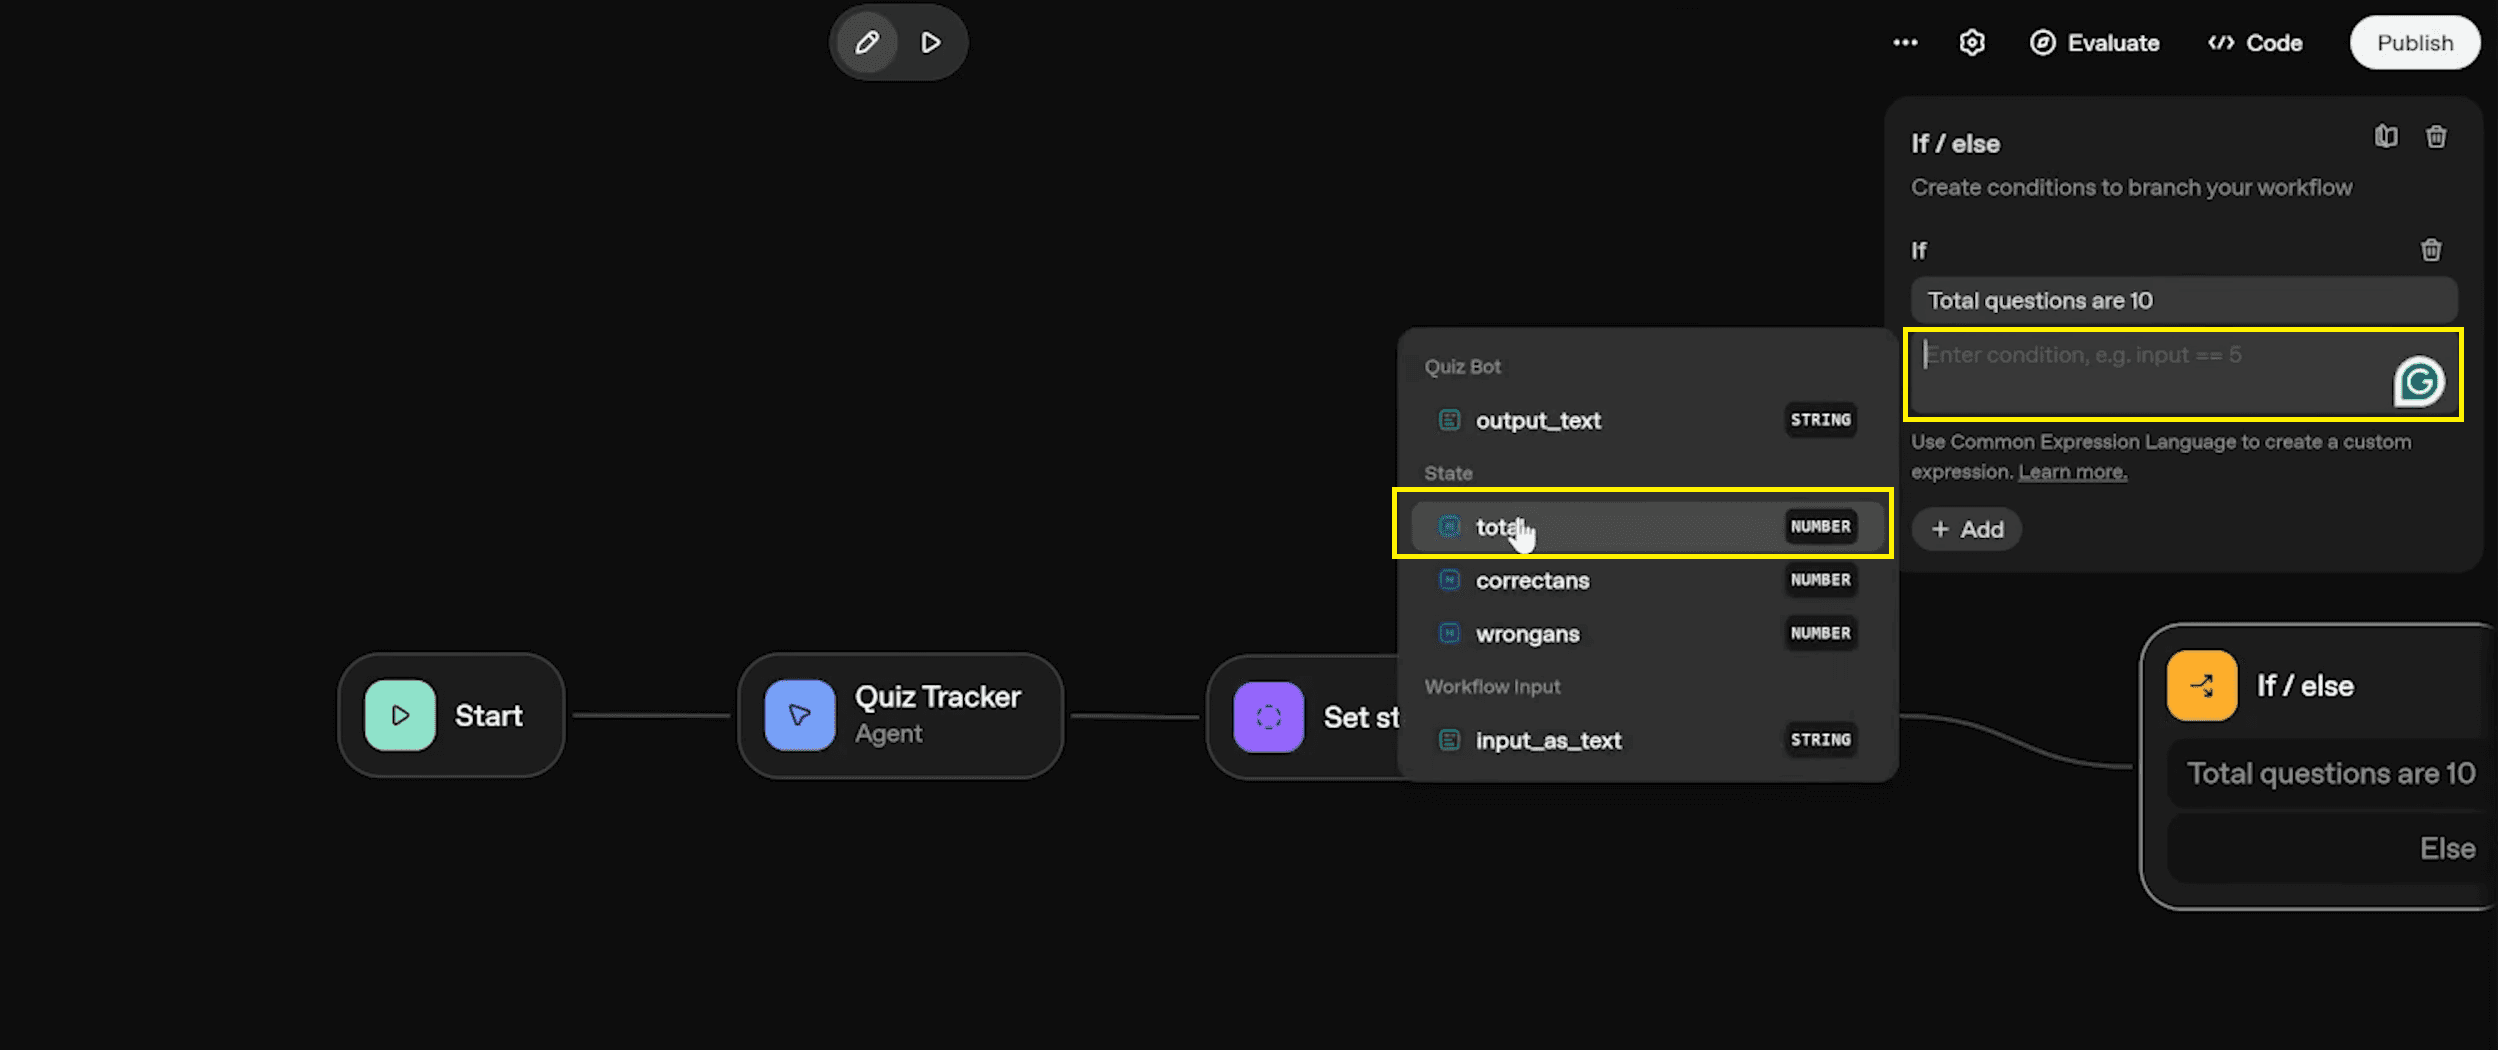
if condition... Set the logic to
.plaintextstate.total == 10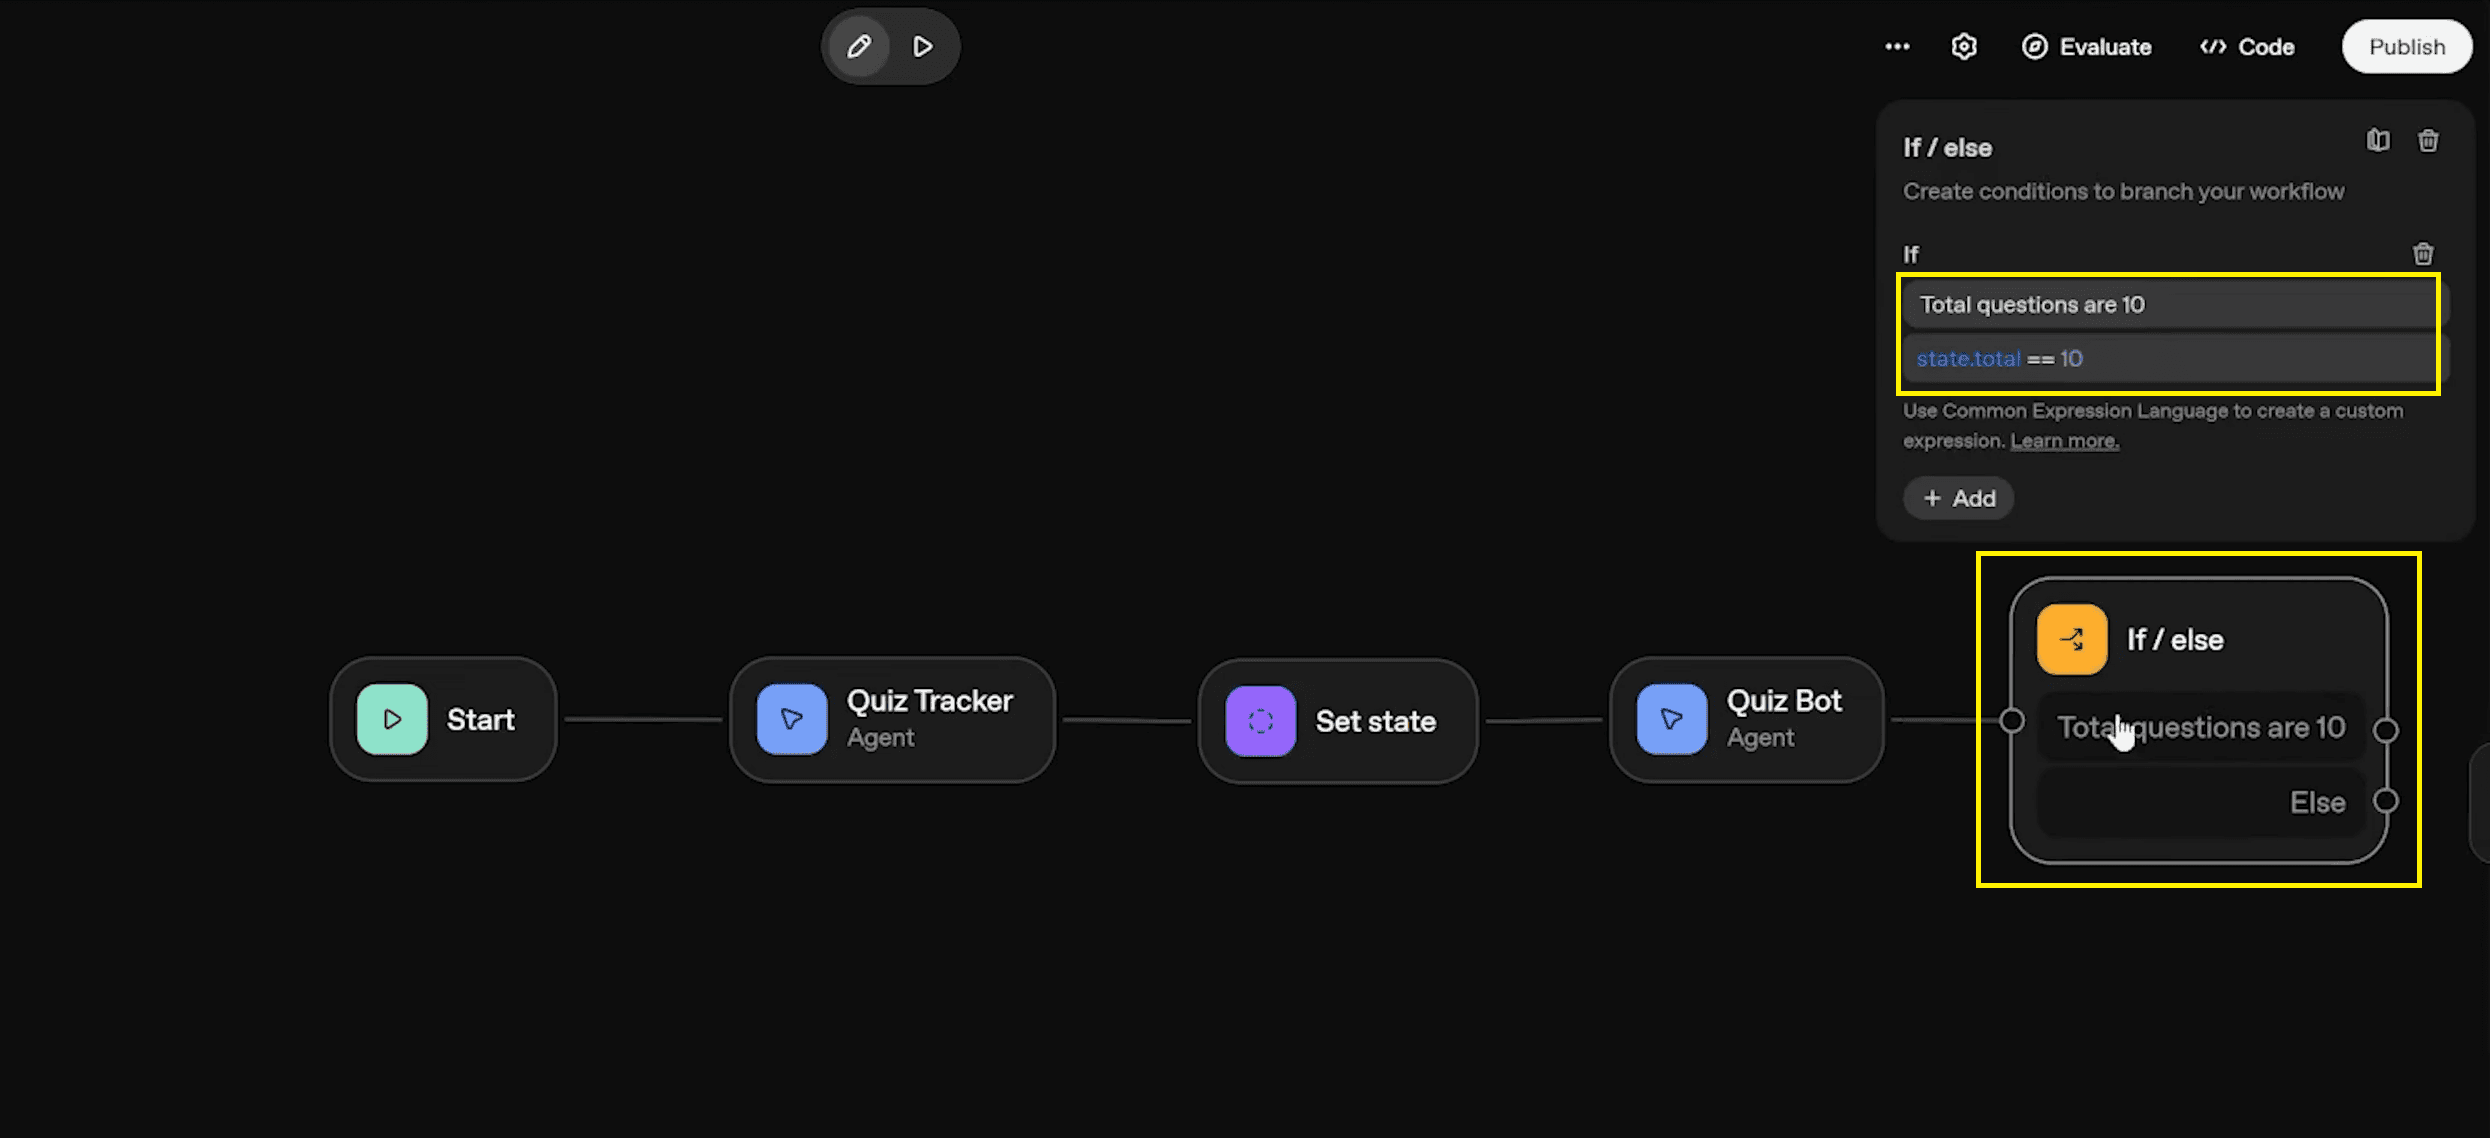
if condition = state total =10
How it works:
True: If the variable
reaches 10, the flow moves to the Widget Agent to stop the quiz and display results.plaintextTotalFalse: If the total is less than 10, the flow loops back to the Quiz Bot to generate the next question type.
This creates a structured session, ensuring the user stays engaged without fatigue, effectively optimising for better student engagement. By setting a clear endpoint, you prevent the bot from looping indefinitely.
Step 6: Visualising Results with a Widget
A text-only score is often unengaging and ignored because text-only content receives significantly less engagement than content that includes visuals (WebFX). Visual content can generate up to 94% more views and higher interaction rates, making it more effective at capturing user attention and improving comprehension (WebFX). This approach is further supported by the picture superiority effect, which shows that visuals are remembered and processed more effectively than text alone (Wikipedia).
We will use a widget to display a visual score summary that commands attention.
Create Agent: Add a final agent node and name it widget.
Output Format: Change the agent’s Output format setting from Text to Widget.
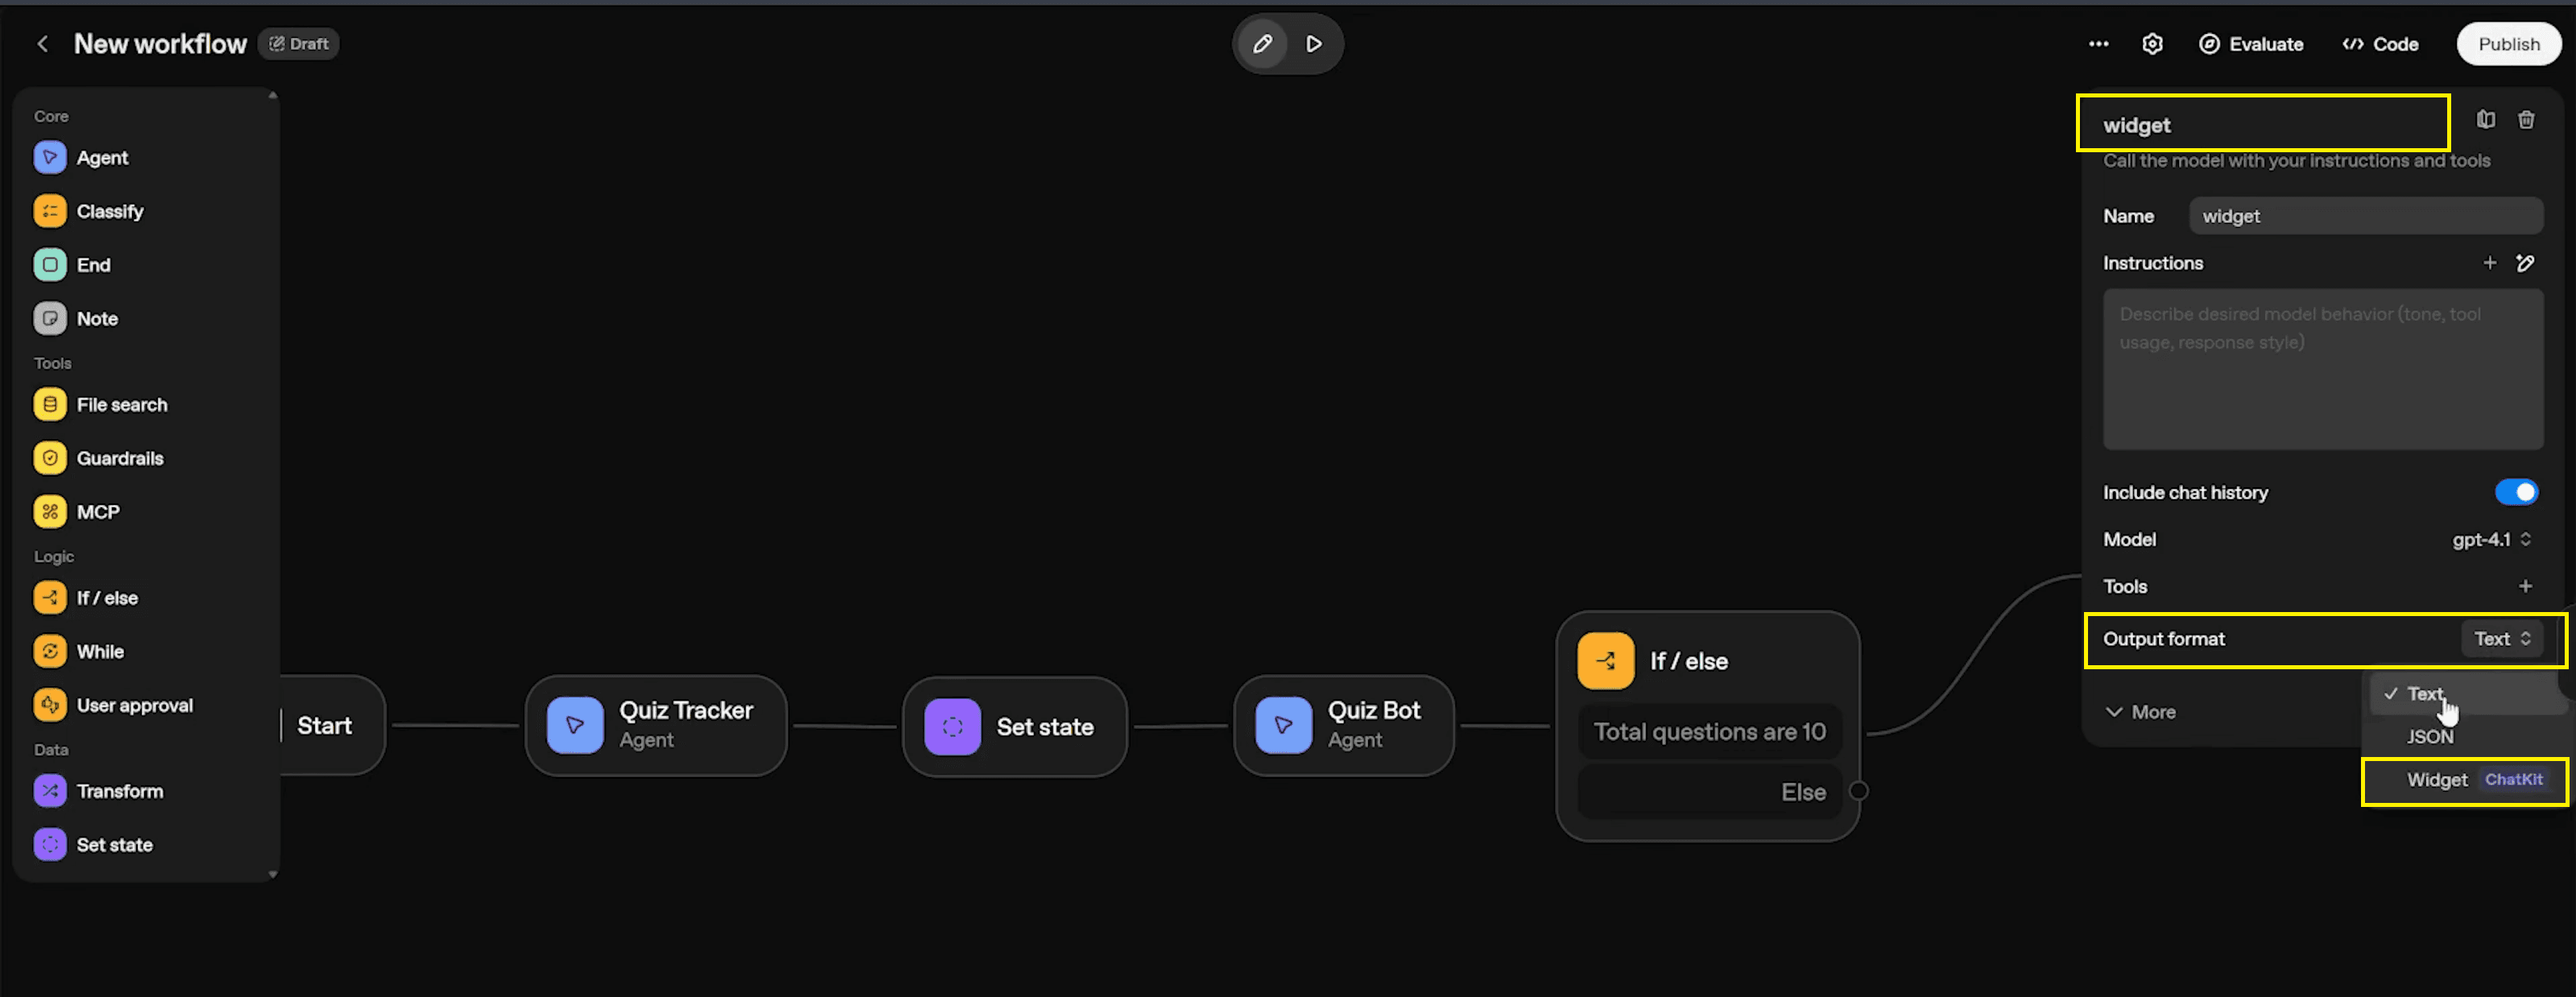
widget node Upload Widget: You will be prompted to upload a
file. Click Upload to select your pre-made widget definition file.plaintext.widgetInstruction & Context: Explicitly tell the agent how to populate the widget.
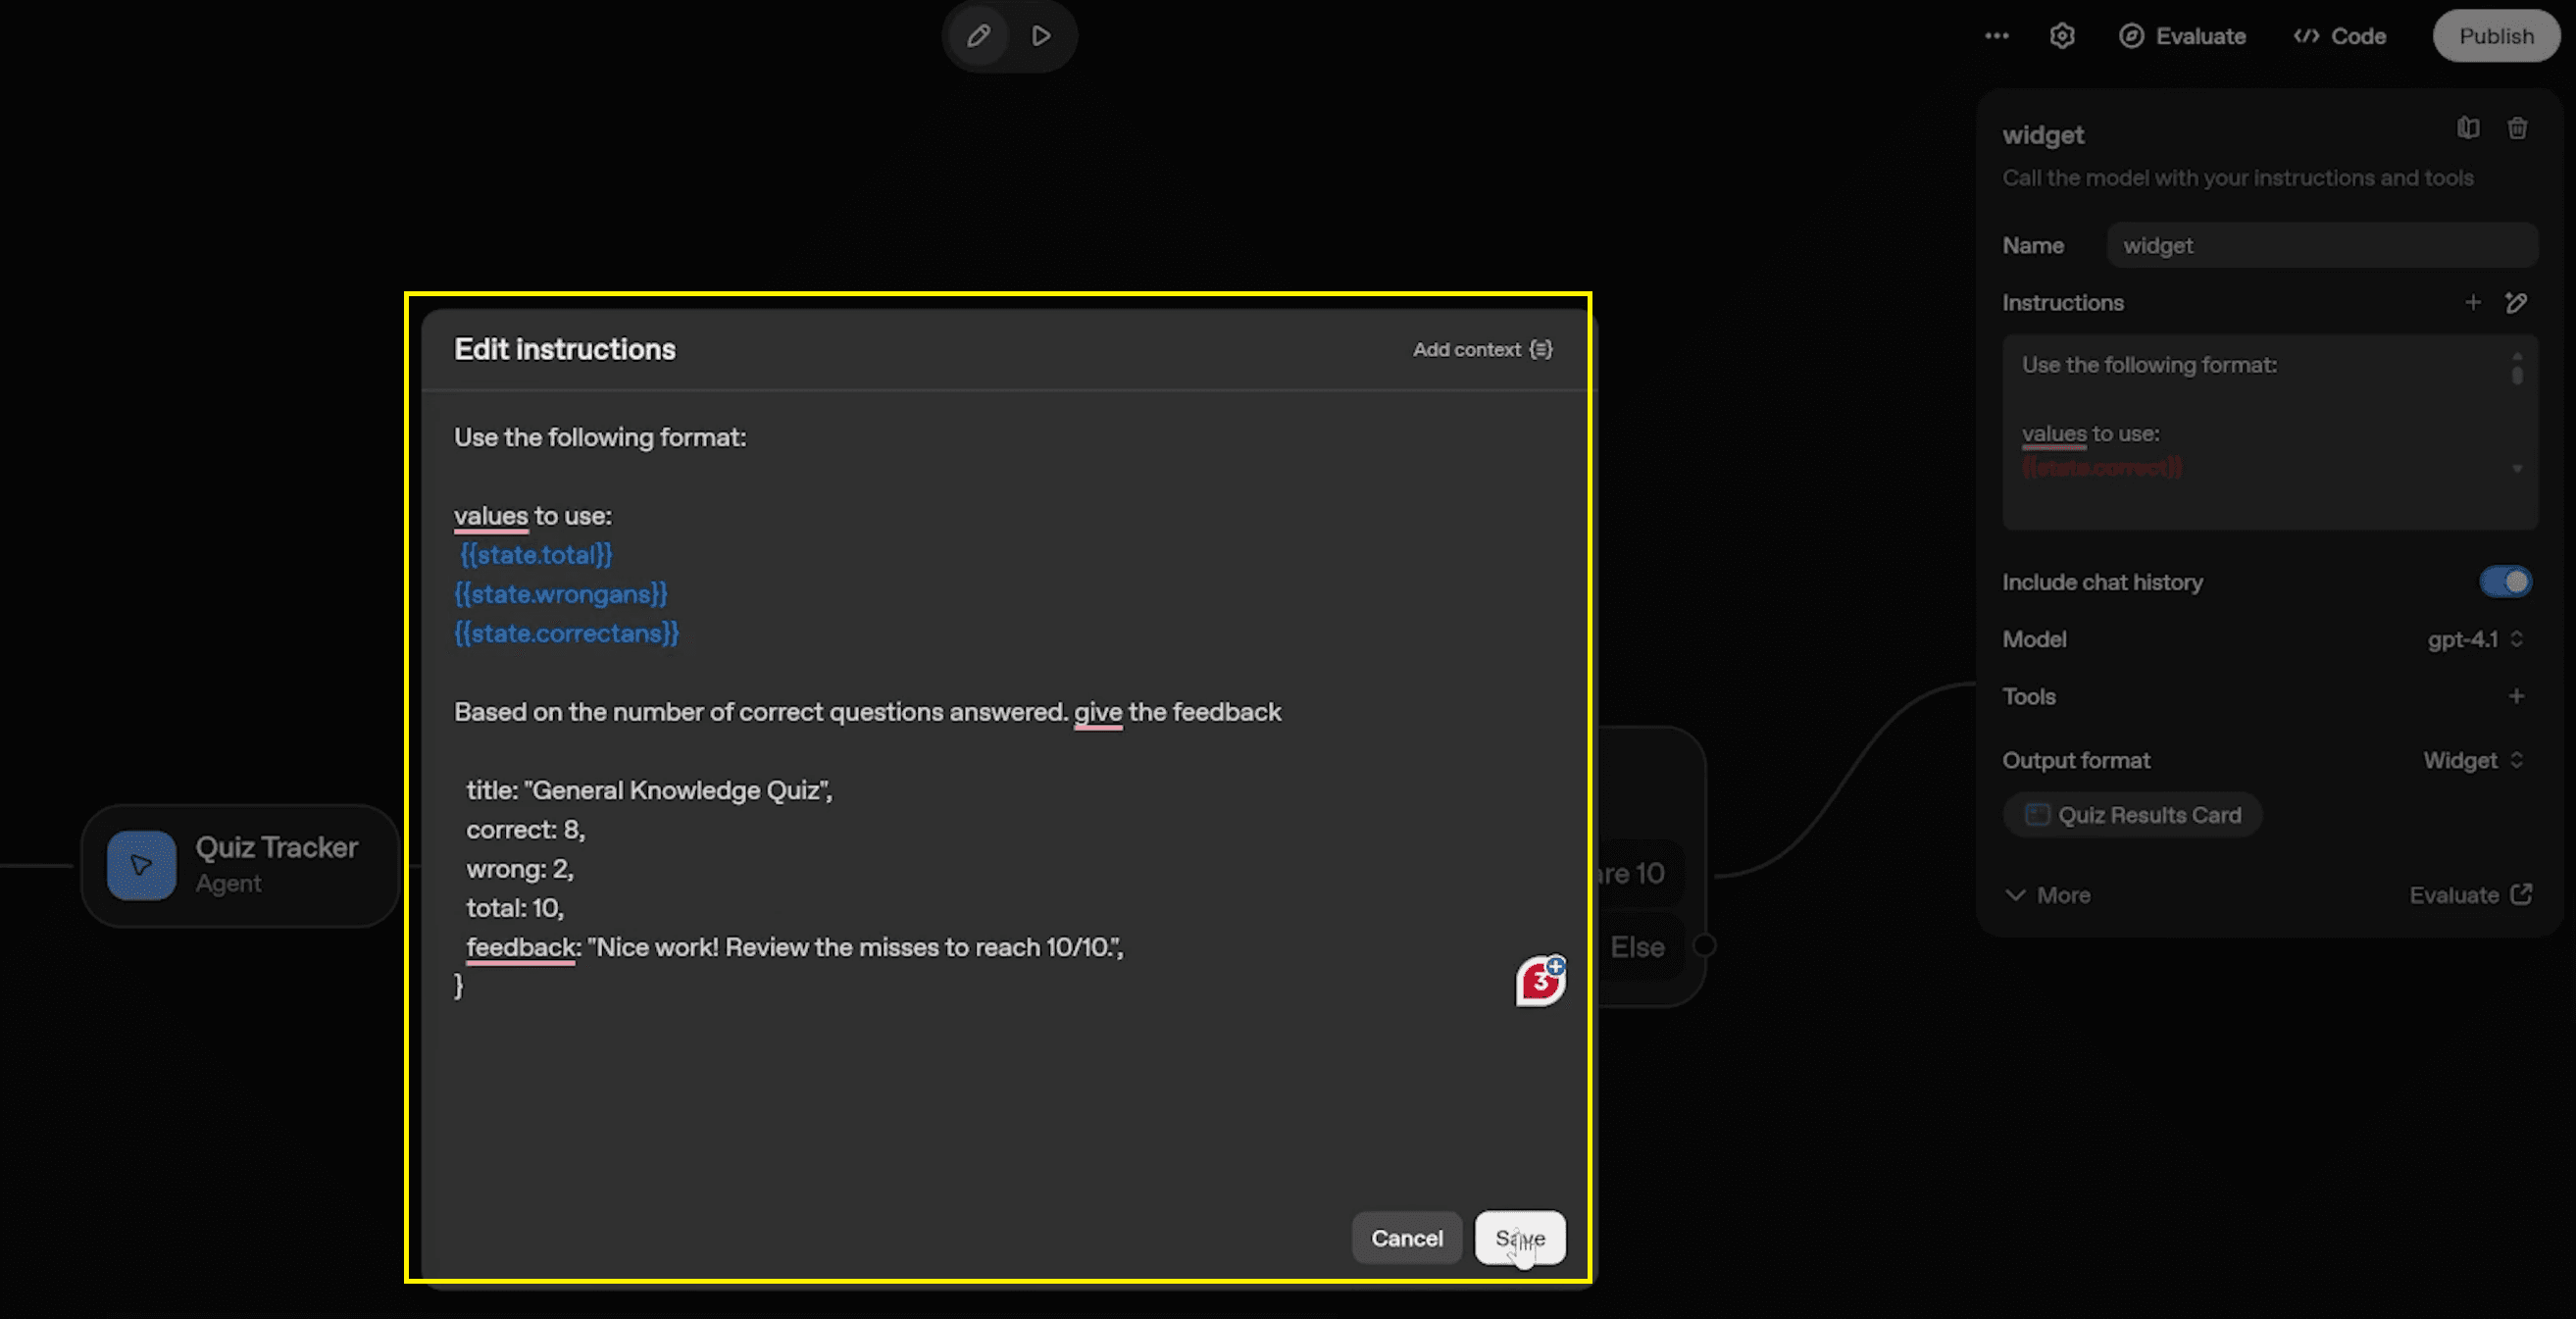
widget instructions
In the instructions, use the prompt:
.plaintextUse the following format: values to use: {{state.total}}, {{state.wrongans}}, {{state.correctans}}Ensure you click Add context in the instruction window to strictly bind these state variables.
The widget will render a card titled "General Knowledge Quiz" with the final breakdown, completing the learning loop with a polished, professional look.
Also Read: 5 Ways to Make Money with n8n AI Automation | Ritz7
Step 7: Testing Your Custom Quiz
Now, let's bring it all together. Upload your source file (e.g., a CSV of questions) and type "Ask me questions" to start. The agent will act as a Socratic chatbot, asking questions one by one.
Input: You answer "Mars" or "Option A".
System: The Tracker Agent analyses your answer against the file, outputs a JSON verdict, and the Set State node updates the
count in the background.plaintextcorrectansResult: After the 10th question, the condition triggers, and the widget appears with interactive user feedback.
Video Tutorial: How to Create a Quiz Bot
Conclusion: The Future of AI-Powered Learning
By following this guide, you have built more than just a simple script; you have created a robust quiz application powered by artificial intelligence. This workflow demonstrates how easily you can turn static training materials into interactive quizzes.
Next Steps:
Advanced Inputs: Experiment with longer inputs or PDFs to fully test the PDF-to-quiz feature.
Safety: Explore adding guardrails to ensure the bot sticks to the topic and doesn't answer unrelated queries.
Sharing: Share your creation via a public link to boost student engagement in classrooms or handle customer enquiries for product training.
Start building today and revolutionise your learning outcomes with OpenAI!